It is best practice to create Azure components before building and releasing code. I would usually point you to the Azure portal for learning purposes, but in this scenario you need to work at the command line, so if you don’t have it installed already I would strongly advise you to install the Azure CLI.
Preparing the user machine
Azure CLI
Install Azure CLI 2.0 on Windows
In addition, here are two important Kubernetes tools to download as well:
Kubernetes Tools
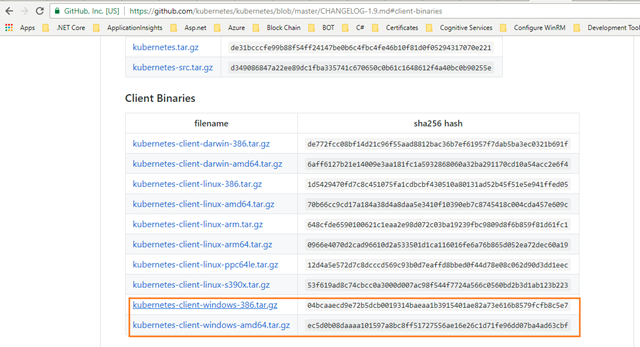
Kubectl – https://github.com/kubernetes/kubernetes/blob/master/CHANGELOG-1.9.md (Go to the newest “Client Binaries” and grab it.)
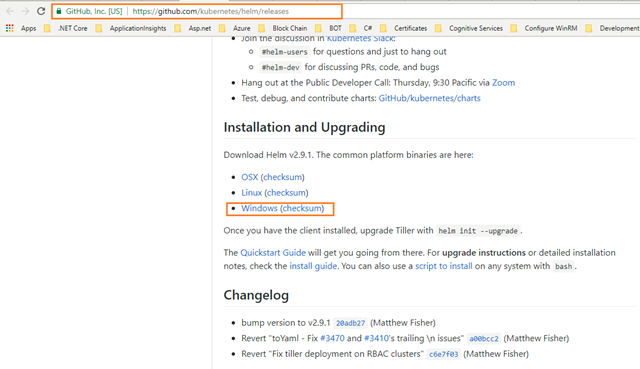
Helm – https://github.com/kubernetes/helm/releases go to this link and click on Windows (checksum), then helm files will be downloaded into your local machine.
(Or) you can click the below link directly to download the Helm files.
Windows (checksum): https://storage.googleapis.com/kubernetes-helm/helm-v2.9.1-windows-amd64.zip
Note: This blog explains how to download and install Azure CLI, Kubectl and Helm files in Windows OS.
They are plain executables, so no installers; first create a folder in your PC or local machine in the following path: C:\k8s – this is where you are going to store and work with helm and Kubectl tools. Then copy and paste them into the folder you just created.
Now your folder path C:\k8s should be like this figure below:
If you are having .Zip files in the above path, you can extract the files in the same folder only.
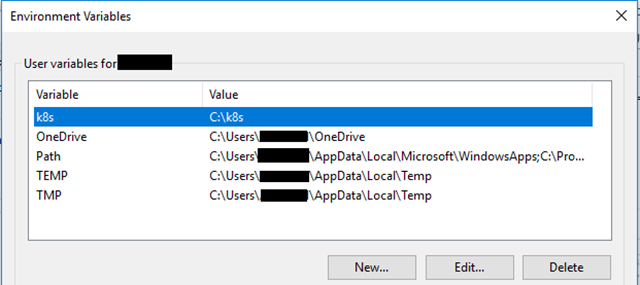
For the sake of simplicity you should add this folder path to your Environment Variables in Windows:
Kubectl is the “control app” for Kubernetes, and Helm is the package manager (or the equivalent of NuGet in the .NET world if you like) for Kubernetes.
You might ask yourself why you need Kubernetes native tools, when you are using a managed Kubernetes service, and that is a valid question. A lot of managed services put an abstraction on top of the underlying service, and hides the original in various manners. An important thing to understand about AKS is that while it certainly abstracts parts of the k8s setup it does not hide the fact that it is k8s. This means that you can interact with the cluster as if you had set it up from scratch. Which also means that if you are already are a k8s ninja you can still feel at home, otherwise, it’s necessary to learn at least some of the tooling. You don’t need to aspire to ninja-level knowledge of Kubernetes; however, you need to be able to follow along as I switch between k8s for shorthand and typing Kubernetes out properly.
Reference Links
Overview of kubectl
https://kubernetes.io/docs/reference/kubectl/overview/
Kubectl Cheat Sheet
https://kubernetes.io/docs/reference/kubectl/cheatsheet/
The package manager for Kubernetes
Creating the AKS cluster using the Azure CLI
-
Open the Command Prompt with administrative mode.
-
Note: This login process is implemented using the OAuth DeviceProfile flow. You can implement this if you like:
Create a resource group
-
You need a resource group to contain the AKS instance. (Technically it doesn’t matter which location you deploy the resource group too, but I suggest going with one that is supported by AKS and sticking with it throughout the setup.)
Create a resource group with the az group create command. An Azure resource group is a logical group in which Azure resources are deployed and managed.
When creating a resource group you are asked to specify a location, this is where your resources will live in Azure.
The following command creates a resource group named KZEU-AKSDMO-SB-DEV-RGP-01 in the eastus location.
az group create –name KZEU-AKSDMO-SB-DEV-RGP-01 –location eastus
Create AKS cluster
-
Next you need to create the AKS cluster:
Use the az aks create command to create an AKS cluster. The following command creates a cluster named DemoAKS01 with one node.
az aks create –name KZEU-AKSDMO-SB-DEV-AKS-01 –resource-group KZEU-AKSDMO-SB-DEV-RGP-01 –node-count 1 –generate-ssh-keys –kubernetes-version 1.11.2 –node-vm-size Standard_DS1_v2
You will notice that I chose a specific Kubernetes version, which seems to be a low-level detail when we’re dealing with a service that should handle this for us. The reason for this is that Kubernetes is a fast-moving target, so you might need to be on a certain level for specific features and/or compatibility. 1.11.2 is to date the newest AKS supported version, so you may verify if there is a newer one meanwhile, or upgrade the version later. If you don’t specify the version you will be given the default version, which was on the 1.7.x branch when I tested.
Since this is a managed service which may create a delay for a new version of Kubernetes being released and available in AKS, close management would be needed.
To keep costs down in the test environment I’m only using one node, but in production you should ramp this up to at least 3 for high availability and scale. I also specified the VM size to be a DS1_v2. (This is also the default if you omit the parameter.) I tried keeping cost low, and going with the cheapest SKU I could locate, but the performance was abysmal when going through the cycle of pulling and deploying images repeatedly; so I upgraded.
In light of this I would like to highlight another piece of goodness with AKS. In a Kubernetes cluster you have management nodes and worker nodes. Just like you need more than one worker to distribute the load, you need multiple managers to have high availability.
AKS takes care of the management, but not only is it abstracted away, you don’t pay for it either – you pay for the nodes, and that’s it.
After several minutes the command completes and returns JSON-formatted information about the cluster.
Important:
Save the JSON output in a separate text file, because you need the ssh keys later in this document.
Note:
If you get the below error while running the above az aks create command, then you can re-run the same command once again.
Deployment failed. Error occurred in request.
Note:
While creating AKS, internally a new resource group is created (like MC_<Resource Group Name>_<AKS Name>_<Resource Group Location>) which is consists of Virtual machine, Virtual network, DNS Zone, Availability set, Network interface, Network security group, Load balancer and Public IP address etc.…
Connect to the cluster
-
To manage a Kubernetes cluster use kubectl, the Kubernetes command-line client.
-
If you want to install it locally, use the az aks install-cli command.
az aks install-cli
-
Connect kubectl to your Kubernetes cluster by using the az aks get-credentials command and configure accordingly. This step downloads credentials and configures the Kubernetes CLI to use them.
az aks get-credentials –resource-group KZEU-AKSDMO-SB-DEV-RGP-01 –name KZEU-AKSDMO-SB-DEV-AKS-01
-
Verify the connection to your cluster via the kubectl get command to return a list of the cluster nodes. Note that this can take a few minutes to appear.
kubectl get nodes
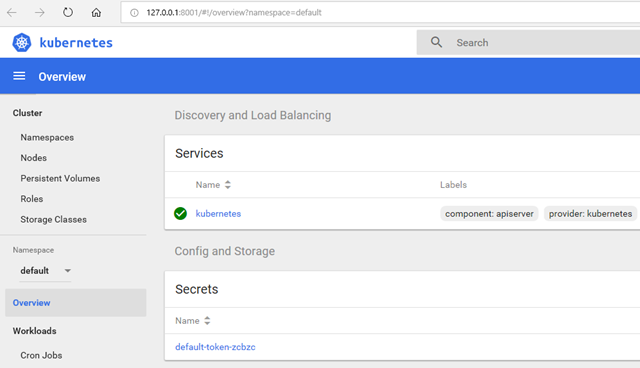
This will launch a browser tab with a graphical representation:
Kubectl also allows for connecting to the dashboard (kubectl proxy); however, when using the Azure CLI everything is automatically piggybacked onto the Azure session you have. You’ll notice that the address is 127.0.0.1 even though it isn’t local, but that’s just some proxy address where the traffic is tunneled through to Azure.
Configure the helm in local machine
-
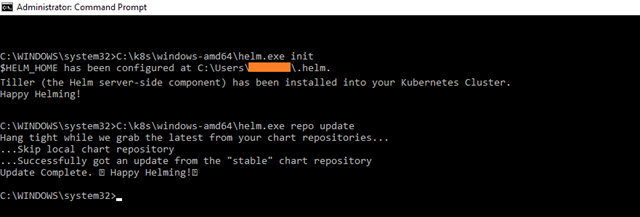
Helm needs to be primed as well to be ready for later. Based on having a working cluster as verified in the previous step, helm will automagically work out where to apply its logic. (You can have multiple clusters, so part of the point in verifying that the cluster is ok is to make sure you’re connected to the right one.) Apply the following:
helm.exe init
helm.exe repo update
In my case helm.exe is available in the following path. I used the complete helm.exe path for executing the above commands in the command prompt:
The cluster should now be more or less ready to have images deployed.
Much like we refer to images when building virtual machines, Docker uses the same concept although slightly different on the implementation level. To get running containers inside your Kubernetes cluster you need a repository for these images. The default public repo is Docker Hub, and images stored there will be entirely suited for your AKS cluster. But we don’t want to make our images available on the Internet for now, so we will want a private repository. In the Azure ecosystem this is delivered by Azure Container Registry (ACR).
You can easily create this in the portal, for coherency, let’s do this through the CLI as well. You can throw this into the AKS resource group, but we will create a new group for our registry, since a registry is logically speaking a separate entity. Then it becomes more obvious to re-use across clusters too.
Create an azure container registry (ACR) using the Azure CLI
Create a resource group
-
Create a resource group with the az group create command. An Azure resource group is a logical group in which Azure resources are deployed and managed.
When creating a resource group you are asked to specify a location; this is where your resources will live in Azure.
The following command creates a resource group named KZEU-AKSDMO-SB-DEV-RGP-02 in the eastus location.
az group create –name KZEU-AKSDMO-SB-DEV-RGP-02 –location eastus
Create a container registry
-
Here you create a Basic registry. Azure Container Registry is available in several different SKUs as described briefly in the following table. For extended details on each, see Container registry SKUs.
SKU
Description
Basic
A cost-optimized entry point for developers learning about Azure Container Registry. Basic registries have the same programmatic capabilities as Standard and Premium (Azure Active Directory authentication integration, image deletion, and web hooks), however, there are size and usage constraints.
Standard
The Standard registry offers the same capabilities as Basic, but with increased storage limits and image throughput. Standard registries should satisfy the needs of most production scenarios.
Premium
Premium registries have higher limits on constraints, such as storage and concurrent operations, including enhanced storage capabilities to support high-volume scenarios. In addition to higher image throughput capacity, Premium adds features like geo-replication for managing a single registry across multiple regions, maintaining a network-close registry to each deployment.
-
Create an ACR instance using the az acr create command.
The registry name must be unique within Azure, and contain 5-50 alphanumeric characters. In the following command, DemoACRregistry is used. Update this to a unique value.
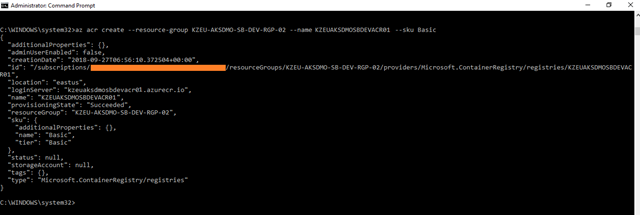
az acr create –resource-group KZEU-AKSDMO-SB-DEV-RGP-02 –name KZEUAKSDMOSBDEVACR01 –sku Basic
When the registry is created, the output is similar to the following:
{
“additionalProperties”: {},
“adminUserEnabled”: false,
“creationDate”: “2018-06-28T06:07:11.755241+00:00”,
“id”: “/subscriptions/xxxxx-xxxx-xxxx-xxxx-xxxxxxx/resourceGroups/KZEU-AKSDMO-SB-DEV-RGP-02/providers/Microsoft.ContainerRegistry/registries/KZEUAKSDMOSBDEVACR01”,
“location”: “eastus”,
“loginServer”: “kzeuaksdmosbdevacr01.azurecr.io”,
“name”: ” KZEUAKSDMOSBDEVACR01″,
“provisioningState”: “Succeeded”,
“resourceGroup”: “KZEU-AKSDMO-SB-DEV-RGP-02”,
“sku”: {
“additionalProperties”: {},
“name”: “Basic”,
“tier”: “Basic”
},
“status”: null,
“storageAccount”: null,
“tags”: {},
“type”: “Microsoft.ContainerRegistry/registries”
}
Authenticate with Azure Container Registry from Azure Kubernetes Service
-
While you can now browse the contents of the registry in the portal that does not mean that your cluster can do so. As is indicated by the message upon successful creation of the ACR component we need to create a service principal that will be used by Kubernetes, and we need to give this service principal access to ACR.
-
If you’re new to the concept of service principal you can refer to the below links:
Authenticate with a private Docker container registry
https://docs.microsoft.com/en-us/azure/container-registry/container-registry-authentication
Azure Container Registry authentication with service principals
https://docs.microsoft.com/en-us/azure/container-registry/container-registry-auth-service-principal
Authenticate with Azure Container Registry from Azure Kubernetes Service
https://docs.microsoft.com/en-us/azure/container-registry/container-registry-auth-aks
Grant AKS access to ACR
- When an AKS cluster is created a service principal is also created to manage cluster operability with Azure resources. This service principal can also be used for authentication with an ACR registry. To do so, a role assignment needs to be created to grant the service principal read access to the ACR resource.
- The following sample can be used to complete this operation.
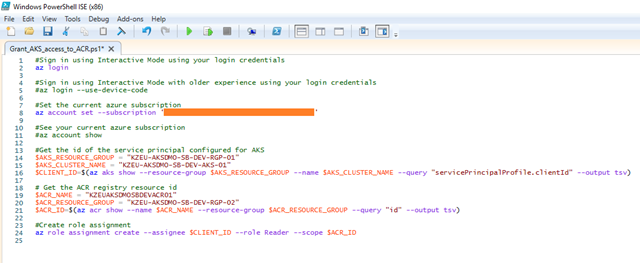
Open the Windows PowerShell ISE (x86) in your local machine and run the below script.
#Sign in using Interactive Mode using your login credentials

az login

#Sign in using Interactive Mode with older experience using your login credentials

#az login --use-device-code

#Set the current azure subscription

az account set --subscription ''

#See your current azure subscription

#az account show

#Get the id of the service principal configured for AKS

$AKS_RESOURCE_GROUP = "KZEU-AKSDMO-SB-DEV-RGP-01"

$AKS_CLUSTER_NAME = "KZEU-AKSDMO-SB-DEV-AKS-01"

$CLIENT_ID=$(az aks show --resource-group $AKS_RESOURCE_GROUP --name $AKS_CLUSTER_NAME --query "servicePrincipalProfile.clientId" --output tsv)

# Get the ACR registry resource id

$ACR_NAME = "KZEUAKSDMOSBDEVACR01"

$ACR_RESOURCE_GROUP = "KZEU-AKSDMO-SB-DEV-RGP-02"

$ACR_ID=$(az acr show --name $ACR_NAME --resource-group $ACR_RESOURCE_GROUP --query "id" --output tsv)

#Create role assignment

az role assignment create --assignee $CLIENT_ID --role Reader --scope $ACR_ID
Output of the above PowerShell Script:
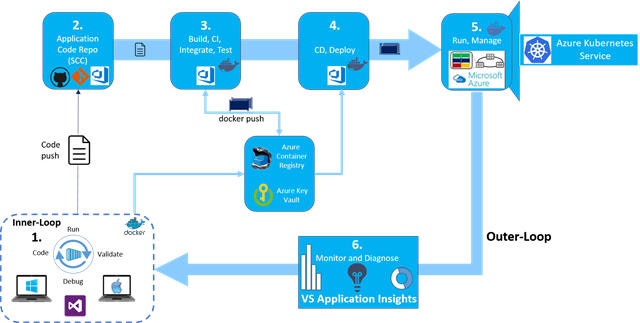
Docker application DevOps workflow with Microsoft tools
Visual Studio, Azure DevOps and Application Insights provide a comprehensive ecosystem for development and IT operations that allow your team to manage projects and to rapidly build, test, and deploy containerized applications:
Microsoft tools can automate the pipeline for specific implementations of containerized applications (Docker, .NET Core, or any combination with other platforms) from global builds and Continuous Integration (CI) and tests with Azure DevOps, to Continuous Deployment (CD) to Docker environments (Dev/Staging/Production), and to provide analytics information about the services back to the development team through Application Insights. Every code commit can trigger a build (CI) and automatically deploy the services to specific containerized environments (CD).
Developers and testers can easily and quickly provision production-like dev and test environments based on Docker by using templates from Azure.
The complexity of containerized application development increases steadily depending on the business complexity and scalability needs. Examples of these are applications based on Microservices architecture. To succeed in such kind of environment your project must automate the whole lifecycle—not only build and deployment, but also management of versions along with the collection of telemetry. In summary, Azure DevOps and Azure offer the following capabilities:
-
Azure DevOps source code management (based on Git or Team Foundation Version Control), agile planning (Agile, Scrum, and CMMI are supported), continuous integration, release management, and other tools for agile teams.
-
Azure DevOps include a powerful and growing ecosystem of first- and third-party extensions that allow you to easily construct a continuous integration, build, test, delivery, and release management pipeline for microservices.
-
Run automated tests as part of your build pipeline in Azure DevOps.
-
Azure DevOps tightens the DevOps lifecycle with delivery to multiple environments – not just for production environments,but also for testing, including A/B experimentation, canary releases, etc.
-
Docker, Azure Container Registry and Azure Resource Manager. Organizations can easily provision Docker containers from private images stored in Azure Container Registry along with any dependency on Azure components (Data, PaaS, etc.) using Azure Resource Manager (ARM) templates with tools they are already comfortable working with.
Steps in the outer-loop DevOps workflow for a Docker application
The outer-loop workflow is end-to-end represented in the above Figure. Now, let’s drill down on each of its steps.
Step 1. Inner loop development workflow for Docker applications
This step was explained in detail in the Part-2 blog, but here is where the outer-loop also starts, in the very precise moment when a developer pushes code to the source control management system (like Git) triggering Continuous Integration (CI) pipeline executions.
Share your code with Visual Studio 2017 and Azure DevOps Git
In Part-3 blog, you already published your code into Azure DevOps by creating the new team project named as AKSDemo.
Changing branch from master to dev in VS2017
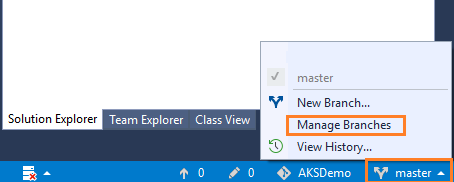
Before making changes to your project, first you need to change the branch from master to dev.
-
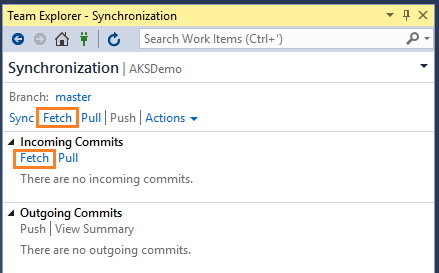
Visual Studio uses the Sync view in Team Explorer to fetch changes. Changes downloaded by fetch are not applied until you Pull or Sync the changes.
-
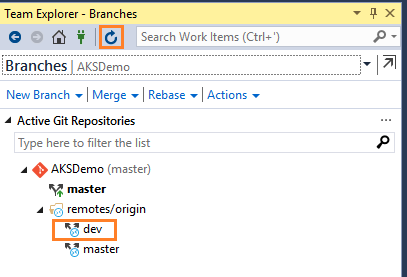
You can review the results of the fetch operation in the Incoming Commits section. Right now you don’t have any Incoming Commits, but the new branch created in Part-3 blog came here while doing the fetch operation.
Note:
You will need to fetch the branch before you can see it and swap to it in your local repo.
-
Now you can work on dev branch.
Commit and push updates
Changes in APIApplication project
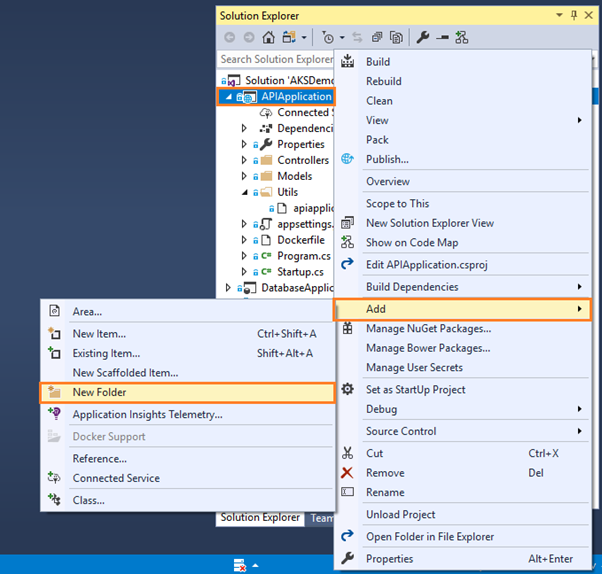
- Enter the New Folder name as Utils.
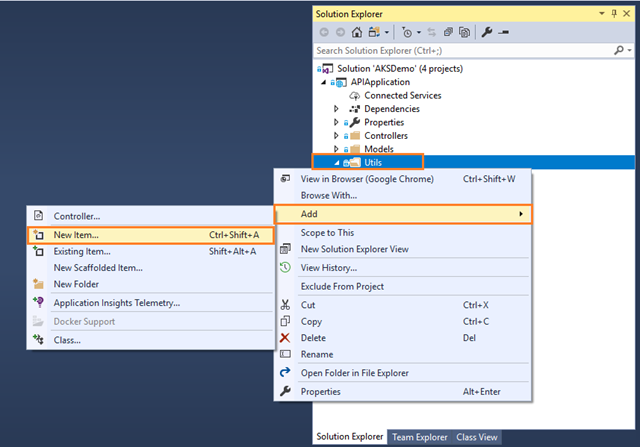
- Right click on Utils folder, then click on Add and choose New Item:
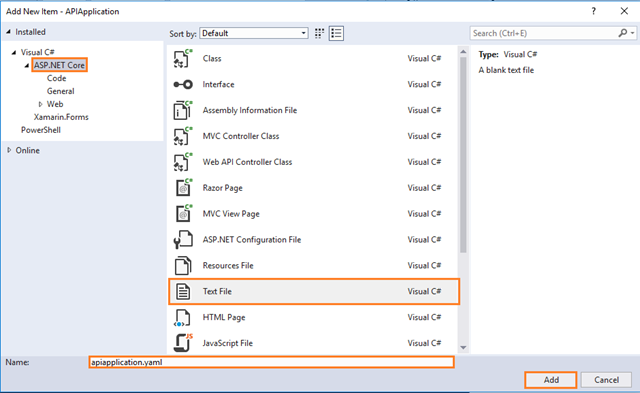
- Complete the Add New Item dialog:
-
In the left pane, tap ASP.NET Core
-
In the center pane, tap Text File
-
Name of the Text File as apiapplication.yaml
-
- Open the apiapplication.yaml file under the Utils folder of your APIApplication project; then add the below lines of code:
apiVersion: apps/v1beta1
kind: Deployment
metadata:
  name: apiapplication
spec:
  template:
    metadata:
      labels:
        app: apiapplication
    spec:
      containers:
      - name: apiapplication
        image: kzeuaksdmosbdevacr01.azurecr.io/apiapplication:#{Version}#
        env:
        - name: ConnectionStrings_DBConnection
          value: "Server=tcp:kzeu-aksdmo-sb-dev-sq-01.database.windows.net,1433;Initial Catalog=KZEU-AKSDMO-SB-DEV-SDB-01;Persist Security Info=False;User ID=kishore;Password=iSMAC2016;MultipleActiveResultSets=False;Encrypt=True;TrustServerCertificate=False;Connection Timeout=30;"
        ports:
        - containerPort: 80
        imagePullPolicy: Always
---
apiVersion: v1
kind: Service
metadata:
  name: apiapplication
spec:
  type: LoadBalancer
  ports:
  - port: 80
  selector:
    app: apiapplication
Be aware – yaml files want spaces, not tabs, and it expects the indent hierarchy to be as above. If you get the indentations wrong, it will not work.
Note:
If you can’t validate the code inside .yml files, you can refer to this link.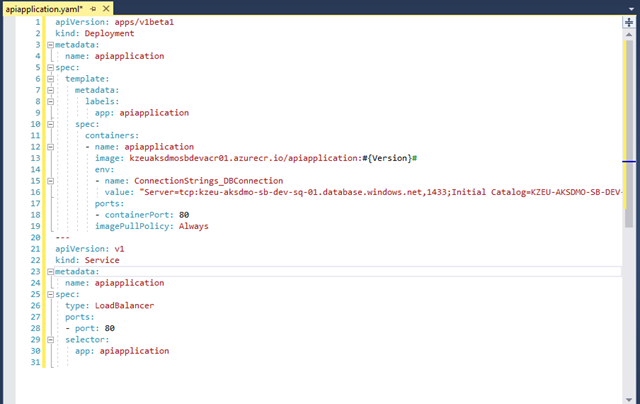
The above yaml contains the type: LoadBalancer. This means, after the container is deployed to Kubernetes, then Kubernetes assigns the proper IP Address to this (apiapplication) container.
I’m not delving into the explanations here, but as you can probably figure out this defines some of the necessary things to describe the container.
-
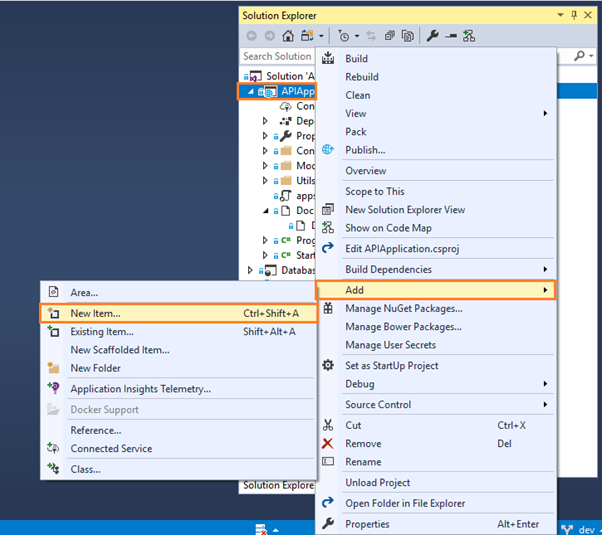
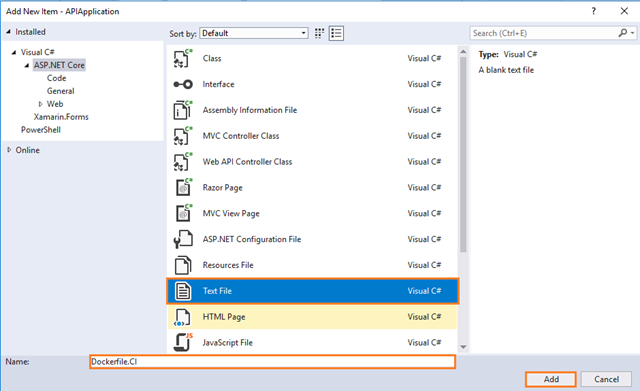
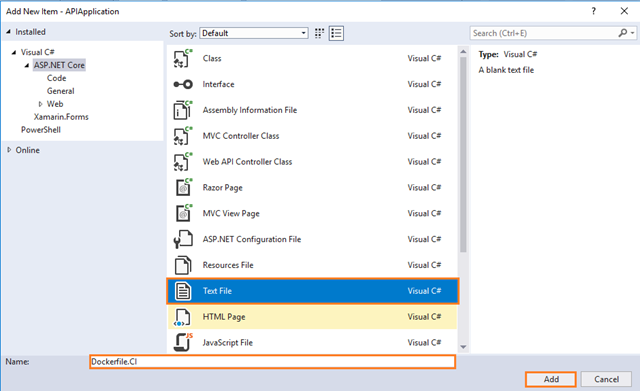
You also need a slightly different Dockerfile for this, so add one called Dockerfile.CI in your APIApplication project.
-
Complete the Add New Item dialog:
-
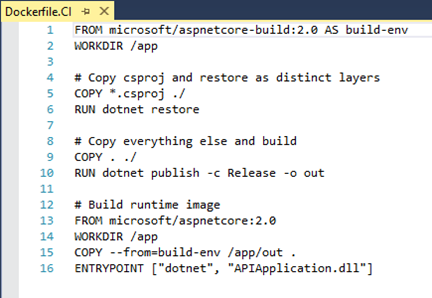
Open the Dockerfile.CI file under the main Dockerfile of your APIApplication project and then add the below lines of code:
FROM microsoft/aspnetcore-build:2.0 AS build-env
WORKDIR /app

# Copy csproj and restore as distinct layers
COPY *.csproj ./
RUN dotnet restore

# Copy everything else and build
COPY . ./
RUN dotnet publish -c Release -o out

# Build runtime image
FROM microsoft/aspnetcore:2.0
WORKDIR /app
COPY --from=build-env /app/out .
ENTRYPOINT ["dotnet", "APIApplication.dll"]
Changes in WebApplication project
- Right click on your WebApplication project, then click on Add and choose the New Folder:
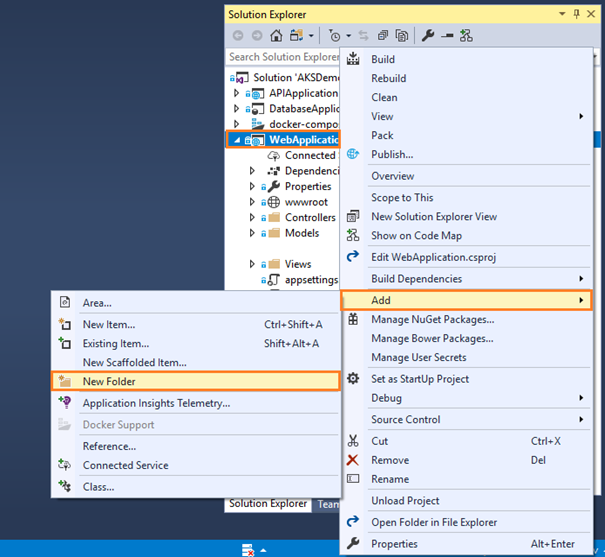 :
: - Enter the New Folder name as Utils.
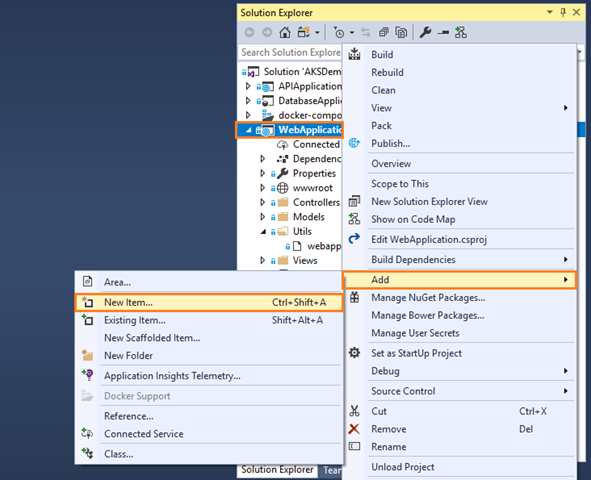
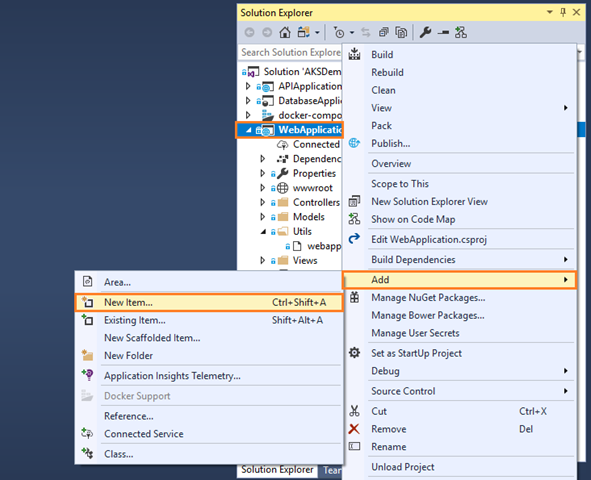
- Right click on Utils folder, then click on Add and choose New Item:
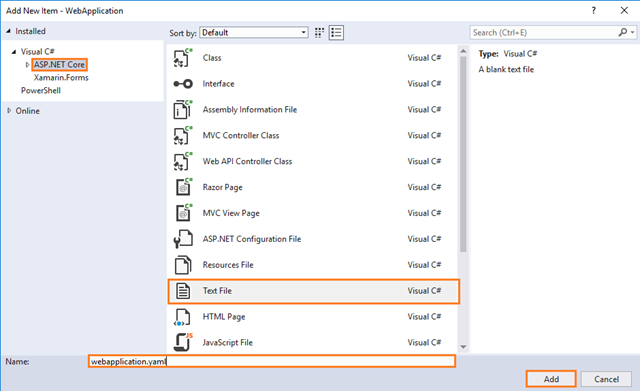
- Complete the Add New Item dialog:
-
Open the webapplication.yaml file under the Utils folder of your APIApplication project and then add the below lines of code:
apiVersion: apps/v1beta1
kind: Deployment
metadata:
  name: webapplication
spec:
  template:
    metadata:
      labels:
        app: webapplication
    spec:
      containers:
      - name: webapplication
        image: kzeuaksdmosbdevacr01.azurecr.io/webapplication:#{Version}#
        env:
        - name: AppSettings_APIURL
          value: http://40.87.88.177/
        ports:
        - containerPort: 80
        imagePullPolicy: Always
---
apiVersion: v1
kind: Service
metadata:
  name: webapplication
spec:
  type: LoadBalancer
  ports:
  - port: 80
  selector:
    app: webapplication
Be aware – yaml files want spaces, not tabs, and it expects the indent hierarchy to be as above. If you get the indentations wrong it will not work.
Note:
If you can’t validate the code inside .yml files, you can refer to this link.
 The above yaml contains the environment variable named as AppSettings_APIURL and also contains the type: LoadBalancer. This means after the container is deployed to Kubernetes, then Kubernetes assigns the proper IP Address to this (webapplication) container
Note:
If you want more information about handling the environment variables in kubernetes deployment file, you can refer to the below link:
-
I’m not delving into the explanations here, but as you can probably figure out this defines some of the necessary things to describe the container.
-
We also need a slightly different Dockerfile for this, so add one called Dockerfile.CI in your WebApplication project
-
Complete the Add New Item dialog:
-
In the left pane, tap ASP.NET Core
-
In the center pane, tap Text File
-
Name of the Text File as Dockerfile.CI
-
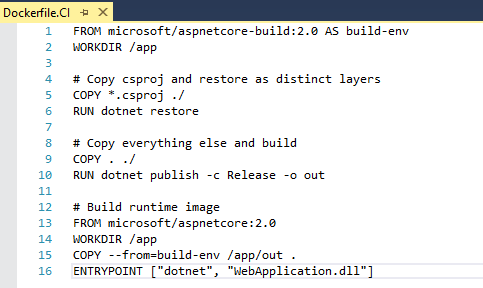
- Open the Dockerfile.CI file under the main Dockerfile of your WebApplication project and then add the below lines of code:
FROM microsoft/aspnetcore-build:2.0 AS build-env
WORKDIR /app

# Copy csproj and restore as distinct layers
COPY *.csproj ./
RUN dotnet restore

# Copy everything else and build
COPY . ./
RUN dotnet publish -c Release -o out

# Build runtime image
FROM microsoft/aspnetcore:2.0
WORKDIR /app
COPY --from=build-env /app/out .
ENTRYPOINT ["dotnet", "WebApplication.dll"]
-
- As you write your code, your changes are automatically tracked by Visual Studio. You can commit changes to your local Git repository by selecting the pending changes icon
 from the status bar.
- As you write your code, your changes are automatically tracked by Visual Studio. You can commit changes to your local Git repository by selecting the pending changes icon
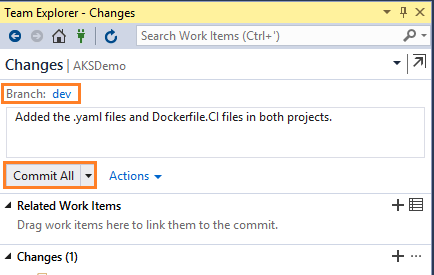
- On the Changes view in Team Explorer, add a message describing your update and commit your changes:
- Select the unpublished changes status bar icon
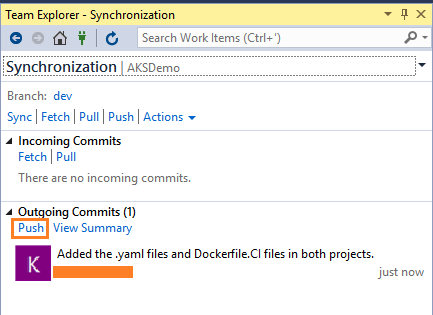
 (or select Sync from the Home view in Team Explorer). Select Push to update your code in Azure DevOps:
Get changes from others
Sync your local repo with changes from your team as they make updates. For that you can refer to this link.
Step 2. SCC integration and management with Azure DevOps and Git
At this step, you need to have a Version Control system to gather a consolidated version of all the code coming from the different developers in the team.
Even when SCC and source-code management might sound trivial to most developers, when developing Docker applications in a DevOps lifecycle, it is critical to highlight that the Docker images with the application must not be submitted directly to the global Docker Registry (like Azure Container Registry or Docker Hub) from the developer’s machine.
On the contrary, the Docker images to be released and deployed to production environments have to be created based on the source code that is being integrated in your global build/CI pipeline of your source-code repository (like Git).
The local images generated by the developers should be used just by the developer when testing within his/her own machine. This is why it is critical to have the DevOps pipeline triggered from the SCC code.
Microsoft Azure DevOps support Git and Team Foundation Version Control: You can choose between them and use it for an end-to-end Microsoft experience. However, you can also manage your code in external repositories (like GitHub, on-premises Git repos or Subversion) and still be able to connect to them and get the code as the starting point for your DevOps CI pipeline.
Note:
Here, we are currently using Azure DevOps and Git for managing the source code pushed by developers into a specified repository (for example AKSDemo). We are also creating the Build and Release Pipelines here.
Alright, now you have everything set up for creating specifications of your pipeline from Visual Studio to a running containers. We need two definitions for this:
-
How Azure DevOps should build and push the resulting artifacts to ACR.
-
How AKS should deploy the containers.
Step 3. Build, CI, Integrate with Azure DevOps and Docker
There are two ways you can approach handling of the building process.
You can push the code into the repo, build the code “directly”, pack it into a Docker image, and push the result to ACR.
The other approach is to push the code to the repo, “inject” the code into a Docker image for the build, have the output in a new Docker image, and then push the result to ACR. This would for instance allow you to build things that aren’t supported natively by Azure DevOps.
I seem to get the second approach to run slightly faster. So, here we will choose the second approach.
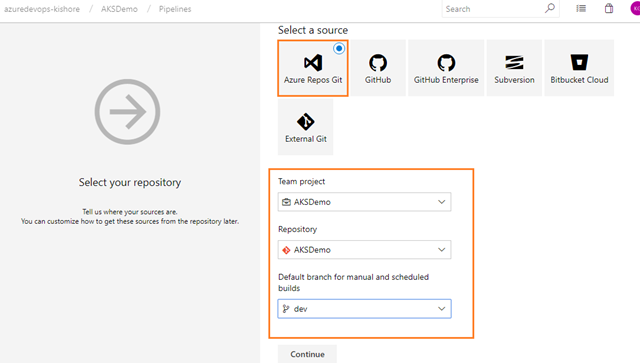
The AKS part and the Azure DevOps part takes turns in this game. First you built Continuous Integration (CI) on Azure DevOps, then you built a Kubernetes cluster (AKS), and now the table is turned towards Azure DevOps again for Continuous Deployment (CD). So, before building the CD pipeline let’s set up a CI pipeline.
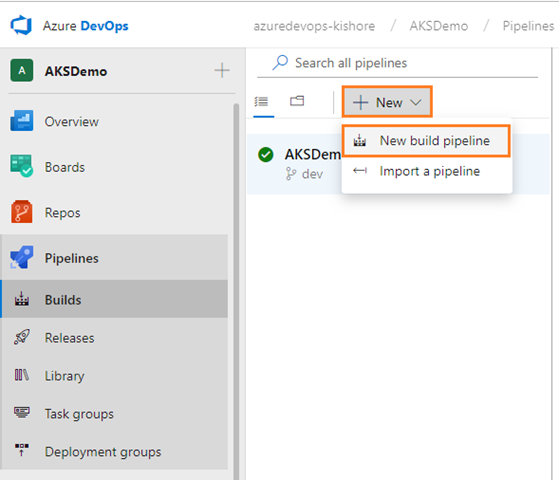
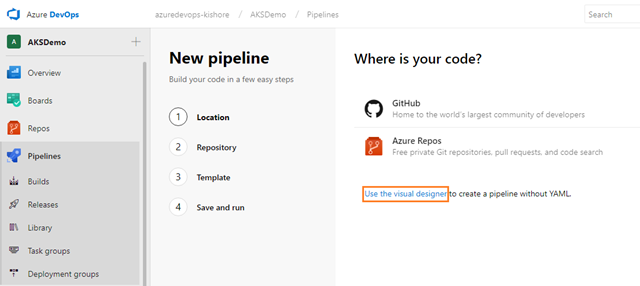
Building a CI pipeline
-
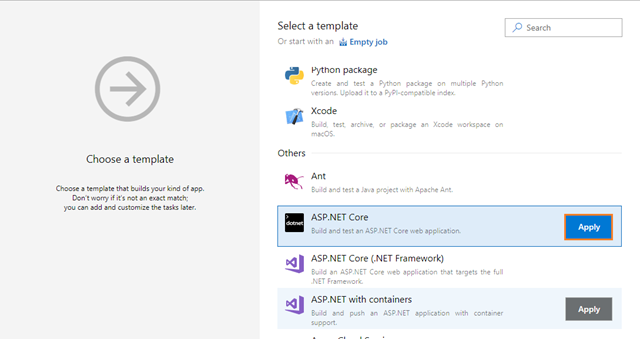
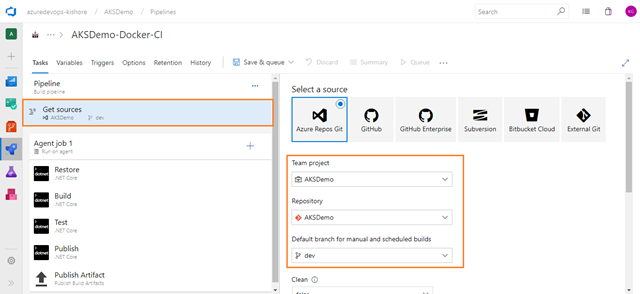
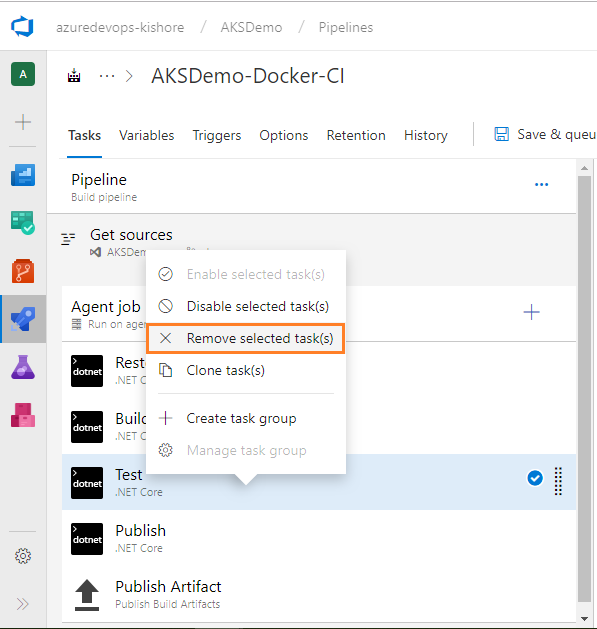
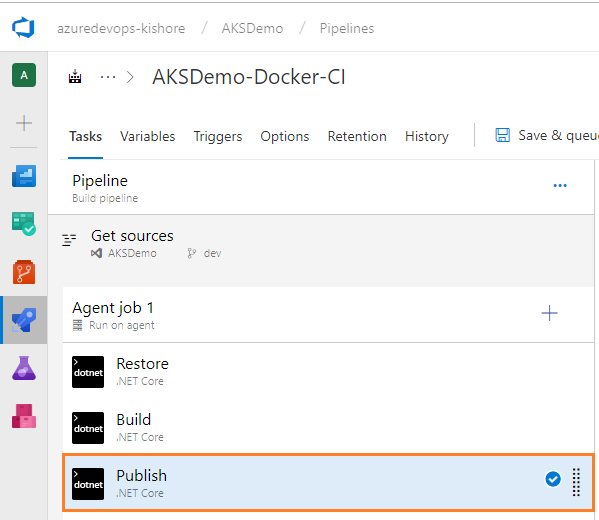
By default the ASP.NET Core template will provide the Restore, Build, Test, Publish and Publish Artifact tasks. You can remove the Test task from the current build pipeline, because you are not doing any testing.
-
There is no need to modify the Restore and Build tasks of .NET Core.
Publish
-
Now you need to modify the Publish task to publish your .NET Core project using the .NET Core task with the Command set to publish.
-
Configure the .NET Core task as follows:
-
Display name: Publish
- Command: publish
- Path to project(s): The path to the csproj file(s) to use. You can use wildcards (e.g. **/.csproj for all .csproj files in all subfolders). Example: **/*.csproj
- Uncheck “Publish Web Projects“.
- Arguments: Arguments to the selected command. For example configuration $(BuildConfiguration) –output $(build.artifactstagingdirectory)
- Uncheck “Zip Published Projects“.
- Uncheck “Add project name to publish path“.

-
-
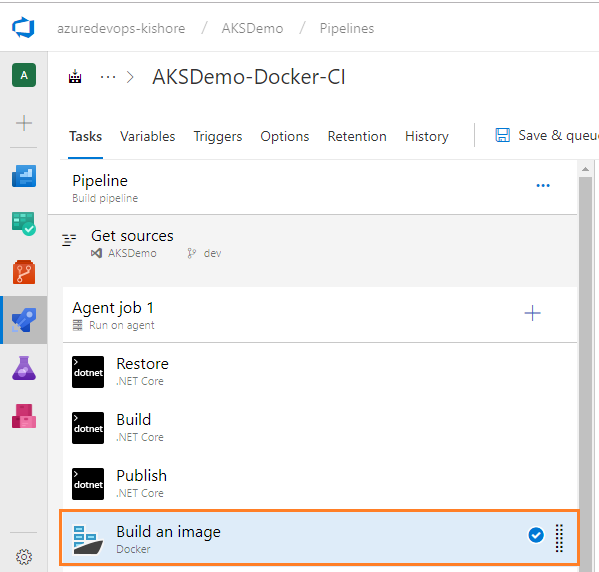
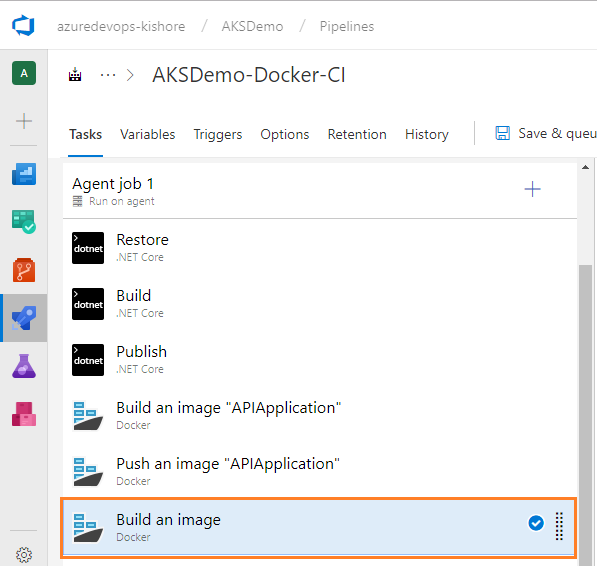
Next, you need to add four Docker tasks (not Docker Compose). Coming to the Docker part, you need to do build and push images to the Azure Container Registry. Currently AKSDemo project contains applications like WebApplication and APIApplication, so, you need to add two build Docker tasks and two push Docker tasks.
Build an image for APIApplication
-
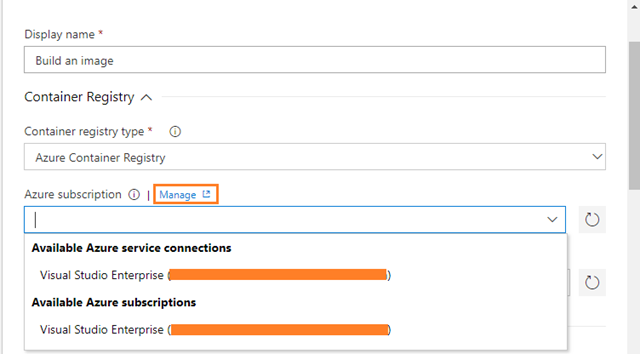
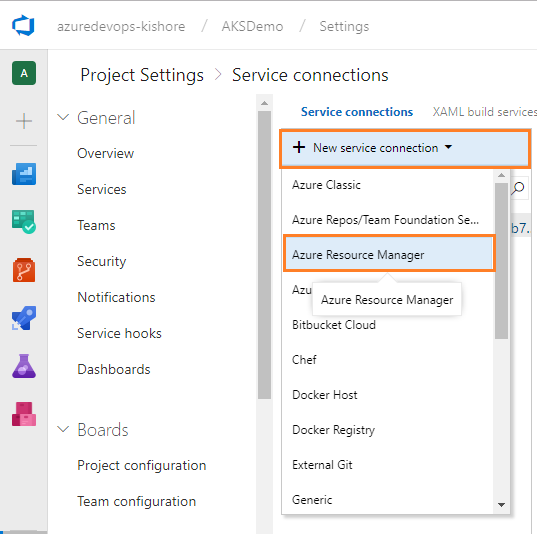
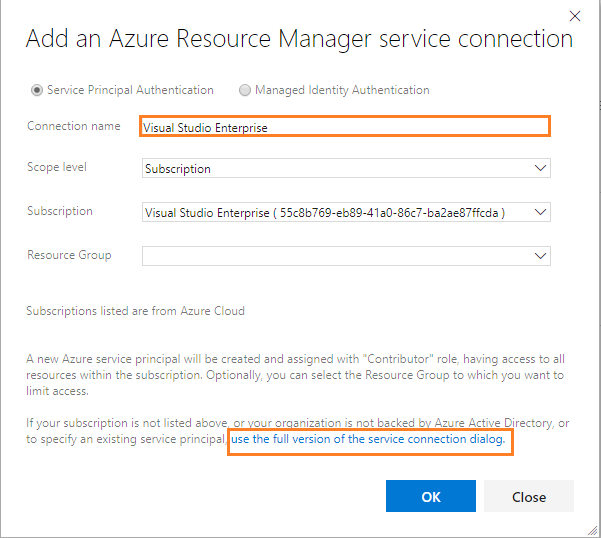
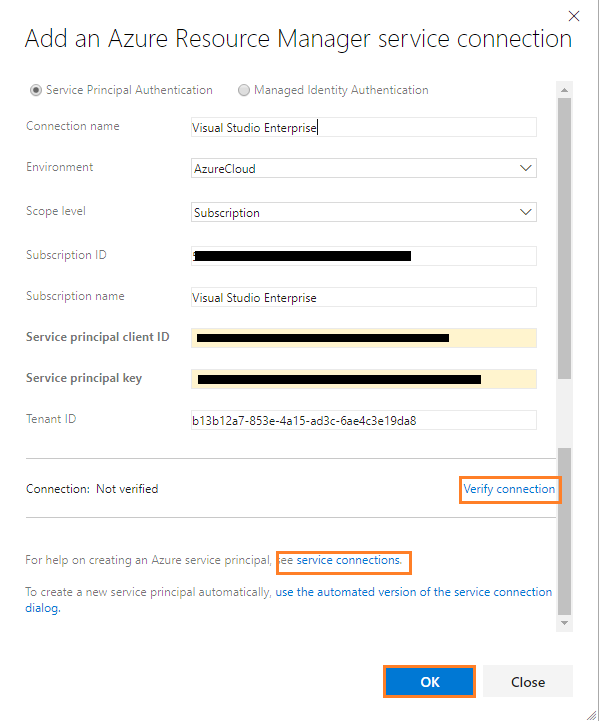
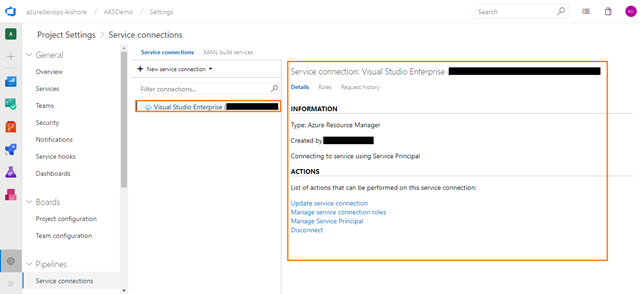
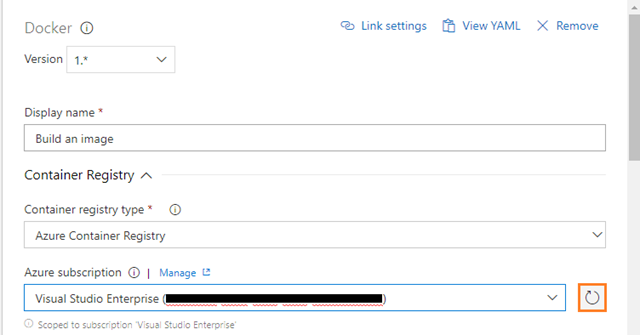
Firstly, configure the Docker tasks for APIApplication. For this you need Azure Resource Manager Subscription connection. If your Azure DevOps account is already linked to an Azure subscription, then it will automatically display under Azure subscription drop down as shown in below screenshot. Otherwise click on Manage:
Azure Resource Manager Endpoint
-
If not backed by Azure then click on the hyperlink ‘use the full version of the service connection dialog’ as shown in above screenshot.
Configure first Docker task
-
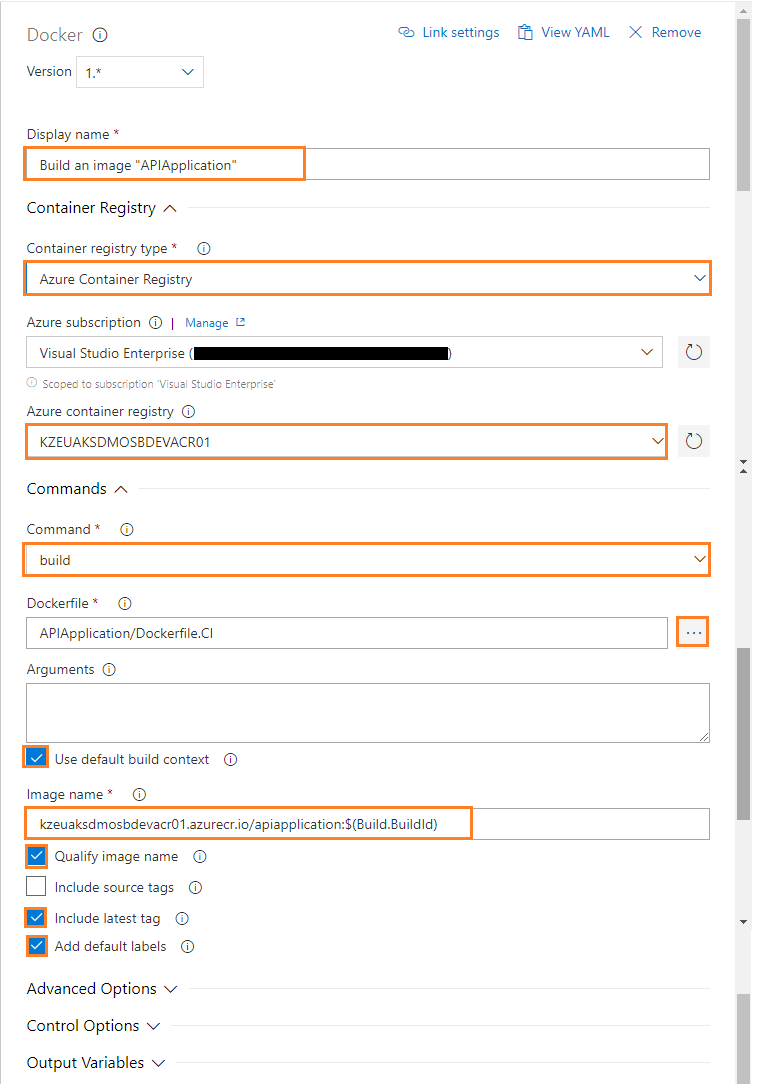
Configure the Docker task for Build an Image of APIApplication as follows:
-
Display name: Build an image “APIApplication”
-
Container Registry Type: Select a Container Registry Type. For example: Azure Container Registry
-
Azure Subscription: Select an Azure subscription
-
Azure Container Registry: Select an Azure Container Registry. For example: KZEUAKSDMOSBDEVACR01
-
Command: Select a Docker command. For example: build
-
Dockerfile: Path to the Docker file to use. Must be within the Docker build context. For example: APIApplication/Dockerfile.CI
-
Check the Use Default Build Context: Set the build context to the directory that contains the Docker file.
-
Image Name: Name of the Docker image to build. For example: kzeuaksdmosbdevacr01.azurecr.io/apiapplication:$(Build.BuildId)
-
Check the Qualify Image Name: Qualify the image name with the Docker registry connection’s hostname if not otherwise specified.
-
Push an image of APIApplication
-
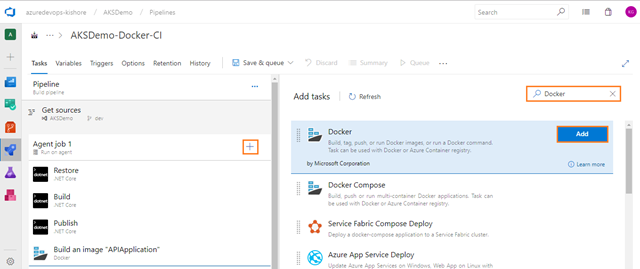
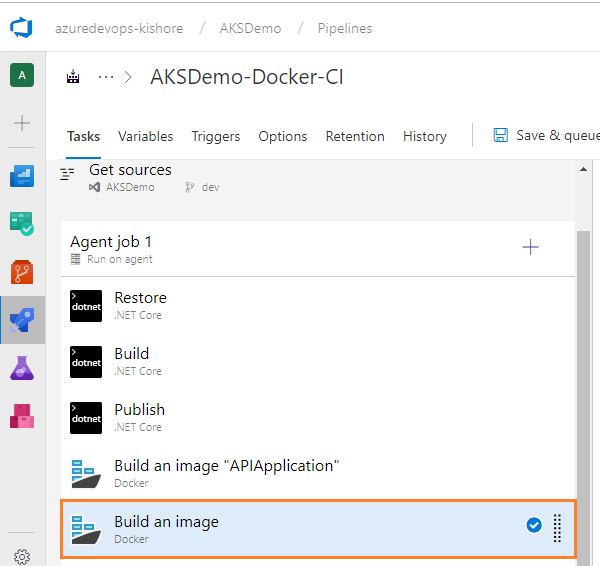
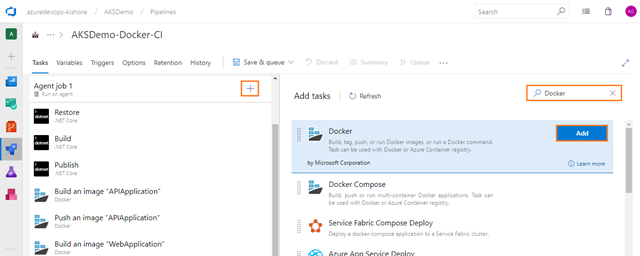
Next add one more Docker task for pushing the image of APIApplication into Azure Container Registry. For that select the Tasks tab, select the plus sign (+) to add a task to Job 1. On the right side, type “Docker” in the search box and click on the Add button of Docker build task, as shown in the figure below:
Configure second Docker task
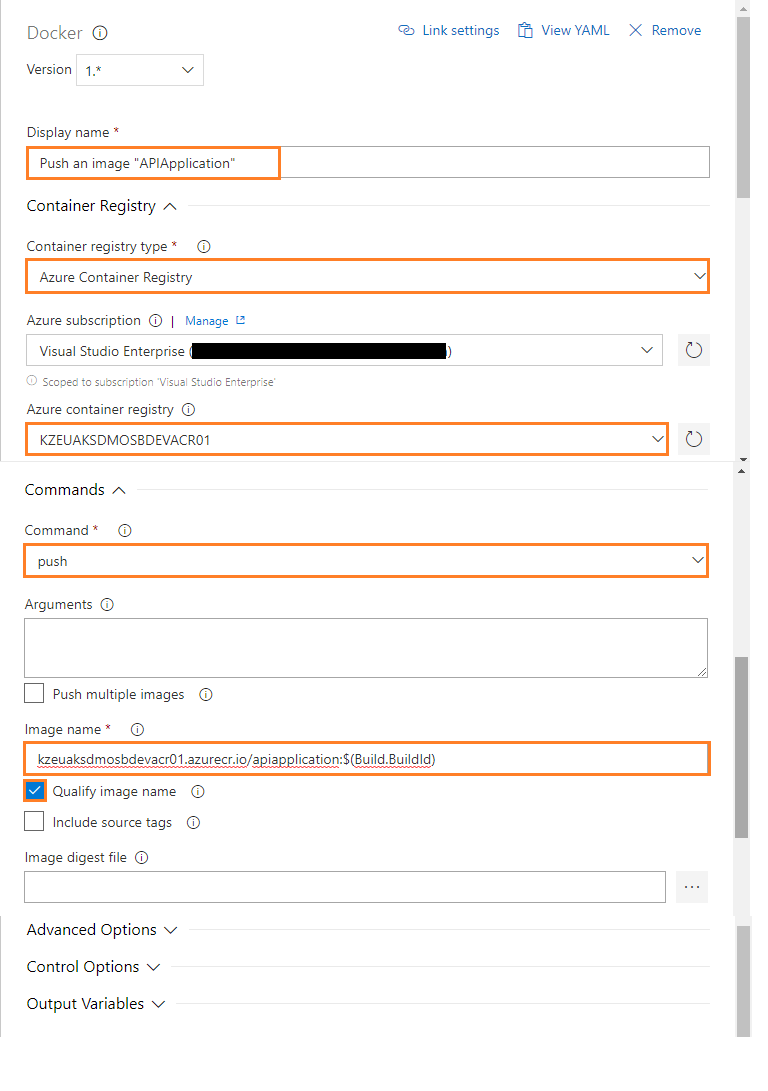
- Configure the above Docker task for Push an Image of APIApplication as follows:
- Display name: Push an image “APIApplication”
- Container registry type: Select a Container Registry Type. For example: Azure Container Registry
- Azure subscription: Select an Azure subscription
- Azure container registry: Select an Azure Container Registry. For example: KZEUAKSDMOSBDEVACR01
- Command: Select a Docker action. For example: push
- Image name: Name of the Docker image to push. For example: kzeuaksdmosbdevacr01.azurecr.io/apiapplication:$(Build.BuildId)
- Check the Qualify image name: Qualify the image name with the Docker registry connection’s hostname, if not otherwise specified.
Build an Image for WebApplication
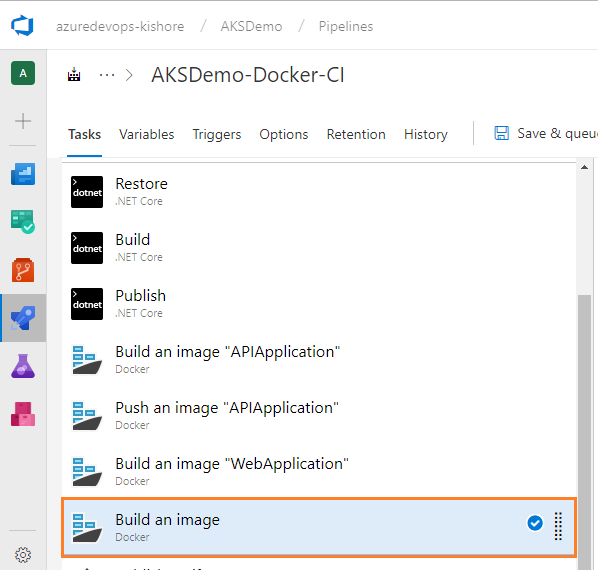
Configure third Docker task
-
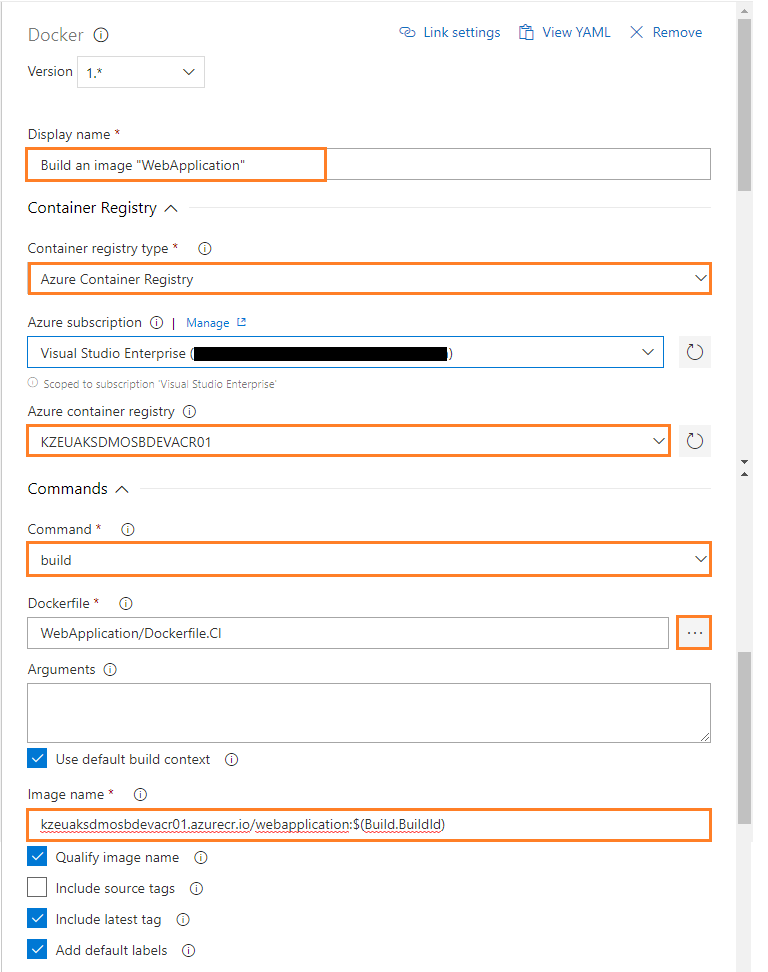
Configure the above Docker task for Build an Image of WebApplication as follows:
-
Display name: Build an image “WebApplication”
-
Container registry type: Select a Container Registry Type. For example: Azure Container Registry
-
Azure subscription: Select an Azure subscription
-
Azure container registry: Select an Azure Container Registry. For example: KZEUAKSDMOSBDEVACR01
-
Command: Select a Docker command. For example: build
-
Dockerfile: Path to the Docker file to use. Must be within the Docker build context. For example: WebApplication/Dockerfile.CI
-
Check the Use default build context: Set the build context to the directory that contains the Docker file.
-
Image name: Name of the Docker image to build. For example: kzeuaksdmosbdevacr01.azurecr.io/webapplication:$(Build.BuildId)
-
Check the Qualify image name: Qualify the image name with the Docker registry connection’s hostname if not otherwise specified.
-
Push an image of WebApplication
-
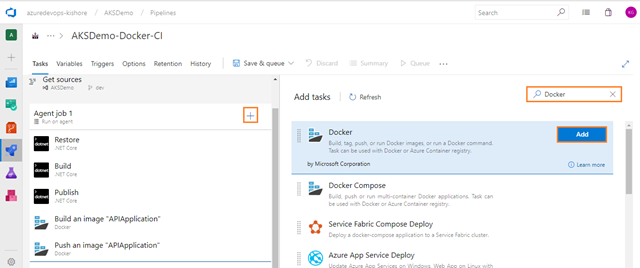
Next, add one more Docker task for pushing the image of WebApplication into Azure Container Registry. For that select Tasks tab, select the plus sign (+) to add a task to Job 1. On the right side, type “Docker” in the search box and click on the Add button of Docker build task as shown in the figure below:
Configure fourth Docker task
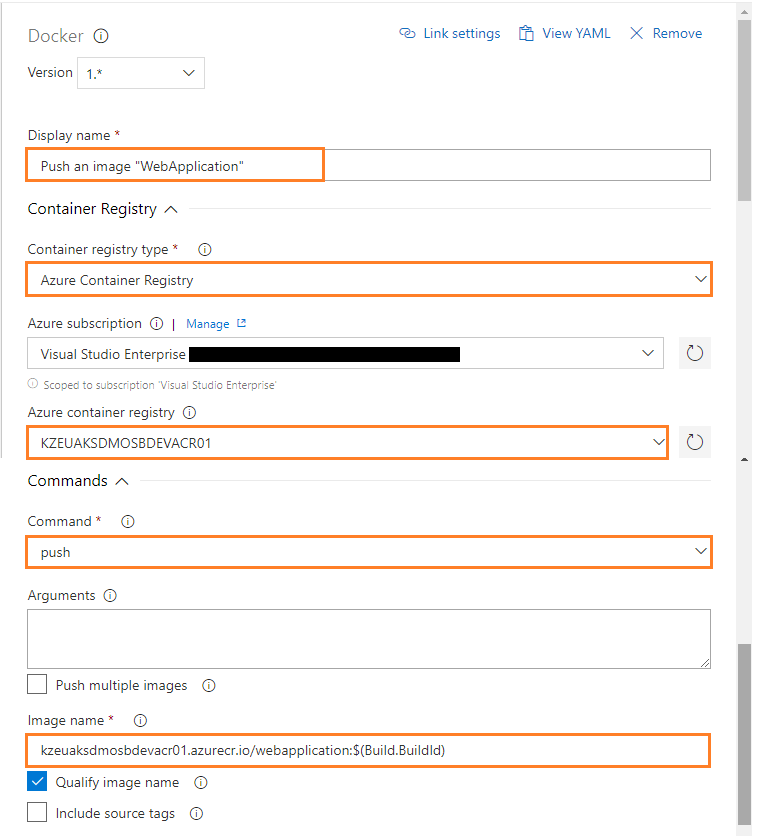
- Configure the above Docker task for Push an Image of WebApplication as follows:
- Display name: Push an image “WebApplication”
- Container registry type: Select a Container Registry Type. For example: Azure Container Registry
- Azure subscription: Select an Azure subscription
- Azure container registry: Select an Azure Container Registry. For example: KZEUAKSDMOSBDEVACR01
- Command: Select a Docker action. For example:push
- Image name: Name of the Docker image to push. For example: kzeuaksdmosbdevacr01.azurecr.io/apiapplication:$(Build.BuildId)
- Check the Qualify image name: Qualify the image name with the Docker registry connection’s host name, if not otherwise specified.
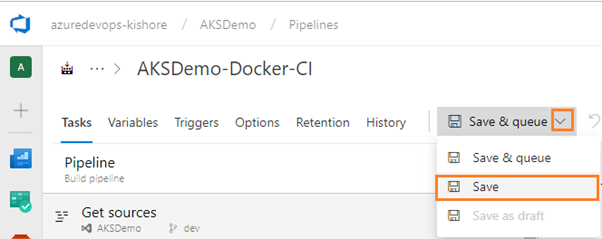
- Click on Save:
Install Replace Tokens Azure DevOps task from Marketplace
-
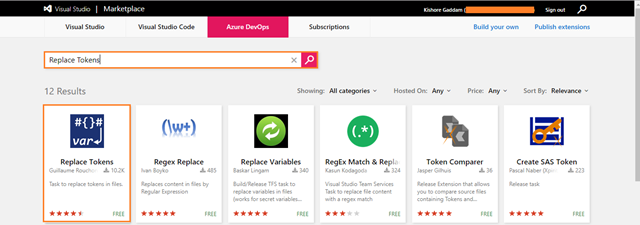
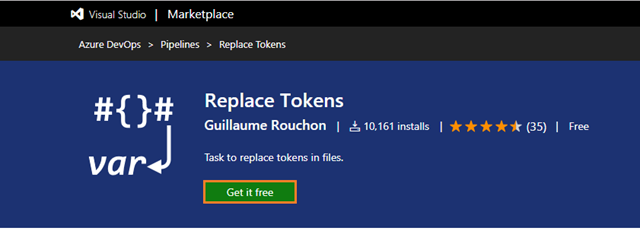
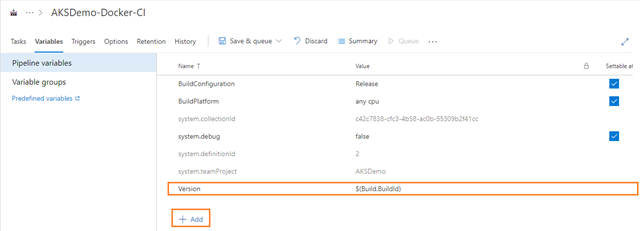
You used a variable as Version in webapplication.yaml and apiapplication.yaml for the image tag, but it doesn’t automatically get translated; so you need a separate task for this i.e Replace Tokens. But it’s currently not in Azure DevOps, therefore, add a task from the Azure DevOps marketplace.
-
If you want more information about Replace Tokens task, you can refer to this link
https://marketplace.visualstudio.com/items?itemName=qetza.replacetokens
-
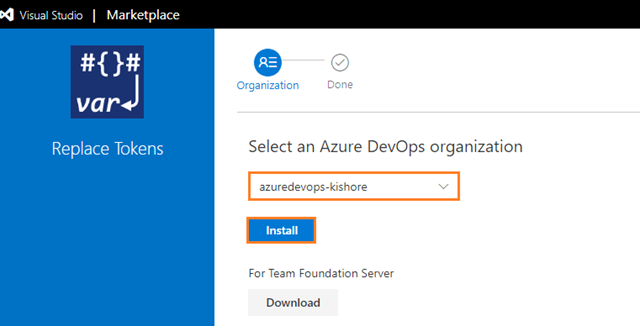
After having installed the above extension from Azure DevOps Marketplace go back to your build pipeline and refresh your current browser page.
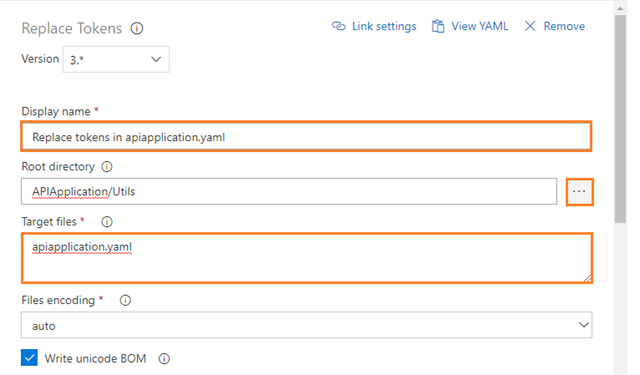
Replace tokens in apiapplication.yaml
-
Configure the above Replace Tokens task for replacing the tokens in apiapplication.yaml file as follows:
-
Display name: Replace tokens in apiapplication.yaml
-
Root directory: Base directory for searching files. If not specified, the default working directory will be used. For Example: APIApplication/Utils
-
Target files: Absolute or relative comma or newline-separated paths to the files to replace tokens. Wildcards can be used. For Example: apiapplication.yaml
-
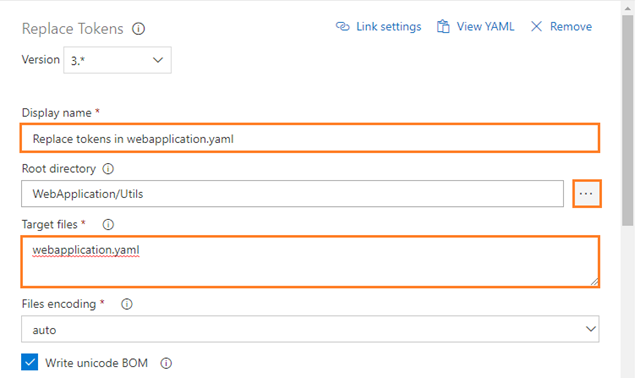
Replace tokens in webapplication.yaml
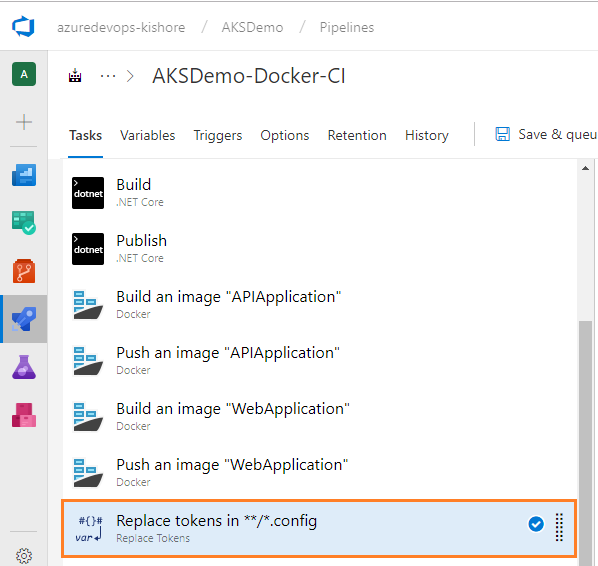
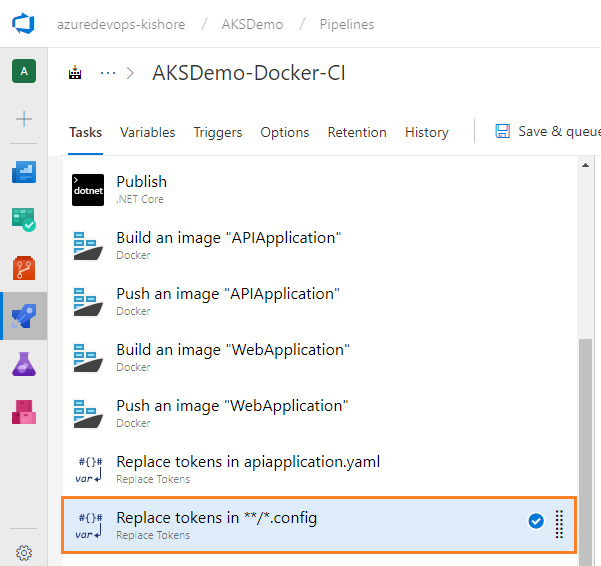
- Next, add one more Replace Tokens task for replacing tokens in the webapplication.yaml file. For that select Tasks tab and then select the plus sign (+) to add a task to Job 1. On the right side, type “Replace Tokens” in the search box and click on the Add button of Replace Tokens build task, as shown in the figure below:
- On the left side, select your new Replace Tokens task:
-
Configure the above Replace Tokens task for replacing the tokens in webapplication.yaml file as follows:
-
Root directory: Base directory for searching files. If not specified the default working directory will be used. For Example: WebApplication/Utils
-
Target files: Absolute or relative comma or newline-separated paths to the files to replace tokens. Wildcards can be used. For Example: webapplication.yaml
-
Display name: Replace tokens in webapplication.yaml
-
- To define which variable to replace head to the Variables tab and add the name “Version” and value $(Build.BuildId):
Copy Files
-
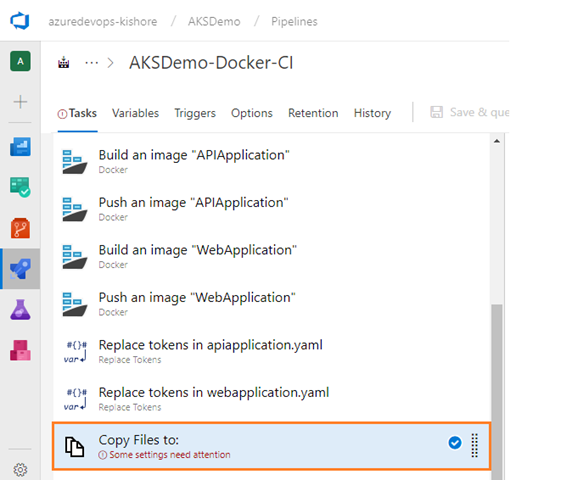
Go back to the Tasks tab then add Copy Files task, for copying the files from source folder to target folder using match patterns. For that select Tasks tab and then select the plus sign (+) to add a task to Job 1. On the right side, type “Copy Files” in the search box and click on the Add button of Copy Files build task, as shown in the figure below:
-
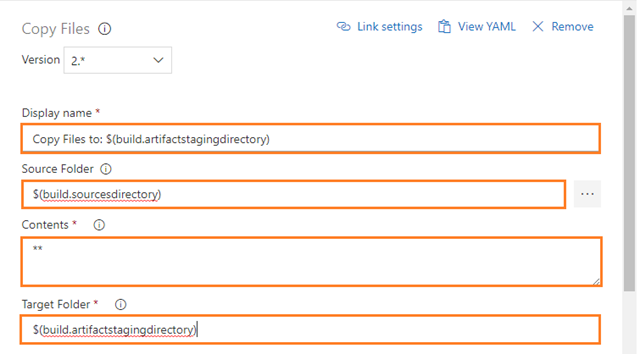
Configure the above Copy Files task for copying the files from the source folder to the target folder using match patterns as follows:
-
Display name: Copy Files to: $(build.artifactstagingdirectory)
-
Source Folder: The source folder that the copy pattern(s) will be run from. Empty is the root of the repo. For example: $(build.sourcesdirectory)
-
Contents: File paths to include as part of the copy. Supports multiple lines of match patterns. For example: **
-
Note:
If you want more information about Copy Files task you can refer this link
https://docs.microsoft.com/en-us/azure/devops/pipelines/tasks/utility/copy-files?view=vsts
Publish Build Artifacts
-
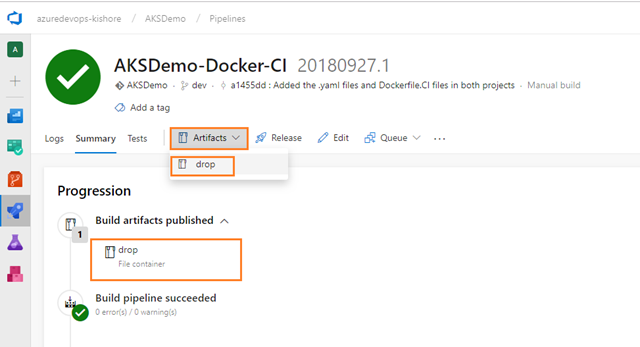
This Publish Build Artifacts task is automatically added whenever you choose ASP.NET Core as a template.
-
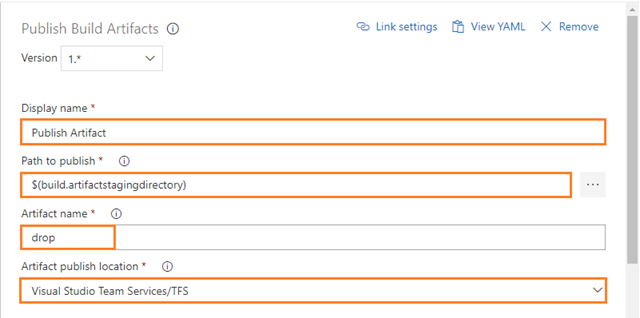
Configure the above Publish Build Artifacts task as follows:
-
Display name: Copy Files to: Publish Artifact
-
Path to publish: The folder or file path to publish. This can be a fully-qualified path or a path relative to the root of the repository. Wildcards are not supported. For example: $(build.artifactstagingdirectory)
-
Artifact name: The name of the artifact to create in the publish location. For example: drop
-
Note:
If you want more information about Publish Build Artifacts task, you can refer to this link.
Enable continuous integration
-
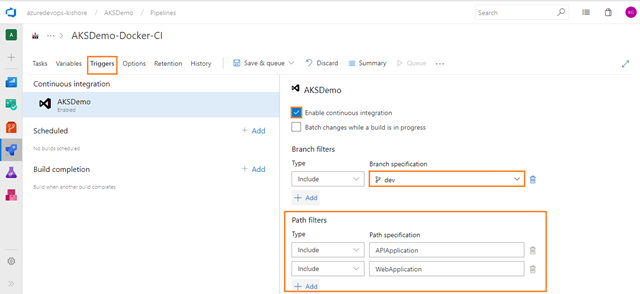
Select the Triggers tab and check the Enable continuous integration option.
-
Add the Path filters as shown in the figure below:
The above build will be triggered only if you modify the files in APIApplication and WebApplication of your team project i.e AKSDemo. This build will not be triggered, if you modify the files in the DatabaseApplication of your team project i.e AKSDemo.
Note:
Here I am adding Path filters for APIApplication and WebApplication in Triggers tab because this AKSDemo repository contains the DatabaseApplication. If not adding to the Path filters here, then you are getting the error during execution of the build. This is because currently you are using Hosted Ubuntu 1604 as Agent pool; by using this agent you are not able to restore the packages and build the DatabaseApplication. That’s why you created separated CI and CD for this DatabaseApplication in the Part-3 blog.
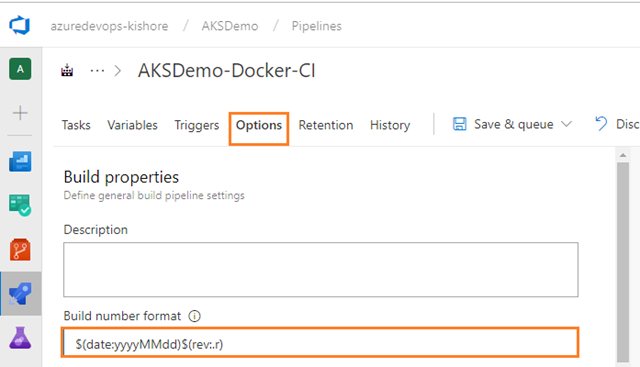
Specify Build number format
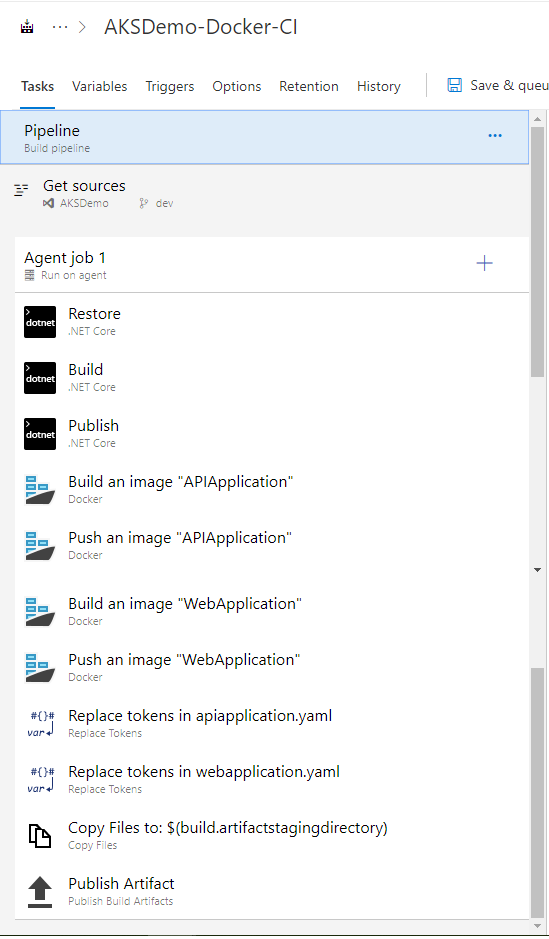
Complete Build Pipeline
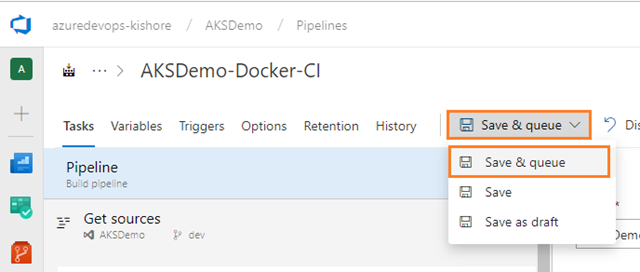
Save and queue the build
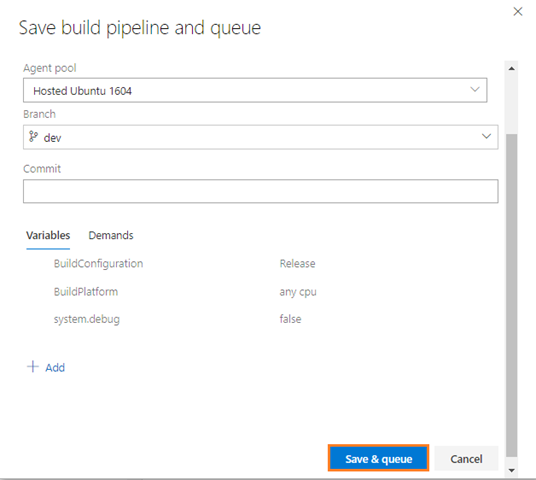
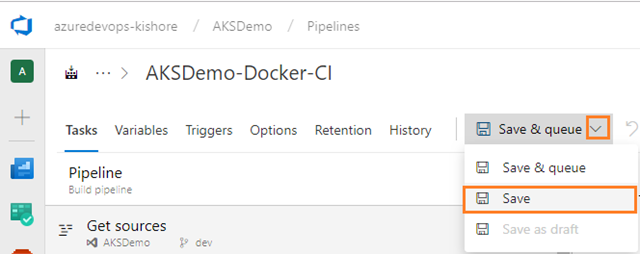
Save and queue a build manually and test your build pipeline.
-
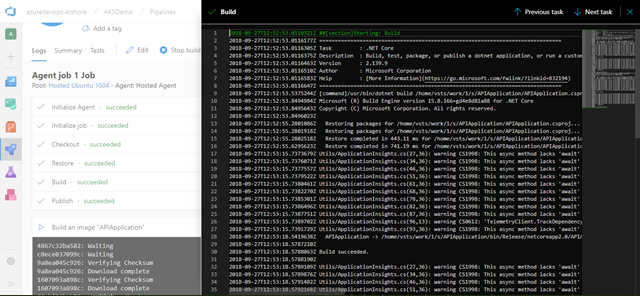
This queues a new build on the Hosted Ubuntu 1604 agent.
-
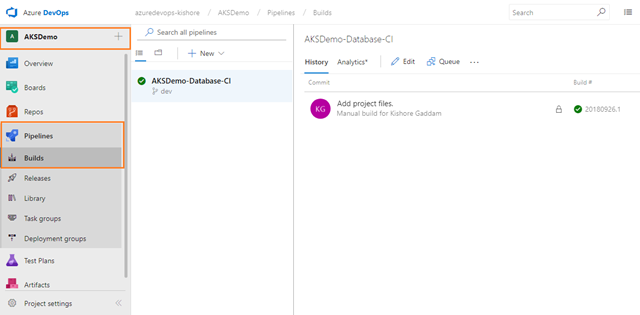
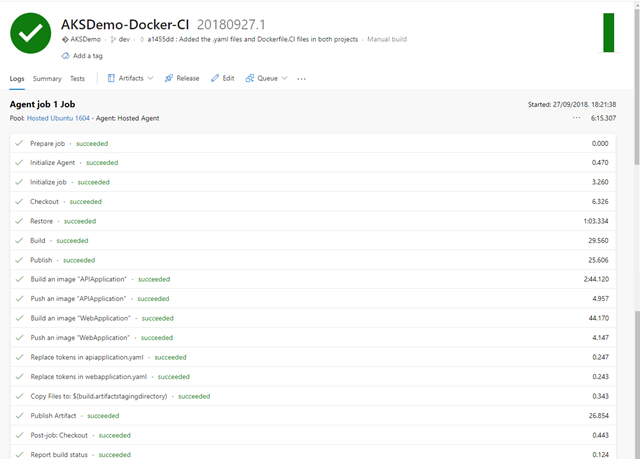
The process will take several minutes to complete this build, but with a bit of luck you will have a complete list of green checkmarks:
If something fails there should be a hint in the logs to suggest why.
Step 4. Continuous Delivery (CD), Deploy
Building a CD pipeline
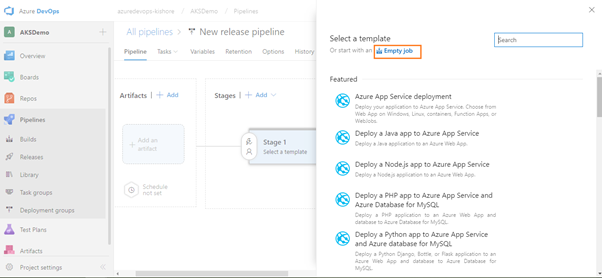
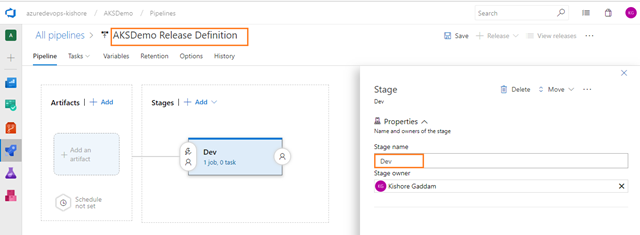
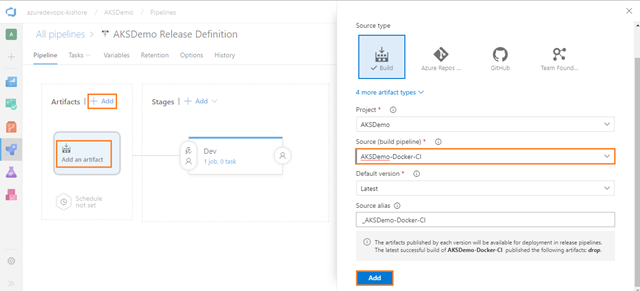
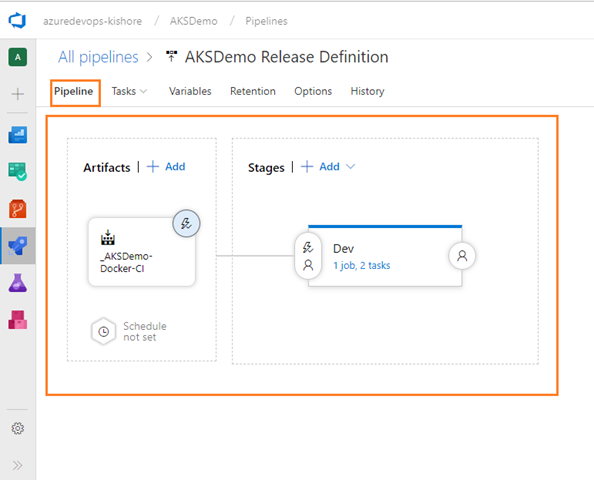
Provided the above build for APIApplication and WebApplication worked, you can nnow define our CD pipeline. Remember; CI is about building and testing the code as often as possible, and CD is about taking the (successful) results of these builds (Artifacts) and deploy into a cluster as often as possible. In general every CD definition containts the Dev, QA, UAT, Staging and Production environments. But for now this CD definition contains the Dev environment only.
Define the process for deploying the .yaml files into Azure Kubernetes Service in one stage.
Deploy .NET Core Web API Application to Kubernetes Cluster
-
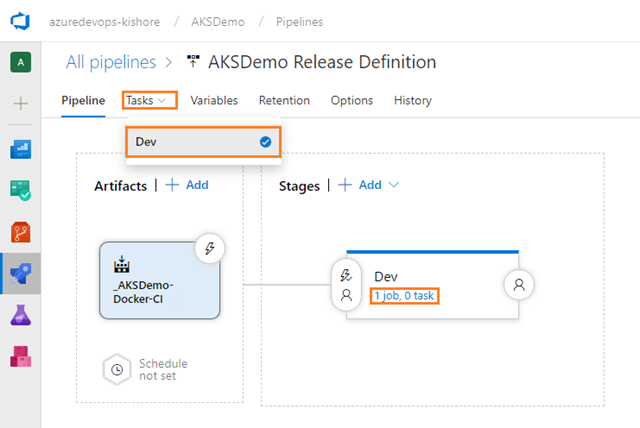
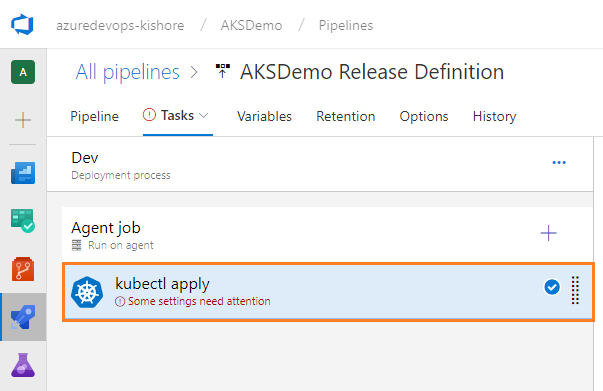
Add a Deploy to Kubernetes task, for Deploy, configure, and update your Kubernetes cluster in Azure Kubernetes Service by running kubectl commands. For that select Tasks tab and then select the plus sign (+) to add a task to Agent job. On the right side, type “kubernetes” in the search box and click on the Add button of Deploy to Kubernetes task, as shown in the figure below:
Configure Deploy to Kubernetes task
-
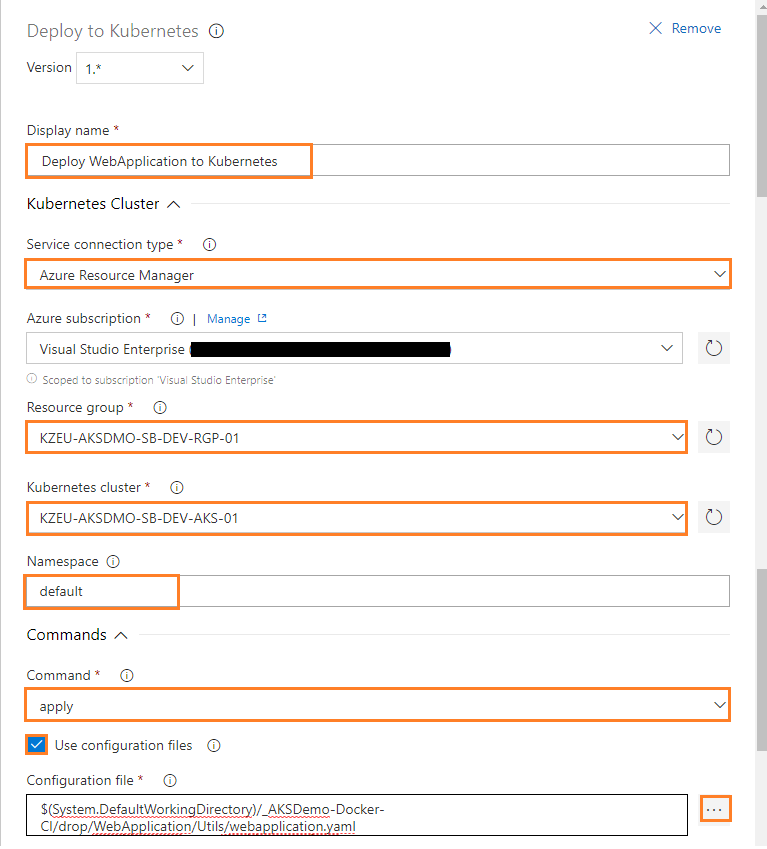
Configure the above Deploy to Kubernetes task for Deploy, configure and update your Kubernetes cluster in Azure Kubernetes Service by running kubectl commands.
-
Display name: Deploy APIApplication to Kubernetes
-
Service connection type: Select a service connection type. Here I can choose type as Azure Resource Manager.
-
Azure subscription: Select the Azure Resource Manager subscription, which contains Azure Container Registry.Note: To configure new service connection, select the Azure subscription from the list and click ‘Authorize’. If your subscription is not listed or if you want to use an existing Service Principal, you can setup an Azure service connection using ‘Add’ or ‘Manage’ button.
Note: To configure a new service connection select the Azure subscription from the list and click ‘Authorize’.
If your subscription is not listed or if you want to use an existing service principal, you can setup an Azure service connection using the ‘Add’ or ‘Manage’ button.
-
Resource group: Select an Azure resource group which contains Azure kubernetes service. For Example: KZEU-AKSDMO-SB-DEV-RGP-01
-
Kubernetes cluster: Select an Azure managed cluster. For Example: KZEU-AKSDMO-SB-DEV-AKS-01
-
Namespace: Set the namespace for the kubectl command by using the –namespace flag. If the namespace is not provided, the commands will run in the default namespace. For Example: default
-
Command: Select or specify a kubectl command to run. For Example: apply
-
Check the Use configuration files to Use Kubernetes configuration file with the kubectl command. Filename, directory, or URL to Kubernetes configuration files can also be provided.
-
Deploy .NET Core Web Application to Kubernetes Cluster
-
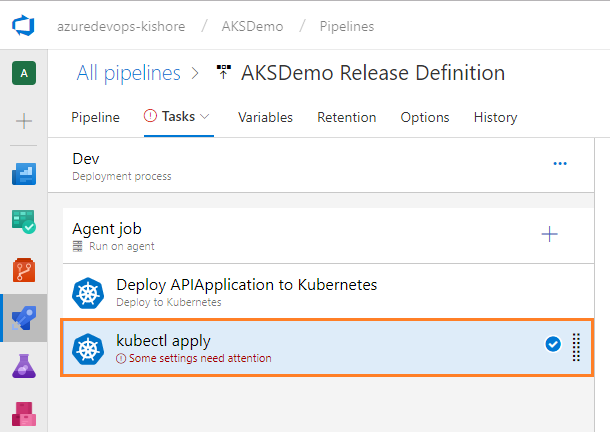
Next, add one more Deploy to Kubernetes task, for Deploy, configure, and update your Kubernetes cluster in Azure Kubernetes Service by running kubectl commands For that select Tasks tab and then select the plus sign (+) to add a task to Agent job. On the right side, type “kubernetes” in the search box and click on the Add button of Deploy to Kubernetes task, as shown in the figure below:
Configure Deploy to Kubernetes task
-
Configure the above Deploy to Kubernetes task to deploy, configure, and update your Kubernetes cluster in Azure Kubernetes Service. For this, run the following kubectl commands.
-
Display name: Deploy WebApplication to Kubernetes
-
Service connection type: Select a service connection type. Here I can choose type as Azure Resource Manager.
-
Azure subscription: Select the Azure Resource Manager subscription, which contains Azure Container Registry. Note: To configure a new service connection, select the Azure subscription from the list and click ‘Authorize’. If your subscription is not listed or if you want to use an existing Service Principal, you can setup an Azure service connection using the ‘Add’ or ‘Manage’ button.
Note: To configure new a service connection, select the Azure subscription from the list and click ‘Authorize’.
If your subscription is not listed or if you want to use an existing service principal, you can setup an Azure service connection using the ‘Add’ or ‘Manage’ button.
-
Resource group: Select an Azure resource group which contains Azure kubernetes service. For Example: KZEU-AKSDMO-SB-DEV-RGP-01
-
Kubernetes cluster: Select an Azure managed cluster. For Example: KZEU-AKSDMO-SB-DEV-AKS-01
-
Namespace: Set the namespace for the kubectl command by using the –namespace flag. If the namespace is not provided, the commands will run in the default namespace. For Example: default
-
Command: Select or specify a kubectl command to run. For Example: apply
-
Check the Use configuration files to Use Kubernetes configuration file with the kubectl command. Filename, directory, or URL to Kubernetes configuration files can also be provided.
-
Specify Release number format
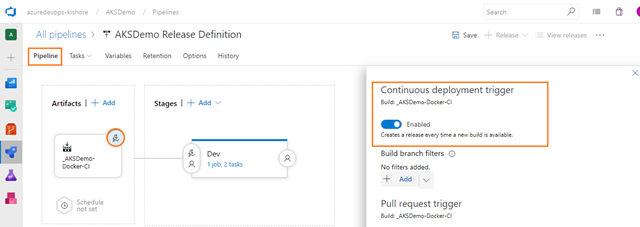
Enable continuous deployment trigger
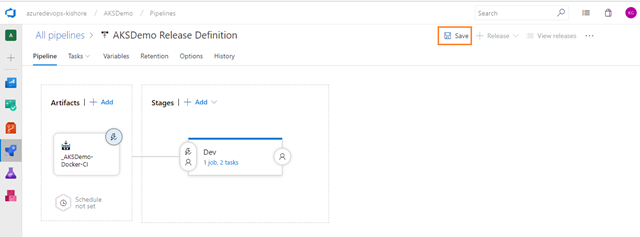
Complete Release Pipeline
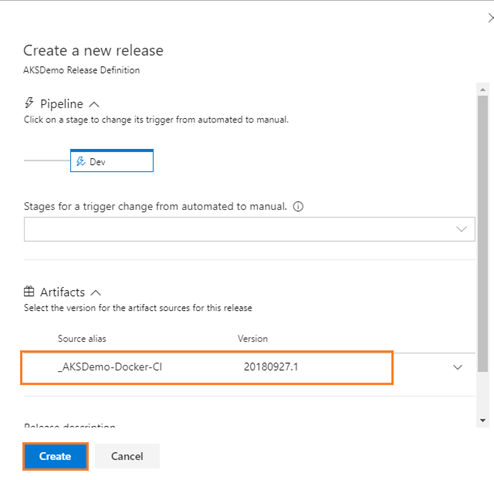
Deploy a release
-
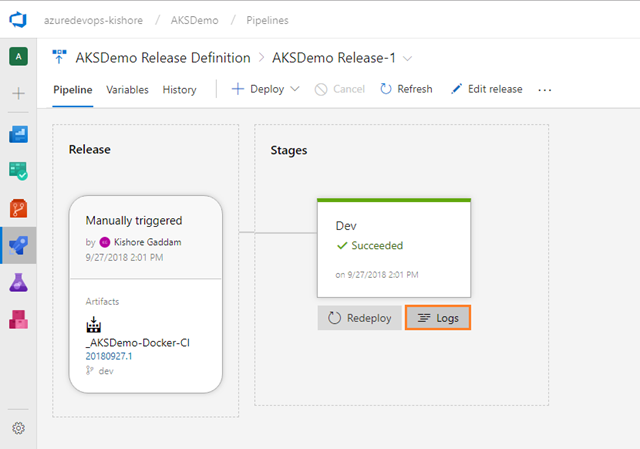
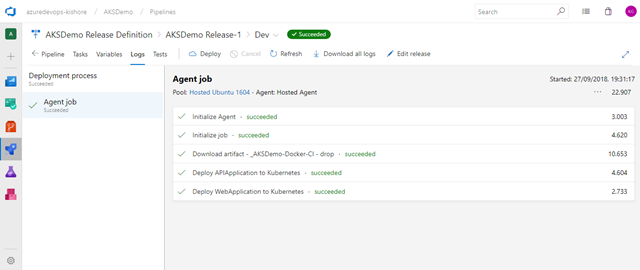
Note: You can track the progress of each release to see if it has been deployed to all the stages. You can track the commits that are part of each release, the associated work items, and the results of any test runs that you’ve added to the release pipeline.
If something fails, there should be a hint in the logs to suggest why.
Now everything completed to setup the build and release definitions for Web Application and API Application. But while doing the initial setup, you have to create the build and release manually without using automatic triggers of the build and release definitions.
From next time onwards, you can modify the code in either API Application or Web Application and check-in your code. This time it will automatically build and then get deployed all the way to the Dev stage, because you already enabled the automatic triggers for both build and release definitions.
Step 5. Run and manage
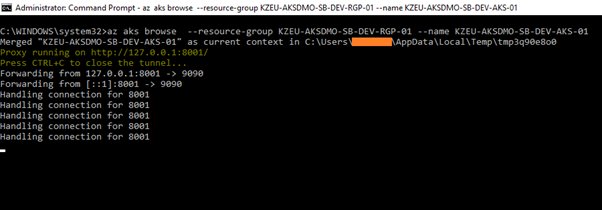
Once the above build and release succeeded, open the command prompt in administrator mode in your local machine and enter the below command:
az aks browse –resource-group <Resource Group Name> –name <AKS Cluster Name>
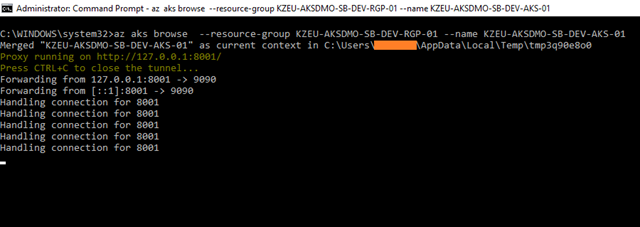
For example: az aks browse –resource-group KZEU-AKSDMO-SB-DEV-RGP-01 –name KZEU-AKSDMO-SB-DEV-AKS-01
Note:
If you are getting the error by running the above command, then you need to follow Connect to the cluster steps.
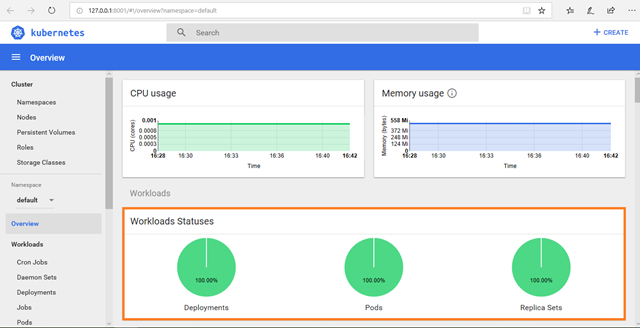
This will launch a browser tab for you with a graphical representation:
In the above kubernetes dashboard you can see the Workloads Statuses with complete Green. This means that there are no failures.
Deployments:
Pods:
Replica Sets:
Services
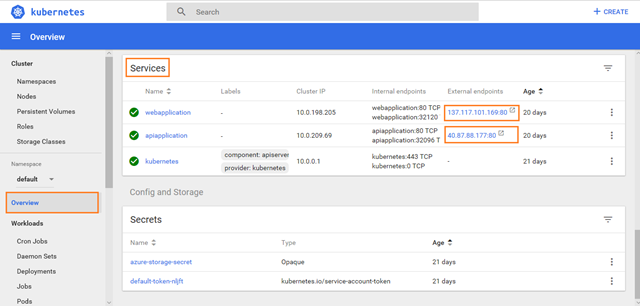
Further down on the same page you will see the Services section where you can observe the External Endpoints of your images like webapplication and apiapplciation:
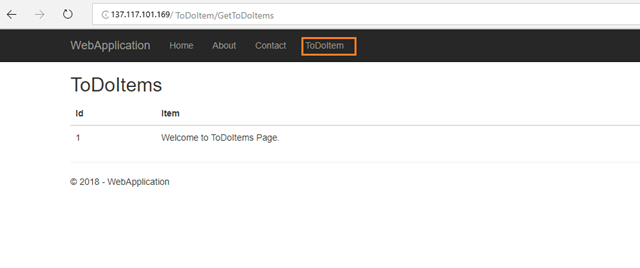
Click on the above External Endpoints of webapplication and apiapplication services.
apiapplication:
webapplication:
Step 6. Monitor and diagnose
This step is not explained here. But after some time I will come up with a new blog to monitor and diagnose.

