Database application DevOps workflow with Microsoft tools
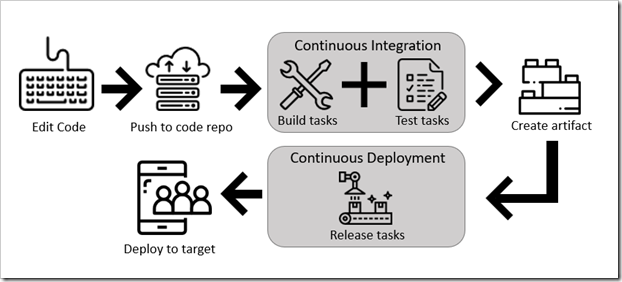
Steps in the outer-loop DevOps workflow for a Database application
The outer-loop end-to-end workflow is represented in the above Figure. Now, let’s drill down on each of its steps.
Prerequisites for the outer-loop
-
Microsoft Azure Account: You will need a valid and active Azure account for this blog/document. If you do not have one, you can sign up for a free trial
-
If you are a Visual Studio Active Subscriber, you are entitled for a $50-$150 Azure credit per month. You can refer to this link to find out more including how to activate and start using your monthly Azure credit.
-
If you are not a Visual Studio Subscriber, you can sign up for the FREE Visual Studio Dev Essentials program to create Azure free account (includes 1 year of free services, $200 for 1st month).
-
-
You will need an Azure DevOps Account. If you do not have one, you can sign up for free here
Step 1. Inner loop development workflow for a Database application
This step was explained in detail in the Part-2 blog/document, but here is where the outer-loop also starts, in the very precise moment when a developer pushes code to the source control management system (like Git) triggering Continuous Integration (CI) pipeline executions.
Share your code with Visual Studio 2017 and Azure DevOps Git
Share your Visual Studio solution i.e AKSDemo.sln in a new Azure DevOps Git repo.
Create a local Git repo for your project
-
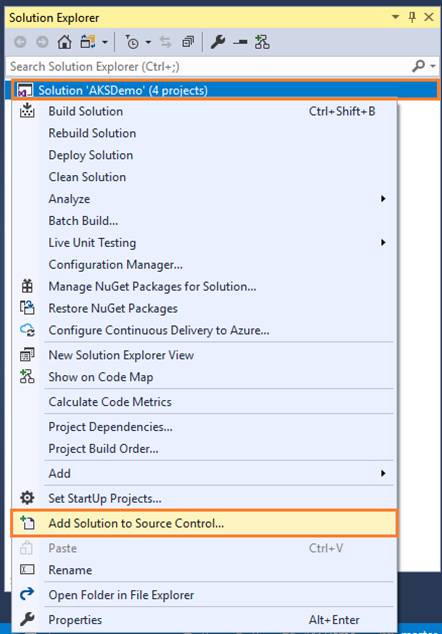
Go to Solution Explorer i.e AKSDemo.sln in your Visual Studio 2017,
This will create a new repository in the folder of the solution and commit your code there. Once you have a local repo, select items in the status bar to quickly navigate between Git tasks in Team Explorer:
![]() Shows the number of unpublished commits in your local branch. Selecting this will open the Sync view in Team Explorer.
Shows the number of unpublished commits in your local branch. Selecting this will open the Sync view in Team Explorer.
![]() Shows the number of uncommitted file changes. Selecting this will open the Changes view in Team Explorer.
Shows the number of uncommitted file changes. Selecting this will open the Changes view in Team Explorer.
![]() Shows the current Git repo. Selecting this will open the Connect view in Team Explorer.
Shows the current Git repo. Selecting this will open the Connect view in Team Explorer.
![]() Shows your current Git branch. Selecting this displays a branch picker to quickly switch between Git branches or create new branches.
Shows your current Git branch. Selecting this displays a branch picker to quickly switch between Git branches or create new branches.
Note
If you don’t see any icons such as ![]() or
or![]() , ensure that you have a project open that is part of a Git repo. If your project is brand new or not yet added to a repo, you can add it to one by selecting
, ensure that you have a project open that is part of a Git repo. If your project is brand new or not yet added to a repo, you can add it to one by selecting ![]() on the status bar, or by right-clicking your solution in Solution Explorer and choosing Add Solution to Source Control.
on the status bar, or by right-clicking your solution in Solution Explorer and choosing Add Solution to Source Control.
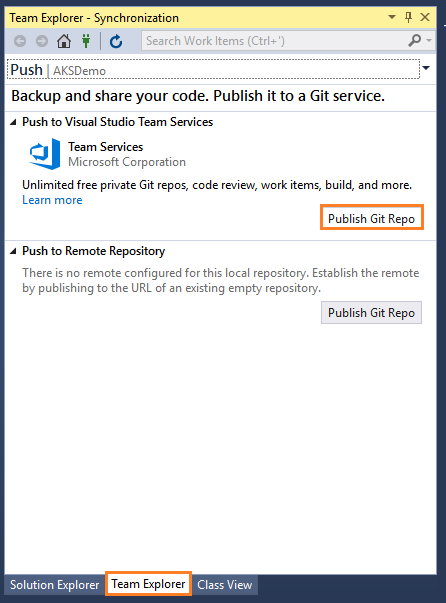
Publish your code to Azure DevOps
-
Select your account in the Team Services Domain drop-down.
-
Note:
The new repository contains the four projects like DatabaseApplication, APIApplication, WebApplication and docker-compose.
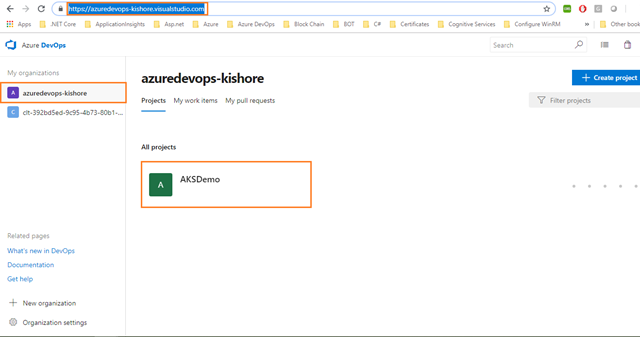
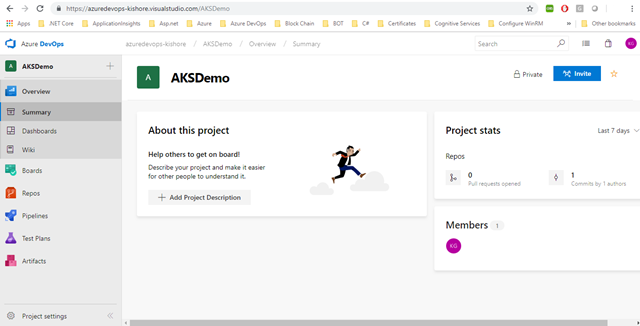
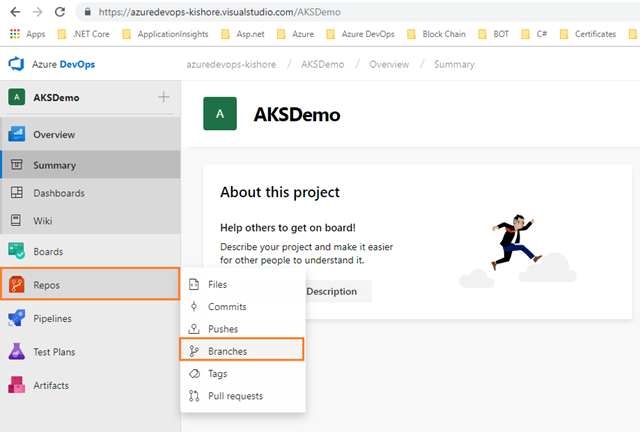
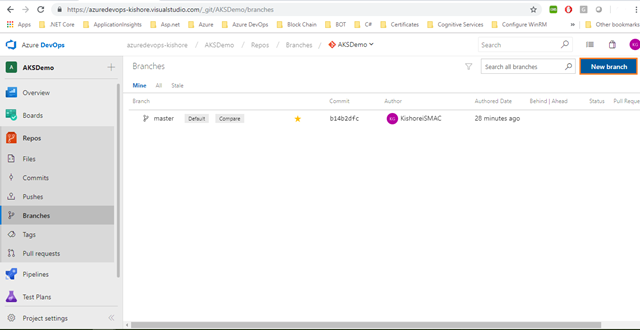
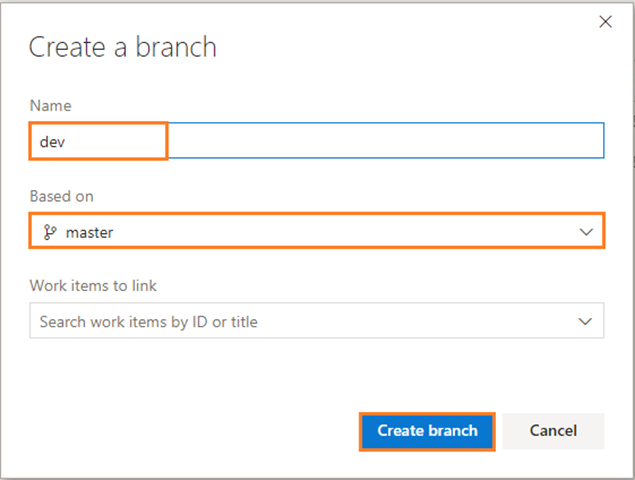
Create a new branch from the web
-
Select Create branch. Now, a new branch is ready for you to work in.
Note:
You will need to fetch the branch before you can see it and swap to it in your local repo.
Step 2. SCC integration and management with Azure DevOps
Here, we are using Azure DevOps and Git for managing the source code pushed by developers into specified repository (for example AKSDemo) and creating the Build and Release Pipelines.
Now, we are ready to create specifications of our pipeline from Visual Studio to a deploy database application. We need two definitions for this:
-
How Azure DevOps should build the code of Database application
-
How Azure DevOps should deploy DACPAC file into Azure SQL Database
Step 3. Build, CI, Integrate with Azure DevOps
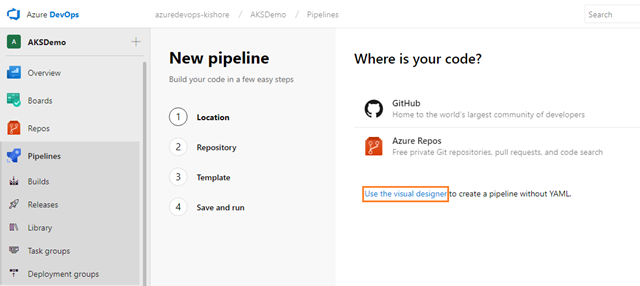
Use Azure Pipelines in the visual designer
You can create and configure your build and release pipelines in the Azure DevOps web portal with the visual designer:
-
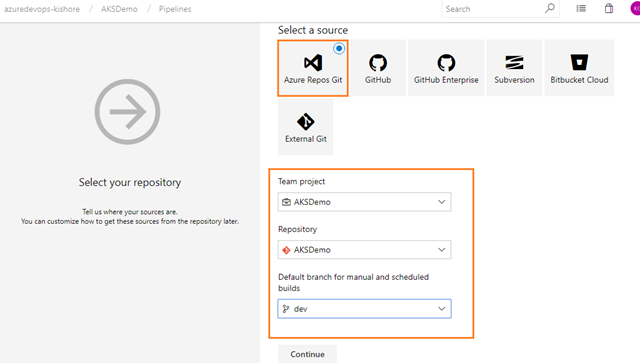
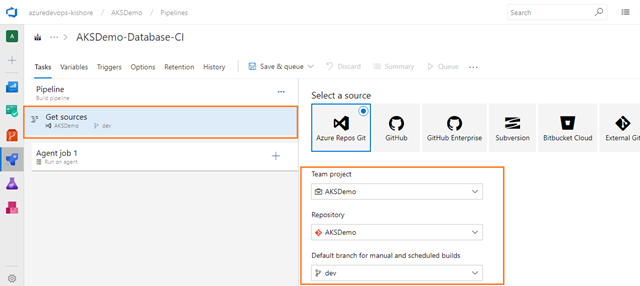
Configure Azure Pipelines to use your Git repo.
-
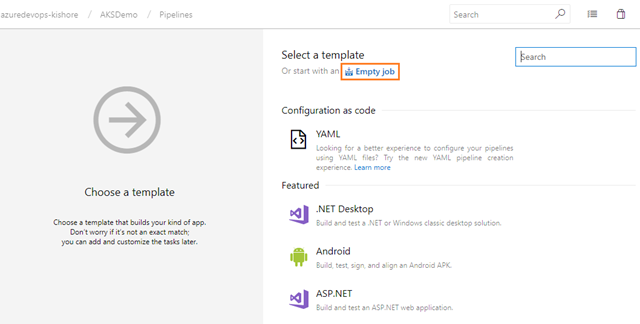
Use the Azure Pipelines visual designer to create and configure your build and release pipelines.
-
Push your code to your version control repository which triggers your pipeline, running any tasks such as building or testing code.
-
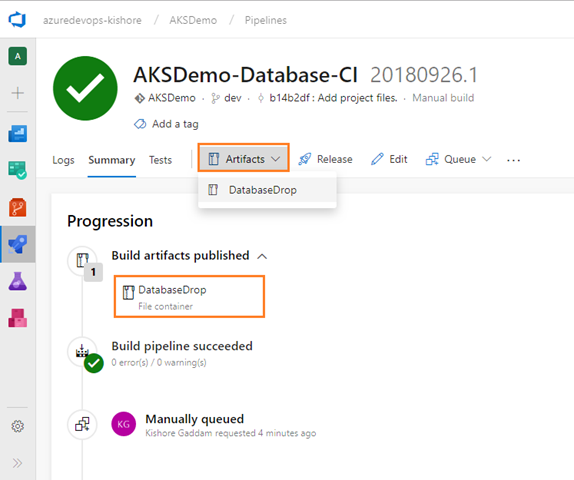
The build creates an artifact that is used by the rest of your pipeline, running any tasks such as deploying to staging or production.
-
Your code is now updated, built, tested, and packaged and can be deployed to any target.
Benefits of using the visual designer
The visual designer is great for users who are new to CI and CD.
-
The visual representation of the pipelines makes it easier to get started
-
The visual designer is located in the same hub as the build results, making it easier to switch back and forth and make changes if needed
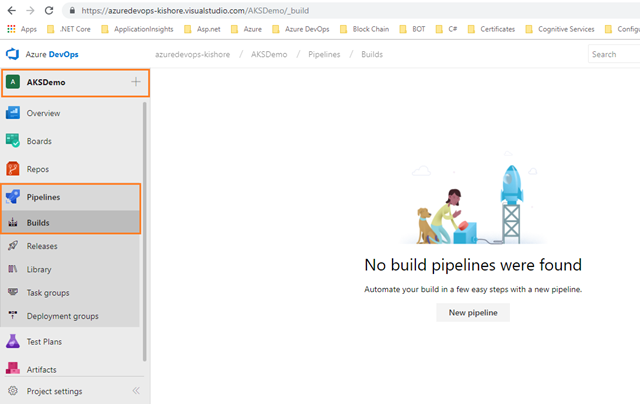
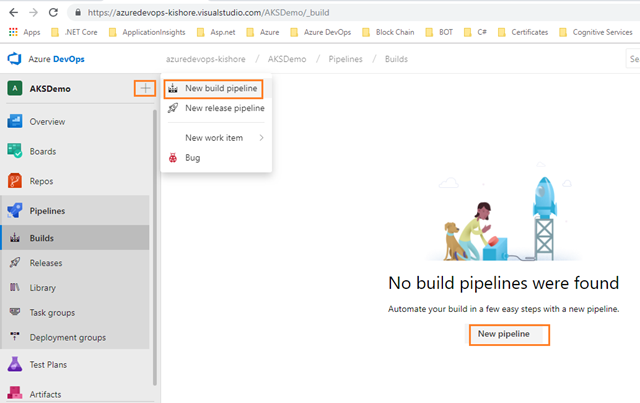
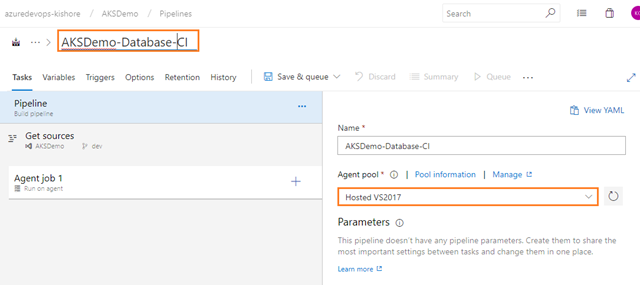
Create a build pipeline
-
Create a build pipeline that’s to build your DatabaseApplication and create artifacts.
MSBuild
-
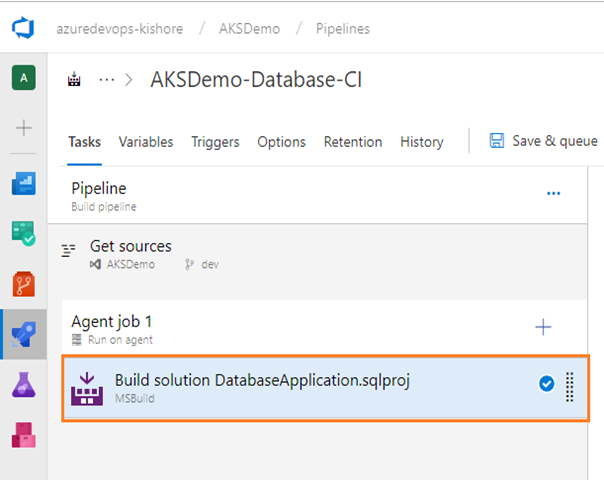
Now, you want to configure the above MSBuild task for building your database project.
-
Configure the MSBuild task as follows:
-
Display name: Build solution DatabaseApplication.sqlproj
- Project: Relative path from repo root of the project(s) or solution(s) to run. Wildcards can be used. For Example: DatabaseApplication/DatabaseApplication.sqlproj
- MSBuild Version: If the preferred version cannot be found, the latest version found will be used instead. On a macOS agent, xbuild (Mono) will be used if version is lower than 15.0. For Example: Latest
- MSBuild Architecture: Optionally supply the architecture (x86, x64) of MSBuild to run. For Example: MSBuild x86
- MSBuild Arguments: Additional arguments passed to MSBuild (on Windows) and xbuild (on macOS). For Example: /t:build /p:CmdLineInMemoryStorage=True
-
Note:
If you want to know more about the MSBuild task, you can refer to this link
https://docs.microsoft.com/en-us/azure/devops/pipelines/tasks/build/msbuild?view=vsts
Copy Files
-
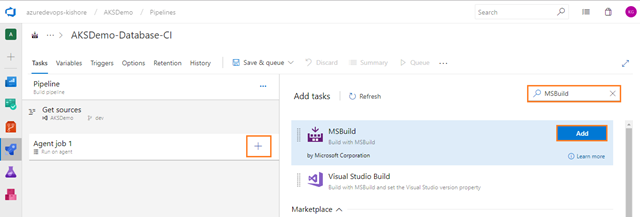
Next, add Copy Files task for copying the files from source folder to target folder using match patterns. On the Tasks tab, select the plus sign (+) to add a task to Job 1. On the right side, type “Copy Files” in the search box, and click on the Add button of Copy Files build task as shown in the figure below:
-
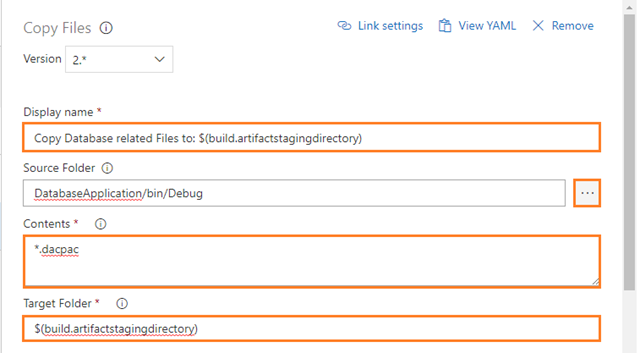
Configure the above Copy Files task for copying the files from the source folder to the target folder using match patterns as follows:
-
Display name: Copy Database related Files to: $(build.artifactstagingdirectory)
-
Source Folder: The source folder that the copy pattern(s) will be run from. Empty is the root of the repo. For example: DatabaseApplication/bin/Debug
-
Contents: File paths to include as part of the copy. Supports multiple lines of match patterns. For example: *.dacpac
-
Target Folder: Target folder or UNC path files will copy to.
-
Note:
If you want to know more about the Copy Files task, you can refer to this link
https://docs.microsoft.com/en-us/azure/devops/pipelines/tasks/utility/copy-files?view=vsts
Publish Build Artifacts
-
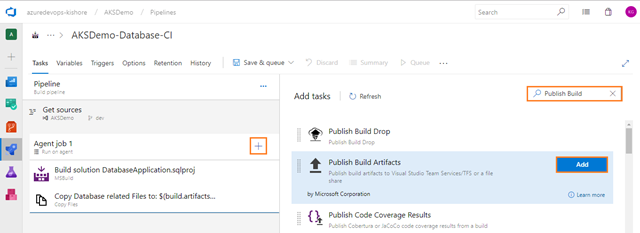
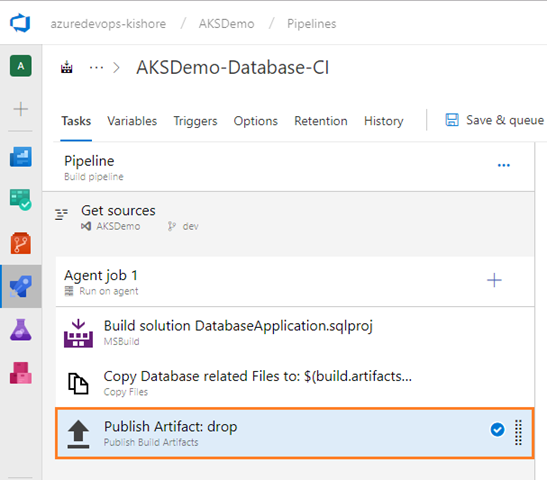
Next, add Publish Build Artifacts task for Publish build artifacts to Visual Studio Team Services. On the Tasks tab, select the plus sign (+) to add a task to Job 1. On the right side, type “Publish Build” in the search box and click on the Add button of Publish Build Artifacts, as shown in the figure below:
-
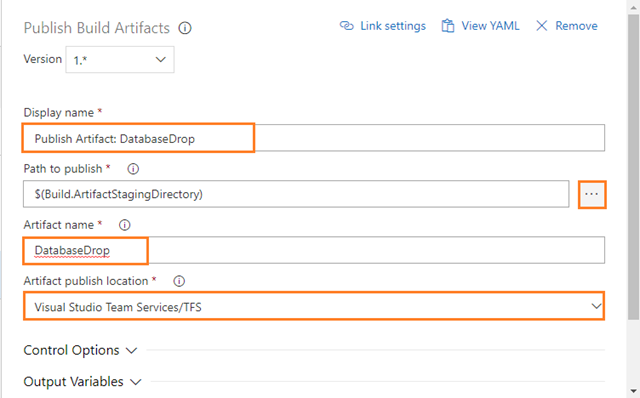
Configure the above Publish Build Artifacts task as follows:
-
Display name: Publish Artifact: DatabaseDrop
-
Path to publish: The folder or file path to publish. This can be a fully-qualified path or a path relative to the root of the repository. Wildcards are not supported. For example: $(build.artifactstagingdirectory)
-
Artifact name: The name of the artifact to create in the publish location. For example: DatabaseDrop
-
Note:
If you want to know more about the Publish Build Artifacts task, you can refer to this link
Note:
Artifacts are the files that you want your build to produce. Artifacts can be nearly anything your team needs to test or deploy your app. For example, you have .DLL and .EXE executable files and .PDB symbols file of a C# or C++ .NET Windows app.
To produce artifacts, we provide tools such as copying with pattern matching and a staging directory in which you can gather your artifacts before publishing them. See Artifacts in Azure Pipelines.
Enable continuous integration (CI)
-
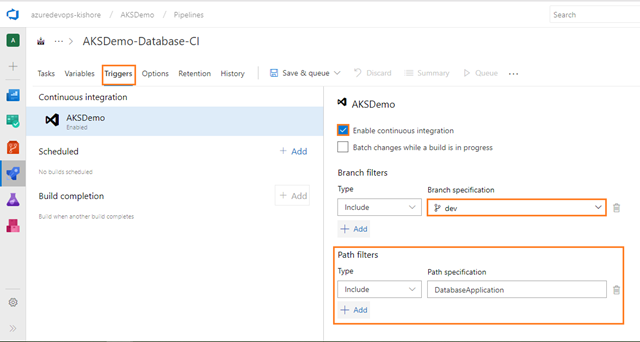
Select the Triggers tab and check the Enable continuous integration option.
The above build is triggered only if you modify the files in the DatabaseApplication of your team project i.e AKSDemo. This build will not be triggered, if you modify the files in APIApplication and WebApplication of your team proejct i.e AKSDemo.
Note:
Here I am adding Path filters for the DatabaseApplication in the Triggers tab because this AKSDemo repository contains APIApplication and WebApplication. If not added, the Path filters then for every commit this build will trigger. This is not recommended and that’s why I added the path filters for this build pipeline. This build will be triggered whenever developers modify the files in the DatabaseApplication project and commit changes into your team project i.e AKSDemo.
One more reason to add the path filters for this build pipeline is that whenever developers modify the files in both the APIApplication and the WebApplication, they commit changes into your team project i.e AKSDemo. At that time you are getting the error while execution of this build. because currently you are using Hosted VS2017 as Agent pool. By using this agent you are not able to build and push linux images into the Azure Container Registry. That’s why you have to create separate CI and CD for the APIApplication andthe WebApplication in the next part or further steps.
Note:
A continuous integration trigger on a build pipeline indicates that the system should automatically queue a new build whenever a code change is committed. You can make the trigger more general or more specific, and also schedule your build (for example, on a nightly basis). See Build triggers.
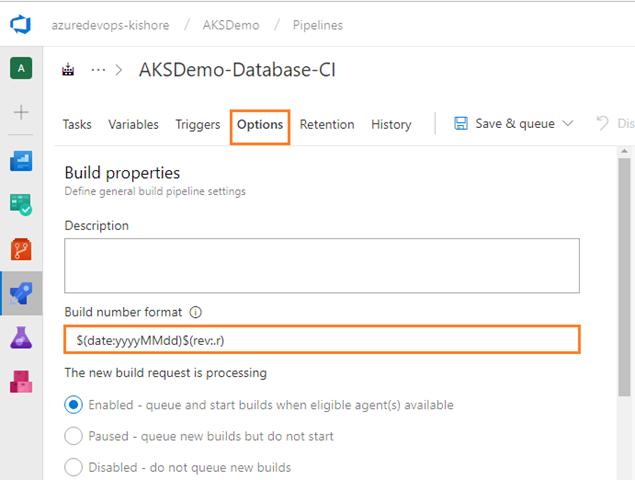
Specify Build number format
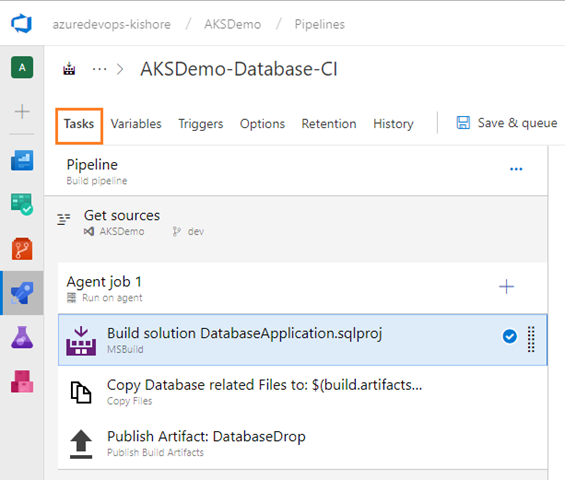
Complete Build Pipeline
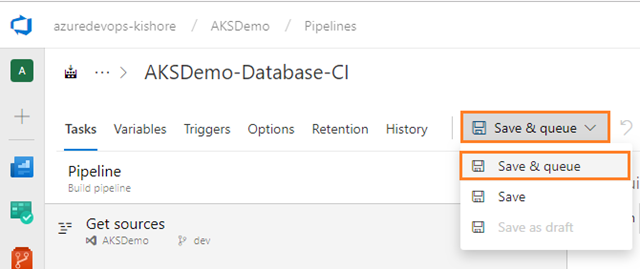
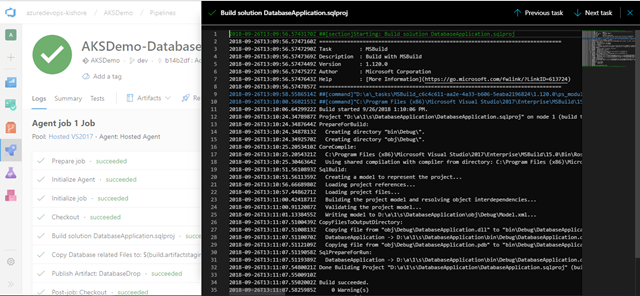
Save and queue the build
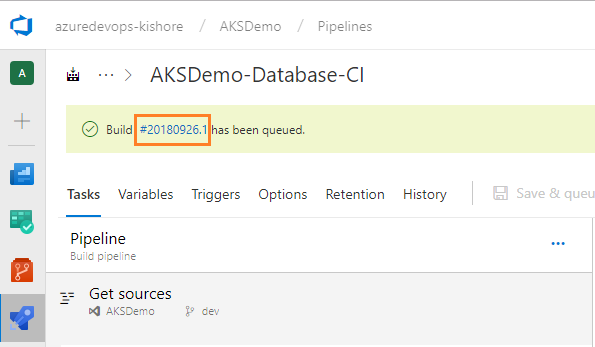
Save and queue a build manually and test your build pipeline.
Step 4. Continuous Delivery (CD), Deploy
Provided the above build for the DatabaseApplication worked, you can now define your CD pipeline. Remember; CI is about building and testing the code as often as possible, and CD is about taking the (successful) results of these builds (Artifacts) and deploy into a target resource as often as possible. In general every CD definition has the Dev, QA, UAT, Staging and Production environments. But for now this CD definition has the Dev environment, only.
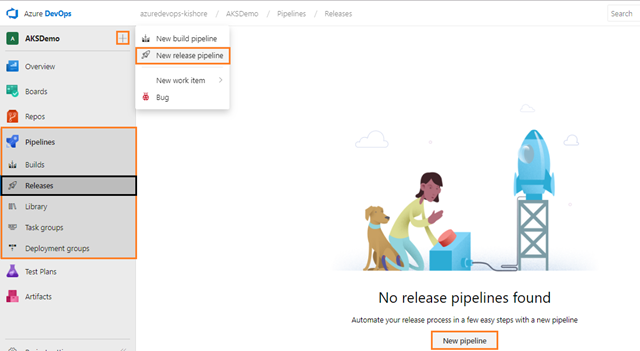
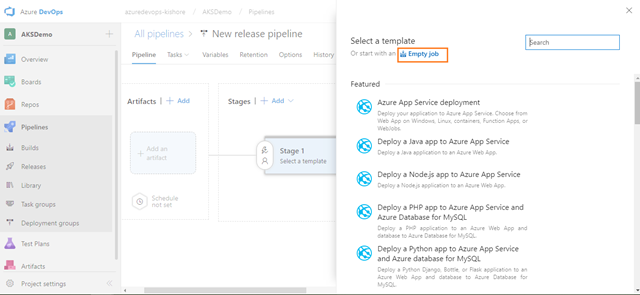
Create a release pipeline
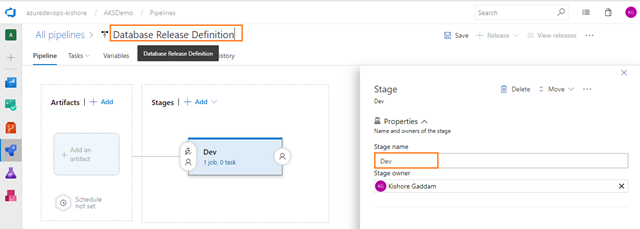
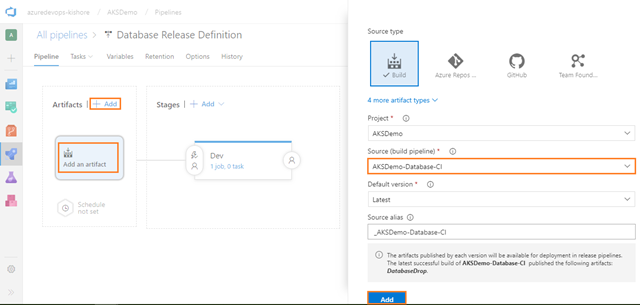
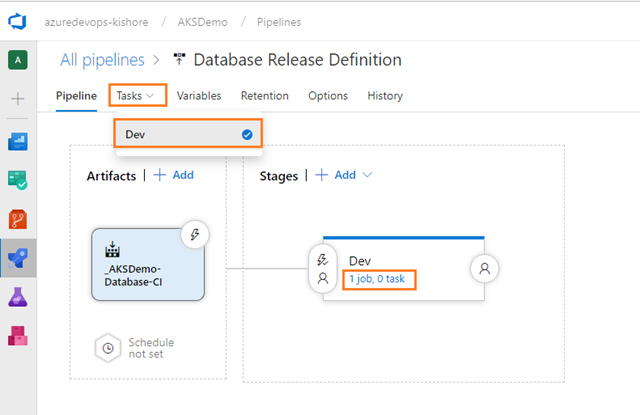
Define the process for deploying the .dacpac file into Azure SQL Database in one stage.
Azure SQL Database Deployment
-
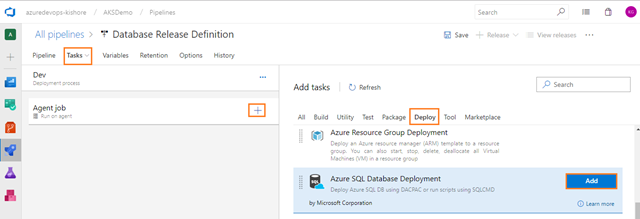
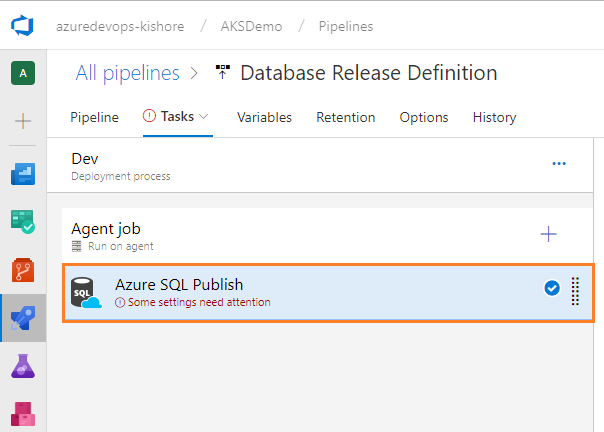
Add the Azure SQL Database Deployment task for deploying an Azure SQL Database to an existing Azure SQL Server by using either DACPACs or SQL Server scripts.
-
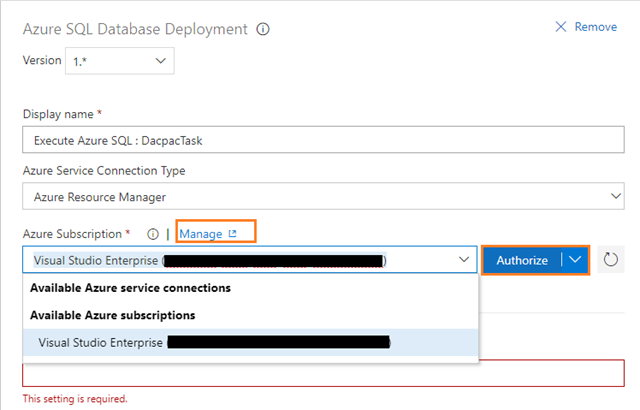
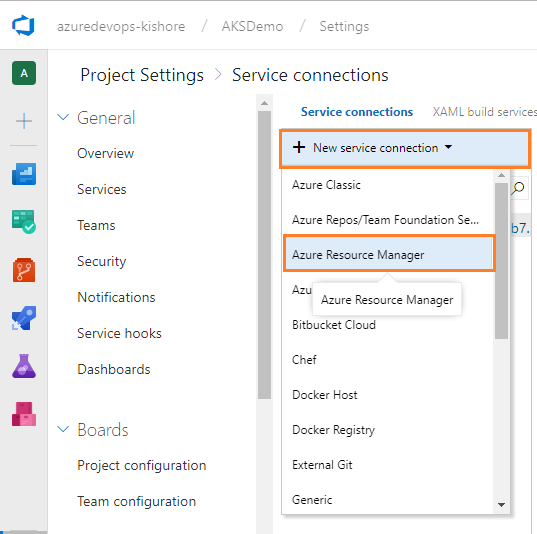
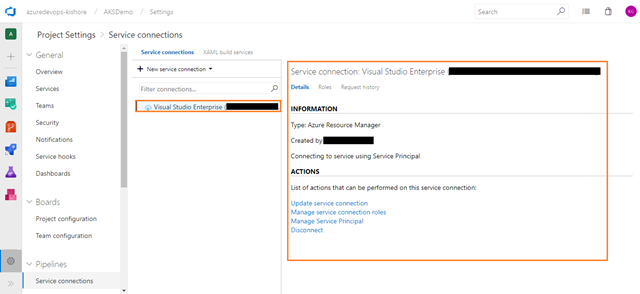
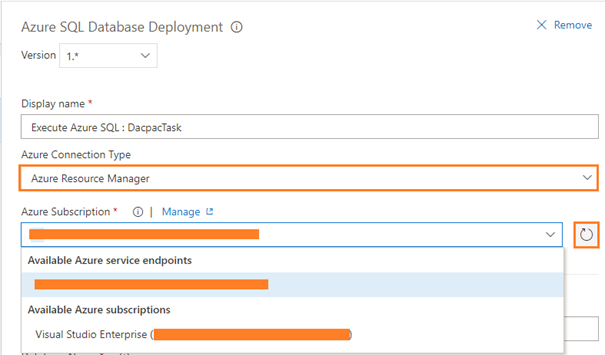
Next, configure the Azure SQL Database Deployment task for the DatabaseApplication. For this you need the Azure Resource Manager Subscription connection. If your Azure DevOps account is already linked to an Azure subscription then it will automatically display in the Azure subscription drop down, as shown in the screenshot below, and click Authorize. Otherwise click on Manage:
Note:
Refer to the below link for Azure SQL Database Deployment task:
https://github.com/Microsoft/vsts-tasks/blob/master/Tasks/SqlAzureDacpacDeploymentV1/README.md
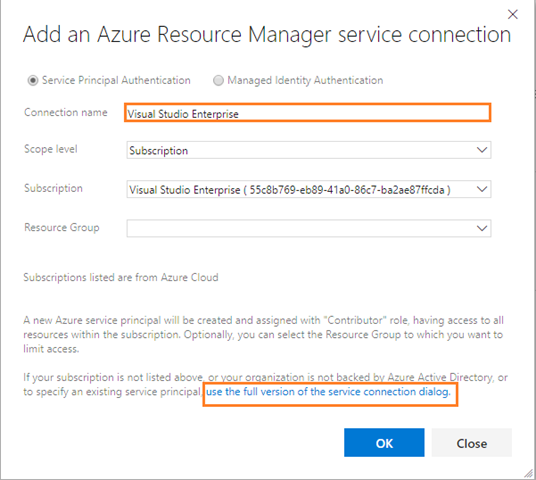
Azure Resource Manager Endpoint
-
If not backed by Azure, then click on the hyperlink ‘use the full version of the service connection dialog’, as shown in the above screenshot.
-
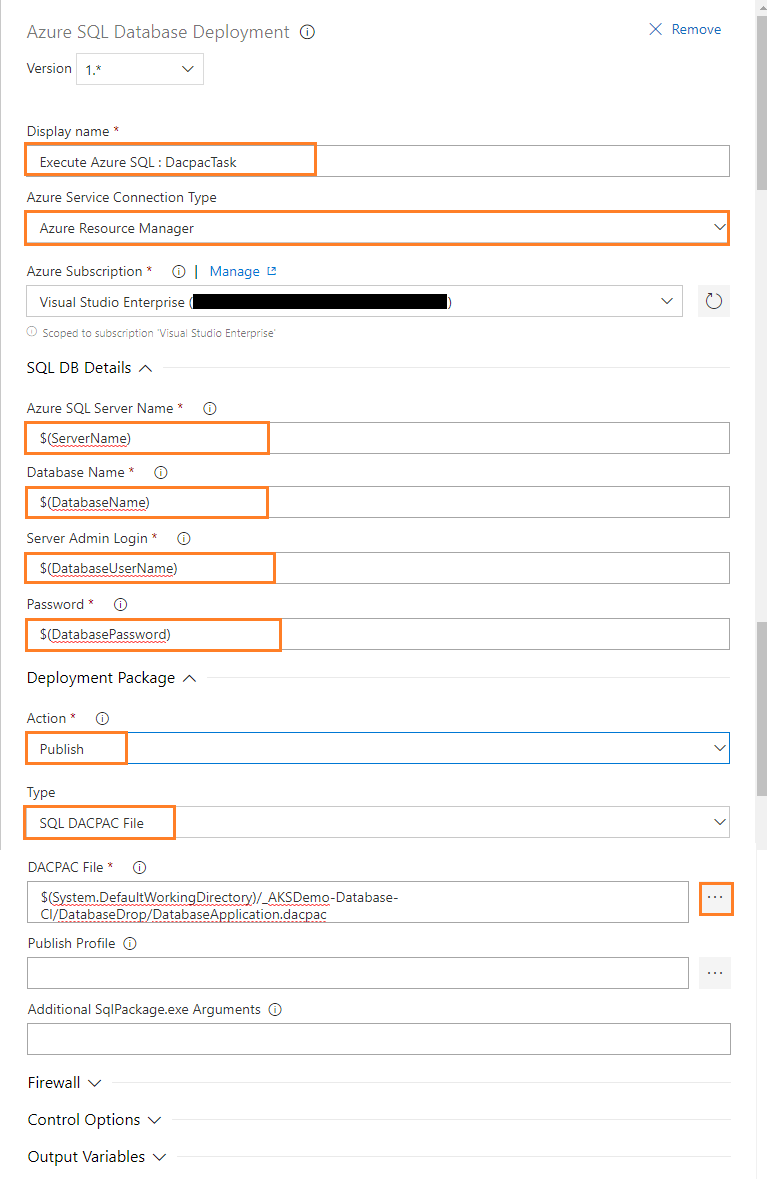
Configure the above task for deploying the DatabaseApplication into Azure SQL Database as follows:
-
Display name: Execute Azure SQL : DacpacTask
-
Azure Connection Type: Select an Azure Connection Type. For example: Azure Resource Manager
-
Azure Subscription: Select an Azure subscription
-
Azure SQL Server Name: Azure SQL Server name
-
Database Name: Name of the Azure SQL Database, where the files will be deployed
-
Server Admin Login: Specify the Azure SQL Server administrator login
-
Password: Password for the Azure SQL Server administrator
-
Action: Choose one of the SQL Actions from the list. For Example: Publish
-
Type: Choose one of the type from the list. For Example: SQL DACPAC File
-
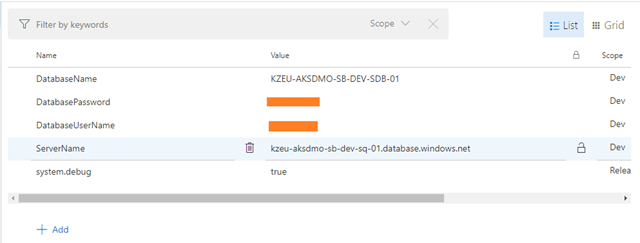
Define the Variables
Specify Release number format
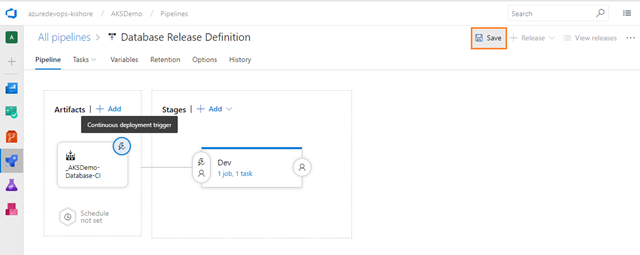
Enable continuous deployment trigger
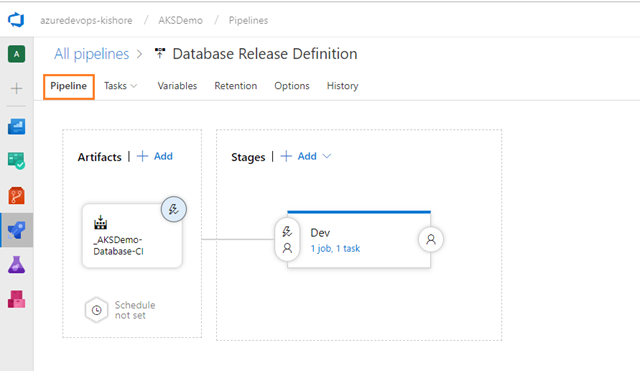
Complete Release Pipeline
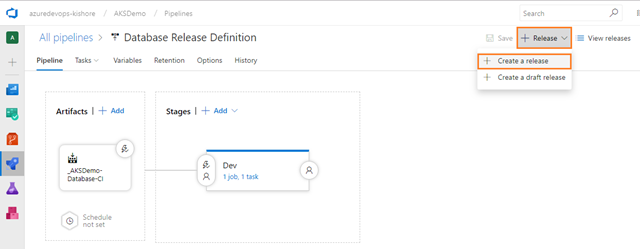
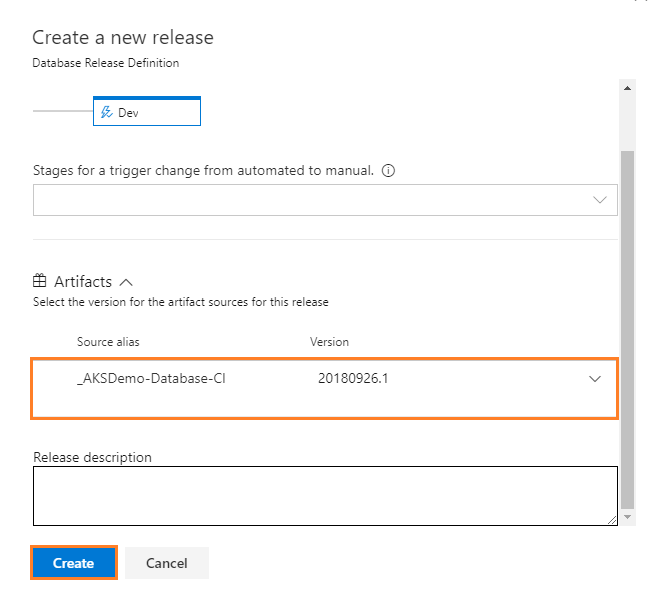
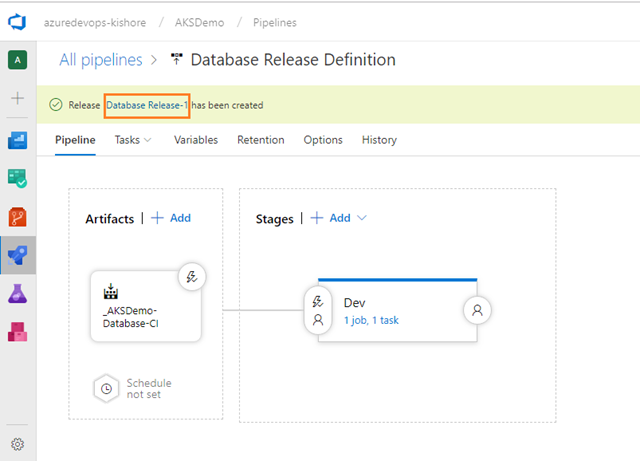
Deploy a release
-
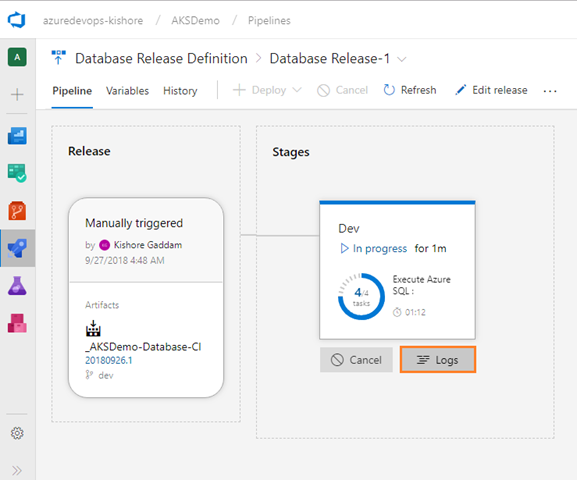
View the logs to get real-time data about the release:
Note:
You can track the progress of each release to see if it has been deployed to all the stages. You can track the commits that are part of each release, the associated work items, and the results of any test runs that you’ve added to the release pipeline.
Now everything completed to setup build and release definitions for the Database Application. But, while doing the initial setup of the build and release definitions you have to created build and release manually without using automatic triggers of build and release definitions.
From next time onward you can modify the files in the DatabaseApplication and check in your code with the automatic build, because you already enabled the automatic triggers for both build and release definitions. As a result your code gets automatically deployed all the way to the Dev stage



![clip_image003[5] clip_image003[5]](https://kishore1021.files.wordpress.com/2018/11/clip_image0035_thumb.png?w=437&h=467)
![clip_image004[5] clip_image004[5]](https://kishore1021.files.wordpress.com/2018/11/clip_image0045_thumb.png?w=442&h=339)

