Category Archives: Software Development Process

Creating a Scrum Team Project in Visual Studio 2012 using Visual Studio Scrum 2.0 process

To Install and Configure Team Foundation Server 2012 see the post here at Team Foundation Server 2012 RC – Install & Configure.

In this post, we will walk through the steps to achieve the following tasks

  • Connect to Team Foundation Server – TFS 2012
  • Creating a Team Project using Visual Studio Scrum 2.0 process
  • Windows Azure TFS Service

This post defines the SCRUM and discusses how to use SCRUM Template 2.0 to manage projects in Visual Studio 2012 Team Foundation Server. You can develop the enterprise projects using SCRUM framework which is based on Agile development methodology.

Scrum is an iterative and incremental agile software development method for managing software projects and product or application development. For Introduction to Agile Project Management Tools, see the blog post @ https://kishore1021.wordpress.com/2011/02/18/agile-project-management-tools/

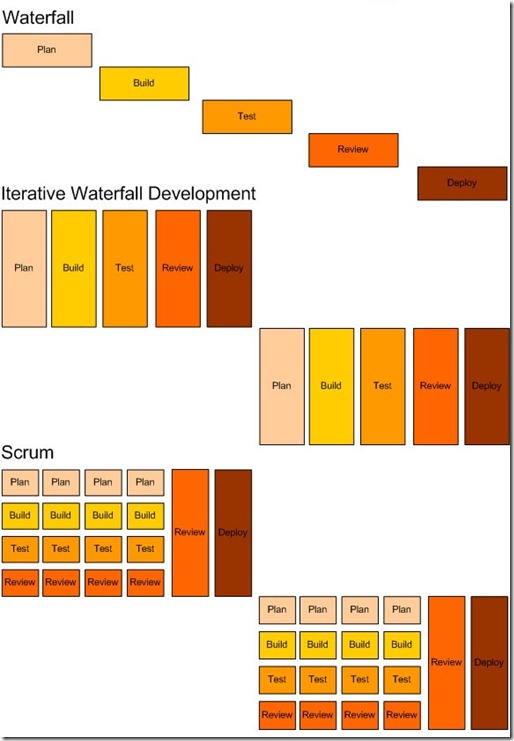
image

Figure: Pictorial representation of the Scrum development.

For Scrum Process for Software Development using Microsoft Visual Studio Scrum 1.0 Process Template , see the blog post @ https://kishore1021.wordpress.com/2010/08/02/scrum-process-for-software-development-using-microsoft-visual-studio-scrum-1-0-process-template/

At this point you can go one of two directions.  You can install TFS 2012 or use Windows Azure based Visual Studio Team Foundation Service Preview. Team Foundation Service Preview enables everyone on your team to collaborate more effectively, be more agile, and deliver better quality software. You can sign up at http://tfspreview.com/en-us/ and start using TFS if you want to use the Azure version.

In this post , we will discuss about installing and configuring TFS with VS 2012.

Connect to Team Foundation Server:

All team projects are stored and managed on a Team Foundation Server. To start working on a team project, you must first connect to the appropriate Team Foundation Server. Following are the steps to connect to an instance of Team Foundation Server for the first time.

1. On the menu bar, choose VIEW menu and click Team Explorer as shown in Fig 1.

image

Figure 1: Selecting Team Explorer in Visual Studio 2012

2. Team Explorer is highlighted up as shown in Fig 2

image

Figure 2: Visual Studio 2012 with Team Explorer

3. On the Team Explorer shown in Fig 3, click Connect to Team Foundation Server.

image

Figure 3: Click the link Connect to Team Foundation Server.

3.1 Step 3 can also be achieved by clicking on the TEAM menu shown in Fig 3.1 and click on Connect to Team Foundation Server.

image

Figure 3.1 Connecting to Team Foundation Server from the TEAM menu

4. In the Connect to Team Foundation Server dialog box, select a Team Foundation Server from the drop-down list as shown in Fig 4.

image

Figure 4: Connecting to Team Foundation Server

Note: If the drop-down list is empty, click the Servers button to manually enter the Team Foundation settings as shown in Fig 4.1. Contact your Team Foundation Server administrator or team project administrator for the correct Team Foundation Server connection settings.

image

Figure 4.1: Manually enter the Team Foundation settings

  1. In the Connect to Team Project dialog box, choose the Servers button.

  2. In the Add/Remove Team Foundation Server dialog box, choose the Add button.

  3. In the Add Team Foundation Server dialog box, type the name or URL for the server.

  4. When you type a server name, the Preview field automatically displays the URL format, for example:

    http:// ServerName:Port/tfs

    ServerName is the name of the server that hosts Team Foundation Server.

    Port is the port that Team Foundation Server uses; the default value is 8080. If your server uses a different port number, you must specify it in the Port number box.

    tfs is the default path to the project collections that are stored on the server. If your team uses a different path, type it in the Path box.

  5. Verify that the URL is correct, choose the OK button twice, and then choose the Close button.

5. In the Connect to Team Project dialog box, under Team Project Collections, select the team project collection that hosts the team projects that you want to connect to. Then, under Team Projects, select the check box for each team project that you want to access, and then choose the Connect button as shown in Fig 5. Team projects with a check mark next to them will display in Team Explorer.

image

Figure 5: Connect to Team Project and choose the Team Projects

6. Click OK.

Team Explorer displays the team projects under the selected Team Foundation Server as shown in Fig 6. Note: The contents displayed in Fig 6 might vary depending on the versions of VS.

image

Fig 6: Details of Team Explorer

Note: Team projects are created on a Team Foundation Server, therefore, you must connect to a Team Foundation Server as described in the above 6 steps before perform Creating a Team Project. After you have connected, you can create a team project.

Creating a Team Project

Software projects in Team Foundation are called team projects and are very different from the software projects (.csprj or .vbproj) in Visual Studio. The team project is the central concept that holds together the team endeavor of creating a specific software technology or product. When you create a team project, the New Team Project Wizard creates a number of focal points by which to centralize the team efforts. A team project Web site is created containing document templates, and predefined reports. A work item database is created for tracking all effort on the project. A process template is installed that determines rules, policies, security groups, and queries for all work effort. A source code branch is created for source control.

image

Figure 7: A project is where you store all your source code, as well as tasks and builds.

1. Team project can be created by using any of the following methods (a, b or c).

a. On the File menu, point to New, and then click Team Project as shown in Fig 8

image

Figure 8: Creating a Team Project from File Menu

b. In Team Explorer click Create a New Team Project as shown in Fig 9

image

Figure 9: Creating a New Team Project from Team Explorer links

c. In Team Explorer click Drop Down Icon, select Project and My Teams, Click on New Team Project as shown in Fig 10

image

Figure 10: 3 steps to create a team project using Home drop down options.

2. The New Team Project wizard appears. On the Specify the Team Project Settings page, type your project name in the What is the name of the team project? box as shown in Fig 11. click Next.

image

Figure 11: Specify the Team Project Settings

Note: Going ahead, I will be using iCITE as the project name.

3. On the Select a Process Template page as shown in Fig 12, in the Which process template should be used to create the team project? drop-down list, select Microsoft Visual Studio Scrum 2.0 as shown in Fig 13.

image

Figure 12: Selecting process template for the New team Project

Team Explorer includes process templates based on the Microsoft Solutions Framework (MSF). Some of the process templates are available by default: Microsoft Visual Studio Scrum 2.0, MSF for Agile Software Development – v6.0, and MSF for CMMI Process Improvement – v6.0. Your team or organization may provide additional process templates or may remove the MSF templates. Here’s some help about what process template to choose:

Microsoft Visual Studio Scrum 2.0 (default) is built for teams practicing the Scrum methodology, and want to use the Scrum terms, such as “Product Backlog Item.”

MSF for Agile Software Development 6.0 supports iterative and incremental software development. MSF for Agile can also be used to implement Scrum, however it is adaptive for more general use.

MSF for CMMI Process Improvement 6.0 supports an approach whose goal is to help organizations improve their performance. Development with CMMI emphasizes traceability and auditability.

image

Figure 13: Selecting Microsoft Visual Studio Scrum 2.0 for the New team Project

4. On the Specify the Source Control Settings page shown in fig 14, keep the default values and click Next.

image

Figure 14: Source Control folder path

5. On the Confirm the Team Project Settings page shown in Fig 15 , click Finish.

image

Figure 15: Confirming the settings for the New Team Project

6. The New Team Project wizard creates your new team project as shown in Fig 16.

NoteNote: It may take several minutes for the wizard to finish.

image

Figure 16: Status showing the Team Project Creation.

7. On the Team Project Created page shown in Fig 17, click Close.

image

Figure 17: Successful creation of Team Project.

Because the check box for Launch the process guidance for more information about running the team project was selected by default, the wizard opens the overview page for the process guidance for MSF Agile for Software Development.

The iCITE Innovation team project displays in Team Explorer. There are several top-level nodes:

  • My Work: This node provides access to the tasks assigned to me.

  • Pending Changes: This node provides access to the team project source control management hierarchy.

  • Work Items: This node provides access to add work items and to create and view queries against the work item database.

  • Builds   This node provides access to the builds of your team project.

  • Web Access: Click on Web Access opens up the web page for the project.

  • Settings:  Clicking on settings brings up the Project Settings page in team Explorer as shown in Figure 18.

image

Figure 18: Team Project Settings displayed in Team Explorer.

From here on, you can either use the Team Explorer in Visual Studio 2012 or using the browser for planning and tracking projects.

a. Using Visual Studio 2012 and team Explorer to manage the Team Project

image

Figure 19: Opening http://kishore1021:8080/tfs/DefaultCollection/iCITE%20Innovation/_admin/_security in Visual Studio 2012.

b. You can also use Web Browser to manage the Team Project. In the Team Explorer home navigation menu for the team project, choose Web Access to launch the browser as shown in Fig 19. A browser window will open to the home page for that team project with the URL http://ServerName:Port/tfs/CollectionName/ProjectName For ex, http://kishore1021:8080/tfs/DefaultCollection/iCITE%20Innovation/ image

Figure 20: Managing the Team Project through browser.

FYI: Click on the settings (gear) icon located on the top upper right hand corner in the browser window shown in figure 20 brings up the browser window shown in Figure 21.image

Figure 21: Control Panel of the Team Project

Fig 22 shows the Control Panel of the Team Project as seen from the browserimage

Figure 22: Control Panel of the Team Project

Windows Azure TFS Service:

Microsoft announced the availability of Windows Azure based Visual Studio Team Foundation Service. To get started, signup for TFS at http://tfspreview.com/.

I created similar project on windows Azure TFS Service and following is the screenshot. https://kishore1021.tfspreview.com/DefaultCollection/iCITE%20Project

image

Figure 23: Team collaboration and agile planning in Windows Azure TFS Service.

To get started on using TFS on Windows Azure, see the blog http://blogs.msdn.com/b/bharry/archive/2011/09/14/team-foundation-server-on-windows-azure.aspx

Team Foundation Server 2012 RC – Install & Configure

In this post, we will walk through the process of Installing & Configuring Team Foundation Server (TFS)2012 on a Windows 8 machine that has Visual Studio 2012.

If you are using TFS 2010 for the Scrum Process , see the blog post @ https://kishore1021.wordpress.com/2010/08/02/scrum-process-for-software-development-using-microsoft-visual-studio-scrum-1-0-process-template/ to configure TFS for Software Development using Microsoft Visual Studio Scrum 1.0 Process Template.

Following are the steps to Install & Configure Team Foundation Server 2012.

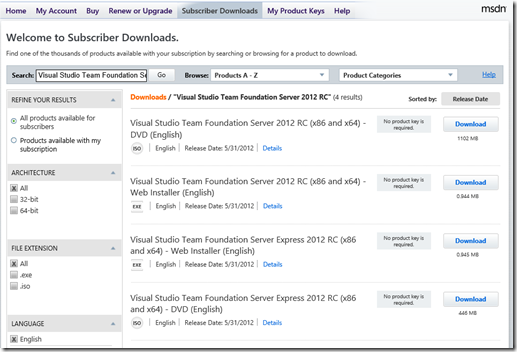
1. Download TFS by clicking on Install Team Foundation Server RC at http://www.microsoft.com/visualstudio/11/en-us/downloads#tfs-group. If you are a MSDN subscriber, go to Subscriber Downloads and search for Visual Studio Team Foundation Server 2012. Click on the Download button next to Visual Studio Team Foundation Server 2012 RC (x86 and x64) – DVD (English) as shown in Fig 1.

image

Figure 1: Visual Studio Team Foundation Server 2012 RC (x86 and x64) – DVD

This will download the ISO file to the download folder on the machine and the file name is en_visual_studio_team_foundation_server_2012_rc_x86_x64_dvd_865710

Note: System Requirements for Team Foundation Server : http://msdn.microsoft.com/en-us/library/tfs/dd578592(v=vs.110)

2. Right Click on en_visual_studio_team_foundation_server_2012_rc_x86_x64_dvd_865710 and click Mount as shown in Fig 2.

image

Figure 2: Mounting the VS TFS ISO File in Windows 8.

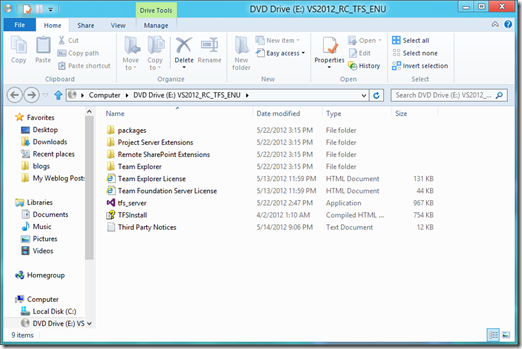
3. Click on the tfs_server.exe file to begin the installation as shown in Fig 3.image

Figure 3: TFS 2012 Installation files mounted on Windows 8.

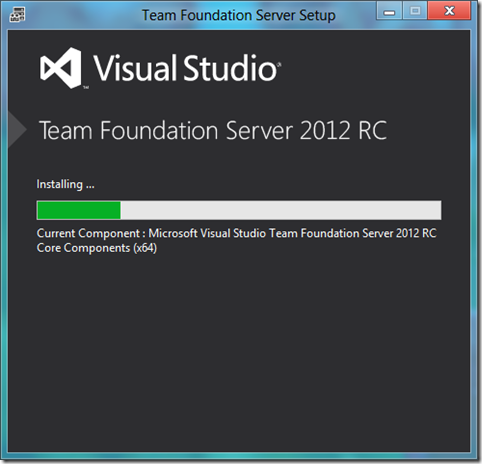
4. This launches the Team Foundation Server Setup as shown in Fig 4.image

Figure 4: Team Foundation Server Setup Wizard

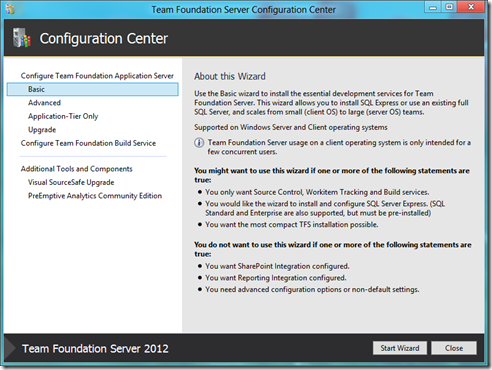
5. In the Team Foundation Server Configuration tool, choose Basic, click on Start Wizard as shown in figure 5.image

Figure 5: Team Foundation Server Configuration Center

Note: If you want to install Team Foundation Server with the least amount of preliminary work, use the basic configuration, which comes with SQL Server Express. This way, the installation wizard configures everything for you. With the basic configuration of Team Foundation Server, you can track bugs, tasks, and other work items. You can put files under version control, and use Team Web Access to log and resolve bugs. However, you will not be able to configure reporting or SharePoint with the basic configuration.

If you want to install Team Foundation Server on a single server with reporting and a team portal, use the standard configuration, which makes installation much simpler. With the standard configuration, you first install SQL Server and the report server, but Team Foundation Server can install SharePoint Foundation 2010 for you.

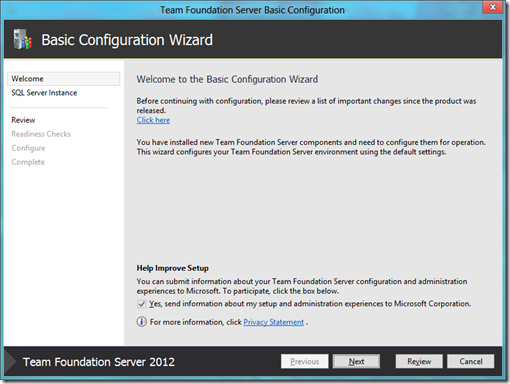
6. The Basic Configuration wizard appears as shown in Fig 6. Read the Welcome screen, and then choose Next.

image    Fig 6: Team Foundation Server Basic Configuration wizard

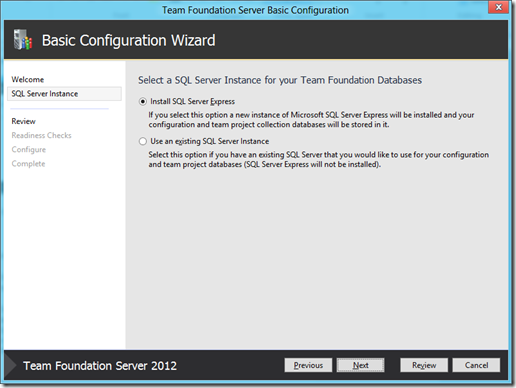
7. Team Foundation Server requires SQL Server, but you have many options, including an option to let Team Foundation Server install SQL Server Express for you. Perform one of the following actions:

  • Choose Install SQL Server Express to host the configuration database on an instance of SQL Server Express, and then choose Next.

  • Choose Use an existing SQL Server Instance to host the configuration database on an existing instance of SQL Server, and choose Next. Then, in SQL Server Instance, type the name of the server that is running SQL Server or the named instance that will host the configuration database, and choose Next. Choose Test to test the connectivity to SQL Server.

I selected Choose Install SQL Server Express as shown in Fig 7. Review the information, and then choose Next.

image

Figure 7: Install SQL Server Express selection

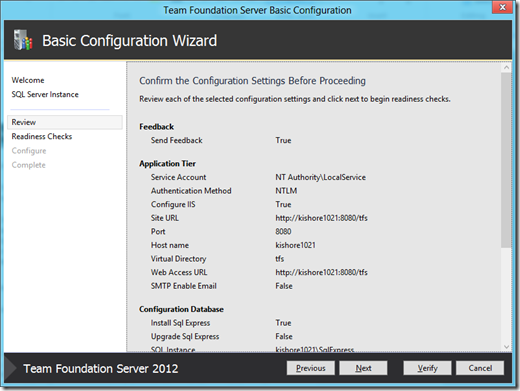
8. The wizard validates your configuration as shown in Figure 8. Click Next

image

Figure 8: Validation of TFS configuration

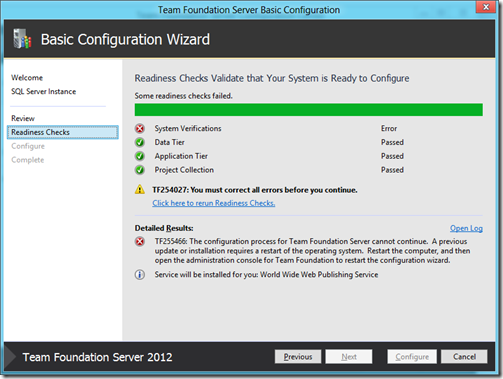
8.1. The validation failed on my machine as shown in Fig 8.1. The good things about this wizard is that it also mentions the reason for validation failure. In my case, I just needed a system restart because I installed some updates earlier that needed a system restart.

image

Figure 8.1: Validation failure

8.2. Restart the system and open the Team Foundation Server Administration Console from the start menu or to open the administration console at a command prompt, Type TFSMgmt.exe, and then press ENTER. The Team Foundation Server Administration Console appears as shown in Fig 8.2. Click on Configure Installed features

image

Figure 8.2: Team Foundation Server Administration Console

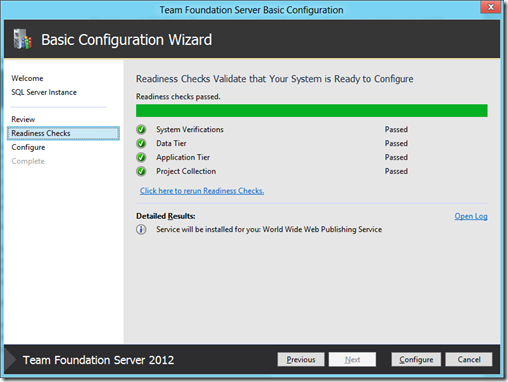
9. Click on Next as shown in Fig 9

image

Figure 9: Readiness Checks.

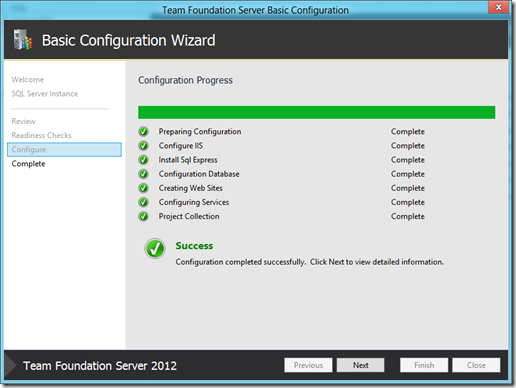
10. Click on Next as shown in Fig 10.

image

Figure 10: TFS Configuration Progress.

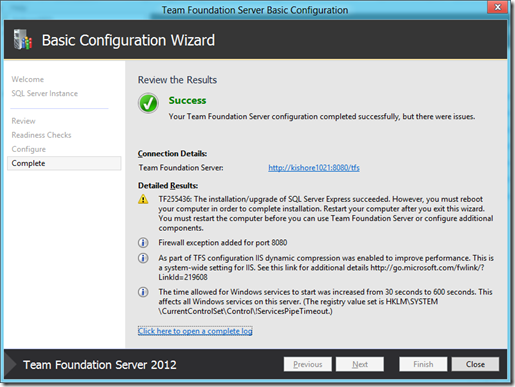
11. Click on Close as shown in Fig 11 and Restart the system.

image

Figure 11: Installation status review.

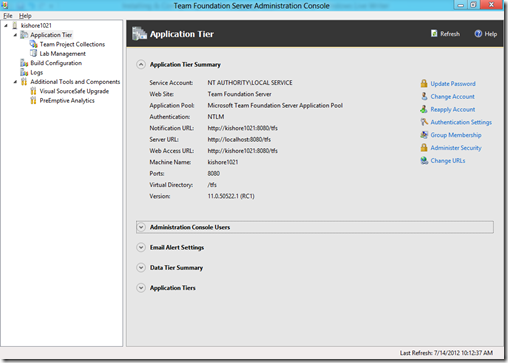
12. Finally, the Team Foundation Server Administration Console appears as shown in Fig 12.

image

Figure 12: Team Foundation Administration Console after successful setup and configuration.

Who Moved my Product Value?

At the outset, it seems like agile is all about short-term focus and a product life cycle is typically the polar opposite – it runs the total gamut in the spectrum that is the life of the product, starting from incubation to end-of-life. So, how does one attribute the relationship between the two? This is where product value comes in.Taking a philosophical question-and-answer approach to determining this intricate relationship, we can ask a very basic question: who are we building a product for? The answer is simple: customers. How do customers attribute the benefits derived from the use of a product that they pay for? Again, the answer is simple – it is notional value. This is the basic definition of product value. Over the years, this definition has evolved from its simple origins to a rapidly transforming lexicon that is built around product value. This is because the value or the definition of it has changed quite a bit in the past decade. The pressures of having to deliver to a competitive industry have grown exponentially within the last decade.

You get what you pay for!

Whilst this statement might be true for most products and commodities (with higher premium usually equated to better product standards), it makes for some interesting analogies in the technology space. Apparently, research shows that 45% of the features in a product never (ever) get used by the majority of its users. So, in the software industry of the 90’s, the equivalent catchy phrase should have been:

YOU PAY FOR WHAT YOU NEVER USE!

Now, try selling that line to your sales guy, let alone your customer! Take a look at this for vindication:


To the layman it might not be seemingly apparent as to where this is all headed, or what this has got to do with Agile or Scrum. To the trained eye, it couldn’t be more obvious. If you take the added dimension of when Agile started becoming more pronounced as an accepted practice, it will dawn that it was not a mere coincidence for it to gain prominence in the last decade when this became much more of a ground force, or groundswell, from its origins as a “nice in theory” practice. Now, this has been the exact decade when the technology boom happened as well, with waterfall being the primary practice of delivering software and solutions. It doesn’t take a trivia genius to put two and two together to demonstrate that the value for customers diminished with waterfall because:

  1. Features were being developed with a target persona in mind that changed quicker than the product time-to-market window thereby rendering most of the features useless by the time it really got to the market.
  2. Rewards weren’t commensurate – there were promising technologies that fell by the wayside because they weren’t nimble enough to change courses midway through development.
  3. A product’s value wasn’t in the number of patents contained within, or the ingenuity of it all – make no mistake, that did indeed play a part – but, the biggest bottom line contribution came from how much value add it provided. This meant changing requirements all the time, and didn’t allow for 6 months of just perfecting a solution to a single problem. It became critical to be adept at maneuvering the product development through its rapidly changing life cycle.

Technology adoption curve

The picture is fairly self-deciphering: the technology adoption is specified by the user persona in the various stages of the business life cycle: innovators setting the stage for early adopters, who demonstrate the viability for the early and late majority to cash in, followed by the late entrants who are adept at “making up for” the gross margins with volumes. The Product Life Cycle is demonstrated as well on the X-axis: with “finding niche” and “EOL decision” making up the two ends of the gamut, in the life of the product, over its living course.

To the mathematical readers, the concept of “increased frequency or reduced wingspan” of this bell curve will immediately convey the message of what’s happening in the market place today. To the less mathematically inclined, all that says is that the span of each phase in the product-lifecycle is shrinking, and rapidly. What was perfectly acceptable to deliver 18-months apart, is now “expected” to happen matter-of-fact in 9 months or less. This doesn’t mean that the workforce is doubled, nor is the complexity lesser now by any stretch of imagination. So, the only piece left to balance the equation is “adaptability” and to a slightly lesser extent, efficiency.

Conclusion

With adaptability driving the decision-making from the helm and change being the only literal constant – now more than ever – it points to only one way of delivering working software and value to customers. And that’s simply by being Agile, with tools like scrum to aid the process.

Source: QCon.

Agile Project Management Tools–SCRUM

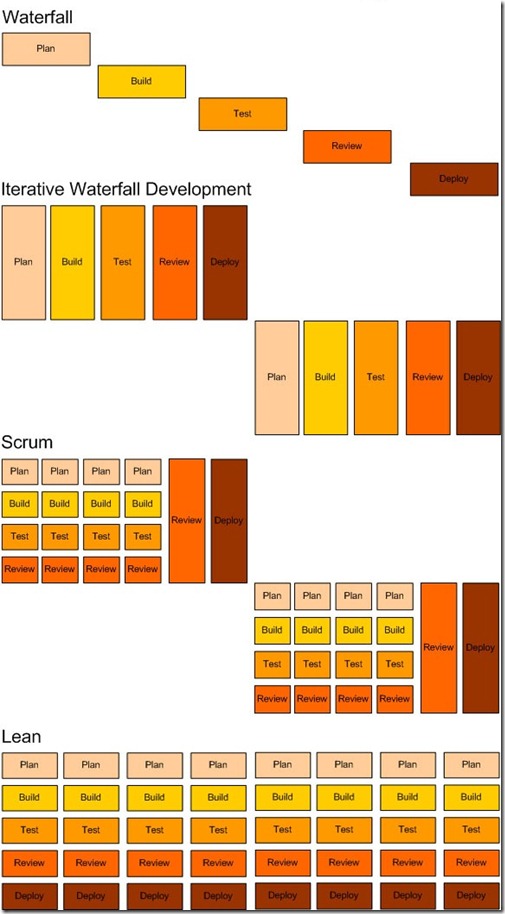
the-difference-between-waterfall-iterative-waterfall-scrum-and-lean

Fig: Evolution of commonly known software development models

Recently, in one of the Project Management conference, i was asked "which agile management tool would you recommend?". As per wiki, Agile Project Management is an iterative method of determining Requirements for Software and for delivering projects in a highly flexible and interactive manner. It requires empowered individuals from the relevant business, with supplier and customer input. Agile methods are becoming increasingly popular among software companies today. Agile
Methods have proven that the best way to develop various software projects with accelerated software development. Increased productivity, reduction of off-shore risks due to customer collaboration and ability to absorb changes in requirements are only some of the important benefits of using agile methods. SCRUM is one of the several software methods derived from Agile Management. SCRUM is all about direct communication and fast, creative decision and control. Lean software development is a translation of Lean manufacturing and Lean IT principles and practices to the software development domain. More info on Kanban in the upcoming posts.

Well, the answer depends upon size, complexity, team location and budget of the company/organization. For each project type, or business environment we need to adapt or choose the tool that best fits our needs. I think the best tool encompasses different tools, for example white board, a software and a couple of templates, or even more. It is important to take into account who is going to use the tool, who is going to provide the data, who is going to use this information to take decisions during the project lifecycle. Acquiring an Agile program management tool should be a team and management’s choice which is projected to add value.

For local teams:
We used physical boards, because they are visible in the office and promotes interaction between team members. And besides a whiteboard which holds current Sprint Data, all you need is a spreadsheet for storing all Scrum data.

Tools:
– Whiteboard & Excel Sheets
– Atlassian JIRA + GreenHopper (http://www.atlassian.com)
– IceScrum (
http://www.icescrum.org/) is a web based Open Source tool (GPL).
– Urban Turtle (http:urbanturtle.com).
– Kanban Tool –
http://kanbantool.com/
– ScrumWorks
– VersionOne
– Agile Zen (www.agilezen.com )
– Targetprocess
– Redmine
– IBM Tools

We used physical boards and excel sheets for about 1.5 years, and then transitioned to JIRA with GreenHopper (as we became a large and distributed development team) which we’ve now been using for about a year. It takes a little getting used having everything in an electronic format, but its flexible and gives you a board in a browser which mimics the physical one you’re used to and the ability to collaborate with dispersed teams. It allowed us to build up an extremely integrated tool chain with JIRA as central platform and customized Dashboard for the different stakeholders.  One key advantage is, that JIRA is quite flexible and can be used in different area’s in an organization. We’ve implemented JIRA for Scrum, Incident Management, Issues Management, Time Management, Action List tracking in meetings, and so on. We’ve integrated Version Control, Code Review, Continuous Integration, Automated Testing, etc. It allowed us a very high level of transparency in different processes.

Summary:
In Summary, the needs should dictate the solution, and one should understand the true need before choosing the tool solution. One person’s amazing tool is another’s waste of bytes. This is SCRUM, and should not be overly elaborate or complicated, it’s towards the far end of the Agile spectrum, i.e. more adaptive rather than prescriptive. But saying that, JIRA plus GreenHopper gets a tick from me! Jira’s flexibility has allowed our different teams to create a planning and story boards that meets each sprint team’s unique requirements. The tool has provided an effective way to manage stories in both co-located and distributed (global) team scenarios. Projecting our digital story boards has allowed transparency throughout teams and across the organization.

Thinking bottom-up:
Sometimes, the "recommended agile tool" depends on the management view and attitude of the people using it, as opposed to size, complexity or budget of the project. Sure, there are some basic principles that we need to adhere to, but you should consider the abilities of your people, their ability to communicate, their capability to make decisions, and then on that basis choose a tool that helps them achieve amazing results.

“Leaders aren’t born, they are made. And they are made just like anything else, through hard work. And that’s the price we’ll have to pay to achieve that goal, or any goal.”

Scrum Process for Software Development using Microsoft Visual Studio Scrum 1.0 Process Template

In the last 14 years, I had seen myself moving from waterfall methodology of software development to Iterative and then to Scrum and finally to Scrum-ban. I will explain a bit about the different methodologies and then move to Scrum Process. Below is the pictorial representation of the Waterfall, Iterative and Scrum software development process. More info about Kanban and Scrum-ban will be posted in my upcoming blogs. In this article, i would like to demo on how to use the Microsoft Visual Studio Scrum 1.0, process template built specifically for Scrum teams

the-difference-between-waterfall-iterative-waterfall-scrum

Picture 1: Pictorial representation of Waterfall, Iterative and Scrum Software Development methodologies.

The waterfall approach is highly risky, often more costly and generally less efficient than more Agile approaches. It requires the creation of up-front documentation before any real business value is created. i.e. You don’t realize any value until the end of the project. This is confounded by the fact that product development is started downstream, or much later in the project’s expected timeframe. This has the obvious disadvantage of delaying the point at which business value can be realized.

Remember the 80-20 rule, 80% of a product’s value comes from 20% of its features. With this in mind, can we conceivably build a software product that provides 20% of the feature set? Yes, We can deliver "version 1" with 20% of the features, then, a little later, "version 2" with a further collection of features and later "version 3". The beauty of this approach is that development of 20% of the features should not take 100% of the project’s expected schedule and budget: we can realize business value much earlier in the cycle.

Iterative Waterfall Development focuses on delivering a sprint of work as opposed to a series of valuable/shippable features. In my experience, The most commonly occurring issue in this type of process is you deliver loads of code and leave it until the last minute to test everything. One issue takes longer than expected to resolve, you miss your sprint deadline and you deliver nothing. Another common symptom of this type of approach is over-commitment.  It’s really difficult to estimate the total effort associated with a particular User Story/Feature when approaching delivery in this phased way.  You’re more or less forced to estimate each phase separately (e.g. estimate development separately to testing in this instance) – this doesn’t work as the phases are not separate, they’re totally intertwined. For example, if you find an issue with the test, you must return to development. The whole team must remain focused on delivering the end goal, not the separate phases. It’s also worth noting that velocity and burn downs are far less (if at all) useful in this type of environment – you don’t benefit from early-warning-signs as you don’t find out whether you’re on track until the end of the sprint.

Scrum Development focuses on delivering fully-tested, independent, valuable, small features. As such, we diversify our risk – if one feature goes wrong, it should not impact another feature. With that said, we still plan our work in iterations and we will still release at the end of each iteration.

For Example, if we run two projects for identical requirements, same time period (For ex: say 1 year) with same team, but one in waterfall Software development process and another in scrum. Assuming you know how scrum and waterfall both work, if you look at the project delivery after 6 months, it would be very interesting output. In the 6 months, the waterfall project might have reached a stage where the requirement analysis is fully complete, design is complete, programming has started and half way through. If I am a customer, how much business value this stage would give me, think about it? At the same time, the scrum project team would have against prioritized product backlog and started delivering shippable product after every sprint (say of 4 scrum cycles every 2 month). Scrum focuses on shippable product in small iterations, and that not only gives the best business value at certain moment in project life cycle but also allows change during the development process that can be taken up in future sprints.


Microsoft Visual Studio Scrum 1.0 Process Template

Last week, Microsoft announced Microsoft Visual Studio Scrum 1.0, a process template built from the ground up specifically for Scrum teams. Below is the step by step guide to Downloading, Installing and setting up the Scrum process for the Project Teams.

Step 1: Downloading the Microsoft Visual Studio Scrum 1.0 Process Template:

There are two ways to download the template.

Option 1: Download from the link Microsoft Visual Studio Scrum 1.0 from the Visual Studio Gallery

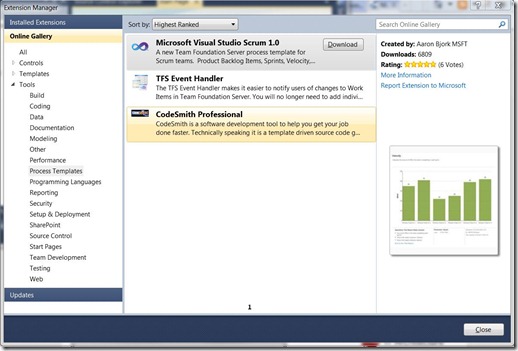
Option 2: Download Microsoft Visual Studio Scrum 1.0 using Visual Studio 2010 using the following steps.

  1. Open VS 2010

  2. On the Tools menu, click Extension Manager.

  3. In Extension Manager, in the left pane, click Online Gallery.

  4. In Online Gallery, click on Tools and select Process Templates

  5. In the right pane, Select Microsoft Visual Studio Scrum 1.0 and  click on the Download button.
  6. This will download the Microsoft_Visual_Studio_Scrum_1.0.MSI to the location you select in the download dialog.
  7. Click on the Microsoft_Visual_Studio_Scrum_1.0.MSI file to start the installation.
  8. The MSI installs the required files to the location (default) C:\Program Files (x86)\Microsoft\Microsoft Visual Studio Scrum 1.0. (I am running Windows 7, 64 bit OS)

Capture

Step 2: Launch the Process Template Explorer in Visual Studio 2010

If you already have a connection to the Team Foundation Server, please ignore the Steps A to D and go to Step 1.

Prerequisite: The following process requires a connection to a Team Foundation Server. In my scenario, i Installed Microsoft Team Foundation Server 2010 locally on Windows 7 PC. Below are the steps to connect to a Team Foundation Server (team project collection).

Step A. In Visual Studio, on the Tools menu, click Connect to Team Foundation Server.

image

Note
If you do not see this option, you have not installed Team Explorer. You must install Team Explorer before you will have the option to connect to Team Foundation Server.

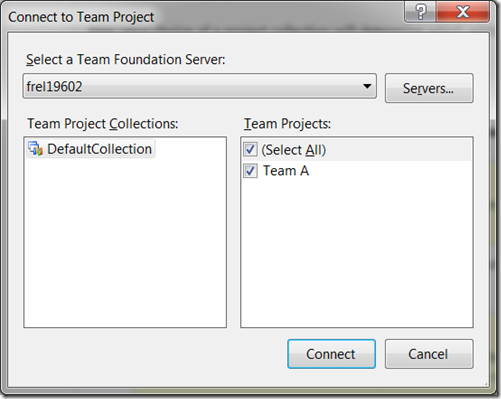
Step B. In the Connect to Team Project dialog box, in the Select a Team Foundation Server drop-down list, click the server that contains the team project collection to which you want to add your team project. image 

Note
If the drop-down list is empty, click the Servers button to manually enter the server connection settings. Contact your Team Foundation administrator or team project administrator to obtain the connection settings.
image

Step C. Click the name of the project collection to which you want to add your team project from the Directory list

Step D. Click Connect. The Team Explorer displays the team projects that you selected. Following is the screenshot of my Team Projects.image

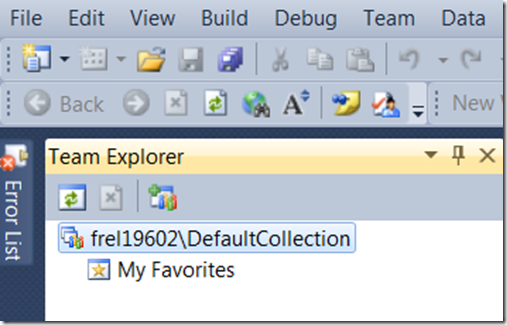
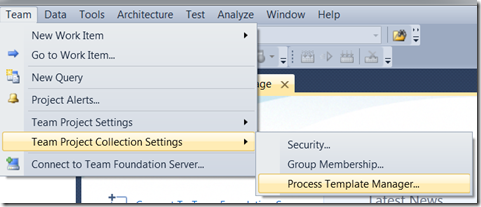
  1. In VS 2010, Click on Team menu
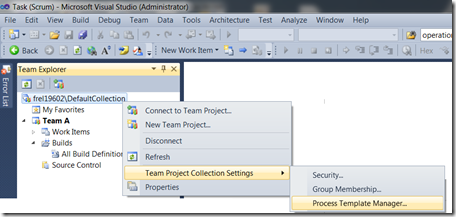
  2. Select Team Project Collection SettingsProcess Template Manager. image OR in Team Explorer window, right click on the collection, select Team Project Collection Settings Process Template Manager. image
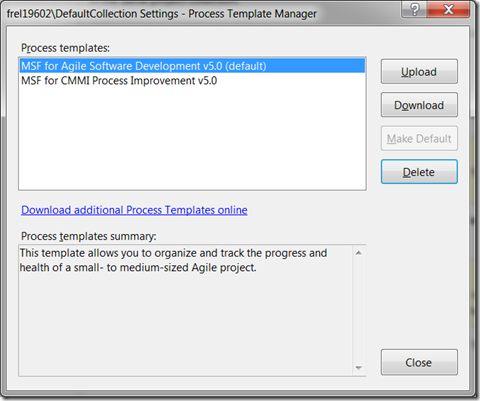
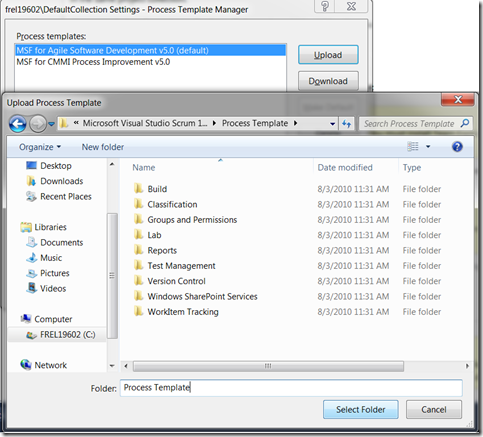
  3. Click Upload button and select the folder where the Microsoft Visual Studio Scrum 1.0 process template is installed (Default: C:\Program Files (x86)\Microsoft\Microsoft Visual Studio Scrum 1.0\Process Template). Click on Select Folder button.image image
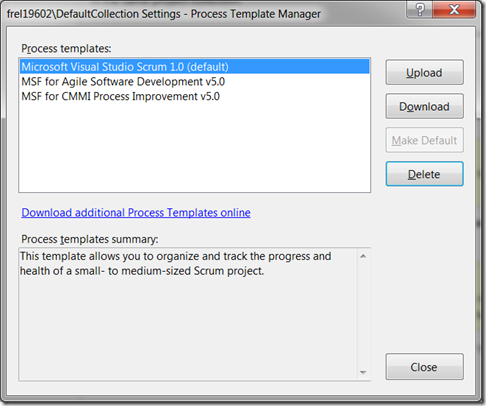
  4. Once installed, Click on Make Default button to make it the default process template. The Microsoft Visual Studio Scrum 1.0 should be listed in the Process Template Manager as follows:image

Create a Team Project

  1. In Team Explorer, right-click the project collection, and then click New Team Project. image OR   open the File menu, point to New, and then click Team Project.image
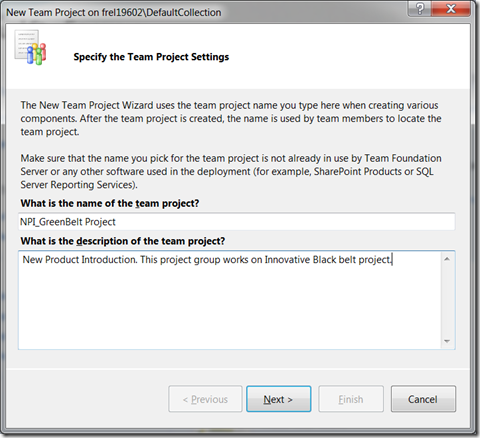
  2. On the Specify the Team Project Settings page, in the What is the name of the team project? box, type a name for the team project that you want to create and type the description of the project.image 

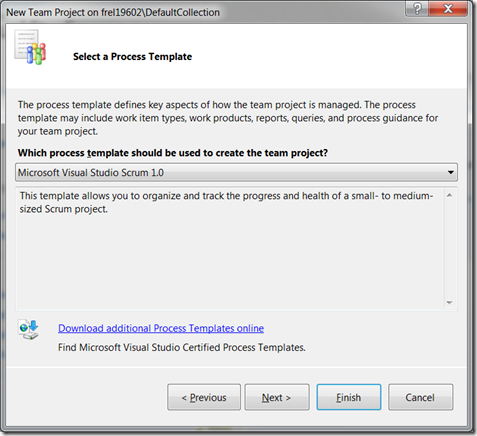
  3. Click Next. On the Select a Process Template page, in the Which process template should be used to create the team project? list, click on Microsoft Visual Studio Scrum 1.0 template. Click on Finishimage

The following tasks are performed automatically:

  • A SharePoint site for your team project is created.

  • An empty version-control folder for your team project is created.

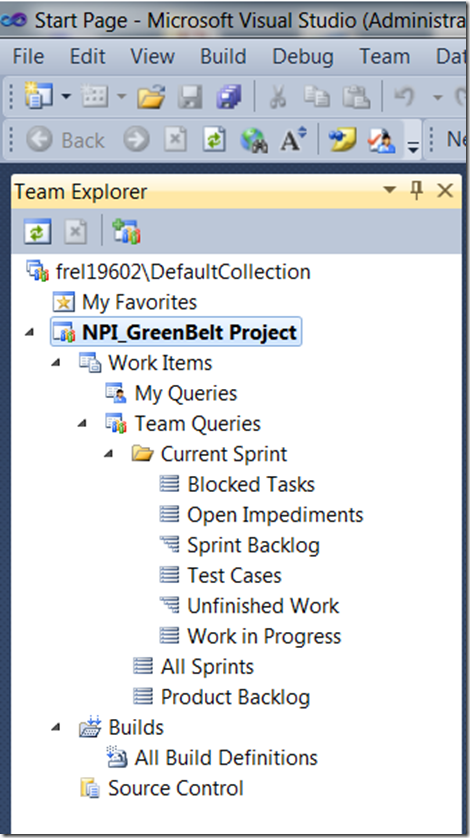
Team Explorer displays the following informationimage 

To start using the Scrum process, refer to the site http://msdn.microsoft.com/en-us/library/ff731587.aspx