Building and Deploying Micro Services with Azure Kubernetes Service (AKS) and Azure DevOps Part-4

It is best practice to create Azure components before building and releasing code. I would usually point you to the Azure portal for learning purposes, but in this scenario you need to work at the command line, so if you don’t have it installed already I would strongly advise you to install the Azure CLI.

Preparing the user machine

Azure CLI

Install Azure CLI 2.0 on Windows

In addition, here are two important Kubernetes tools to download as well:

Kubernetes Tools

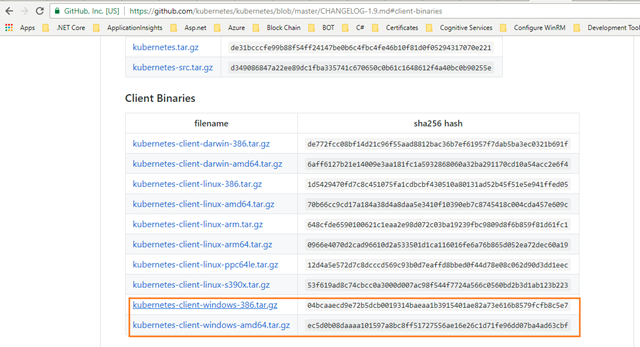
Kubectlhttps://github.com/kubernetes/kubernetes/blob/master/CHANGELOG-1.9.md (Go to the newest “Client Binaries” and grab it.)

s113

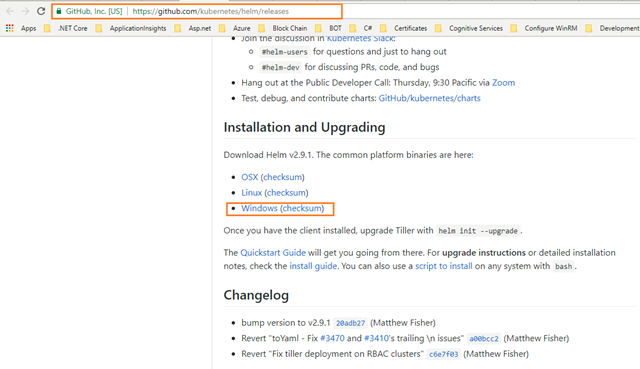
Helmhttps://github.com/kubernetes/helm/releases go to this link and click on Windows (checksum), then helm files will be downloaded into your local machine.

(Or) you can click the below link directly to download the Helm files.

Windows (checksum): https://storage.googleapis.com/kubernetes-helm/helm-v2.9.1-windows-amd64.zip

s114

Note: This blog explains how to download and install Azure CLI, Kubectl and Helm files in Windows OS.

They are plain executables, so no installers; first create a folder in your PC or local machine in the following path: C:\k8s – this is where you are going to store and work with helm and Kubectl tools. Then copy and paste them into the folder you just created.

Now your folder path C:\k8s should be like this figure below:

s115

If you are having .Zip files in the above path, you can extract the files in the same folder only.

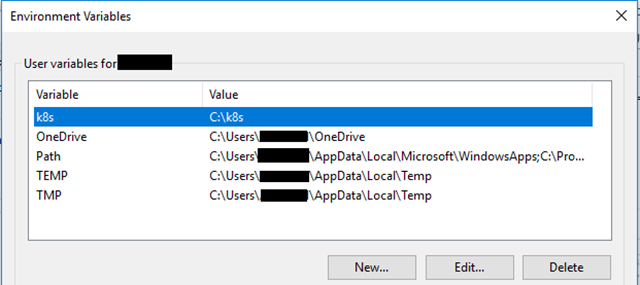
For the sake of simplicity you should add this folder path to your Environment Variables in Windows:

clip_image007

Kubectl is the “control app” for Kubernetes, and Helm is the package manager (or the equivalent of NuGet in the .NET world if you like) for Kubernetes.

You might ask yourself why you need Kubernetes native tools, when you are using a managed Kubernetes service, and that is a valid question. A lot of managed services put an abstraction on top of the underlying service, and hides the original in various manners. An important thing to understand about AKS is that while it certainly abstracts parts of the k8s setup it does not hide the fact that it is k8s. This means that you can interact with the cluster as if you had set it up from scratch. Which also means that if you are already are a k8s ninja you can still feel at home, otherwise, it’s necessary to learn at least some of the tooling. You don’t need to aspire to ninja-level knowledge of Kubernetes; however, you need to be able to follow along as I switch between k8s for shorthand and typing Kubernetes out properly.

Reference Links

Overview of kubectl

https://kubernetes.io/docs/reference/kubectl/overview/

Kubectl Cheat Sheet

https://kubernetes.io/docs/reference/kubectl/cheatsheet/

The package manager for Kubernetes

https://docs.helm.sh/

Creating the AKS cluster using the Azure CLI

  1. Open the Command Prompt with administrative mode.
  2. The first step for using the Azure CLI is logging in:

    az login

    s117

    Note: This login process is implemented using the OAuth DeviceProfile flow. You can implement this if you like:

    https://blogs.msdn.microsoft.com/azuredev/2018/02/13/assisted-login-using-the-oauth-deviceprofile-flow/

  3. If you have multiple subscriptions in Azure, you might need to use az account list and az account set –subscription <Your Azure Subscription ID> to make sure you’re working on the right one:

    s118

Create a resource group

  1. You need a resource group to contain the AKS instance. (Technically it doesn’t matter which location you deploy the resource group too, but I suggest going with one that is supported by AKS and sticking with it throughout the setup.)

    Create a resource group with the az group create command. An Azure resource group is a logical group in which Azure resources are deployed and managed.

    When creating a resource group you are asked to specify a location, this is where your resources will live in Azure.

    The following command creates a resource group named KZEU-AKSDMO-SB-DEV-RGP-01 in the eastus location.

    az group create –name KZEU-AKSDMO-SB-DEV-RGP-01 –location eastus

    s74

Create AKS cluster

  1. Next you need to create the AKS cluster:

    Use the az aks create command to create an AKS cluster. The following command creates a cluster named DemoAKS01 with one node.

    az aks create –name KZEU-AKSDMO-SB-DEV-AKS-01 –resource-group KZEU-AKSDMO-SB-DEV-RGP-01 –node-count 1 –generate-ssh-keys –kubernetes-version 1.11.2 –node-vm-size Standard_DS1_v2

    s75

You will notice that I chose a specific Kubernetes version, which seems to be a low-level detail when we’re dealing with a service that should handle this for us. The reason for this is that Kubernetes is a fast-moving target, so you might need to be on a certain level for specific features and/or compatibility. 1.11.2 is to date the newest AKS supported version, so you may verify if there is a newer one meanwhile, or upgrade the version later. If you don’t specify the version you will be given the default version, which was on the 1.7.x branch when I tested.

Since this is a managed service which may create a delay for a new version of Kubernetes being released and available in AKS, close management would be needed.

To keep costs down in the test environment I’m only using one node, but in production you should ramp this up to at least 3 for high availability and scale. I also specified the VM size to be a DS1_v2. (This is also the default if you omit the parameter.) I tried keeping cost low, and going with the cheapest SKU I could locate, but the performance was abysmal when going through the cycle of pulling and deploying images repeatedly; so I upgraded.

In light of this I would like to highlight another piece of goodness with AKS. In a Kubernetes cluster you have management nodes and worker nodes. Just like you need more than one worker to distribute the load, you need multiple managers to have high availability.

AKS takes care of the management, but not only is it abstracted away, you don’t pay for it either – you pay for the nodes, and that’s it.

After several minutes the command completes and returns JSON-formatted information about the cluster.

Important:

Save the JSON output in a separate text file, because you need the ssh keys later in this document.

Note:

If you get the below error while running the above az aks create command, then you can re-run the same command once again.

Deployment failed. Error occurred in request.

s121

Note:

While creating AKS, internally a new resource group is created (like MC_<Resource Group Name>_<AKS Name>_<Resource Group Location>) which is consists of Virtual machine, Virtual network, DNS Zone, Availability set, Network interface, Network security group, Load balancer and Public IP address etc.…

Connect to the cluster

  1. To manage a Kubernetes cluster use kubectl, the Kubernetes command-line client.
  2. If you want to install it locally, use the az aks install-cli command.

    az aks install-cli

  3. Connect kubectl to your Kubernetes cluster by using the az aks get-credentials command and configure accordingly. This step downloads credentials and configures the Kubernetes CLI to use them.

    az aks get-credentials –resource-group KZEU-AKSDMO-SB-DEV-RGP-01 –name KZEU-AKSDMO-SB-DEV-AKS-01

    s76

  4. Verify the connection to your cluster via the kubectl get command to return a list of the cluster nodes. Note that this can take a few minutes to appear.

    kubectl get nodes

    s77

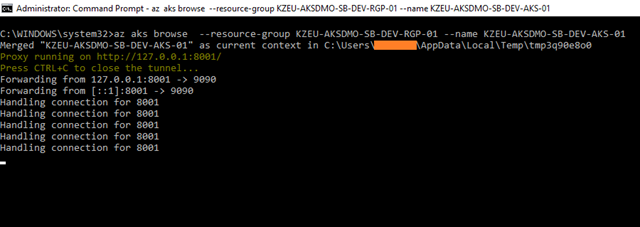
  5. You should also check that you are able to open the Kubernetes dashboard by running

    az aks browse –resource-group KZEU-AKSDMO-SB-DEV-RGP-01 –name KZEU-AKSDMO-SB-DEV-AKS-01

    s78

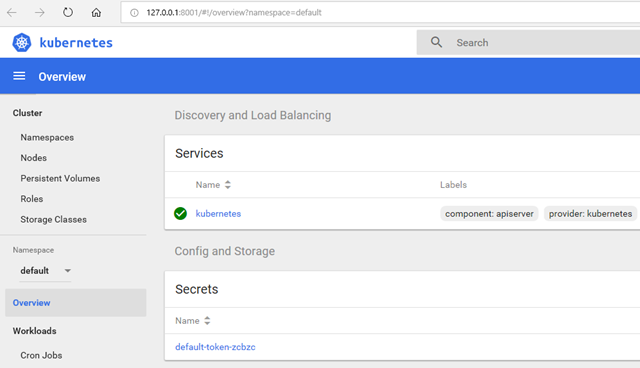
This will launch a browser tab with a graphical representation:

s125

Kubectl also allows for connecting to the dashboard (kubectl proxy); however, when using the Azure CLI everything is automatically piggybacked onto the Azure session you have. You’ll notice that the address is 127.0.0.1 even though it isn’t local, but that’s just some proxy address where the traffic is tunneled through to Azure.

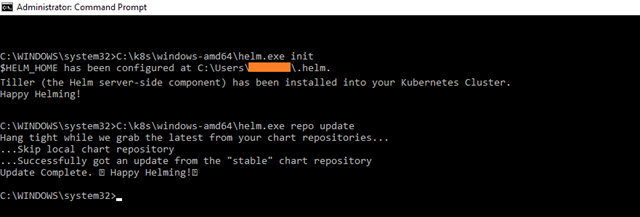
Configure the helm in local machine

  1. Helm needs to be primed as well to be ready for later. Based on having a working cluster as verified in the previous step, helm will automagically work out where to apply its logic. (You can have multiple clusters, so part of the point in verifying that the cluster is ok is to make sure you’re connected to the right one.) Apply the following:

    helm.exe init

    helm.exe repo update

In my case helm.exe is available in the following path. I used the complete helm.exe path for executing the above commands in the command prompt:

clip_image026

s126

The cluster should now be more or less ready to have images deployed.

Much like we refer to images when building virtual machines, Docker uses the same concept although slightly different on the implementation level. To get running containers inside your Kubernetes cluster you need a repository for these images. The default public repo is Docker Hub, and images stored there will be entirely suited for your AKS cluster. But we don’t want to make our images available on the Internet for now, so we will want a private repository. In the Azure ecosystem this is delivered by Azure Container Registry (ACR).

You can easily create this in the portal, for coherency, let’s do this through the CLI as well. You can throw this into the AKS resource group, but we will create a new group for our registry, since a registry is logically speaking a separate entity. Then it becomes more obvious to re-use across clusters too.

Create an azure container registry (ACR) using the Azure CLI

Create a resource group

  1. Create a resource group with the az group create command. An Azure resource group is a logical group in which Azure resources are deployed and managed.

    When creating a resource group you are asked to specify a location; this is where your resources will live in Azure.

    The following command creates a resource group named KZEU-AKSDMO-SB-DEV-RGP-02 in the eastus location.

    az group create –name KZEU-AKSDMO-SB-DEV-RGP-02 –location eastus

    s79

Create a container registry

  1. Here you create a Basic registry. Azure Container Registry is available in several different SKUs as described briefly in the following table. For extended details on each, see Container registry SKUs.

    SKU

    Description

    Basic

    A cost-optimized entry point for developers learning about Azure Container Registry. Basic registries have the same programmatic capabilities as Standard and Premium (Azure Active Directory authentication integration, image deletion, and web hooks), however, there are size and usage constraints.

    Standard

    The Standard registry offers the same capabilities as Basic, but with increased storage limits and image throughput. Standard registries should satisfy the needs of most production scenarios.

    Premium

    Premium registries have higher limits on constraints, such as storage and concurrent operations, including enhanced storage capabilities to support high-volume scenarios. In addition to higher image throughput capacity, Premium adds features like geo-replication for managing a single registry across multiple regions, maintaining a network-close registry to each deployment.

  2. Create an ACR instance using the az acr create command.

    The registry name must be unique within Azure, and contain 5-50 alphanumeric characters. In the following command, DemoACRregistry is used. Update this to a unique value.

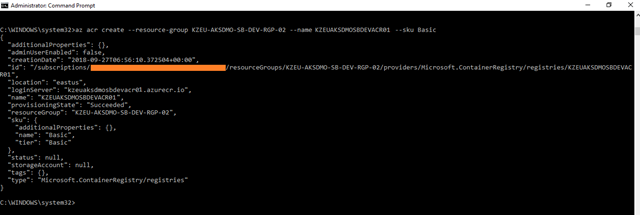
    az acr create –resource-group KZEU-AKSDMO-SB-DEV-RGP-02 –name KZEUAKSDMOSBDEVACR01 –sku Basic

    When the registry is created, the output is similar to the following:

    {

    “additionalProperties”: {},

    “adminUserEnabled”: false,

    “creationDate”: “2018-06-28T06:07:11.755241+00:00”,

    “id”: “/subscriptions/xxxxx-xxxx-xxxx-xxxx-xxxxxxx/resourceGroups/KZEU-AKSDMO-SB-DEV-RGP-02/providers/Microsoft.ContainerRegistry/registries/KZEUAKSDMOSBDEVACR01”,

    “location”: “eastus”,

    “loginServer”: “kzeuaksdmosbdevacr01.azurecr.io”,

    “name”: ” KZEUAKSDMOSBDEVACR01″,

    “provisioningState”: “Succeeded”,

    “resourceGroup”: “KZEU-AKSDMO-SB-DEV-RGP-02”,

    “sku”: {

    “additionalProperties”: {},

    “name”: “Basic”,

    “tier”: “Basic”

    },

    “status”: null,

    “storageAccount”: null,

    “tags”: {},

    “type”: “Microsoft.ContainerRegistry/registries”

    }

    s80

Authenticate with Azure Container Registry from Azure Kubernetes Service

  1. While you can now browse the contents of the registry in the portal that does not mean that your cluster can do so. As is indicated by the message upon successful creation of the ACR component we need to create a service principal that will be used by Kubernetes, and we need to give this service principal access to ACR.
  2. If you’re new to the concept of service principal you can refer to the below links:

    Authenticate with a private Docker container registry

    https://docs.microsoft.com/en-us/azure/container-registry/container-registry-authentication

    Azure Container Registry authentication with service principals

    https://docs.microsoft.com/en-us/azure/container-registry/container-registry-auth-service-principal

    Authenticate with Azure Container Registry from Azure Kubernetes Service

    https://docs.microsoft.com/en-us/azure/container-registry/container-registry-auth-aks

Grant AKS access to ACR

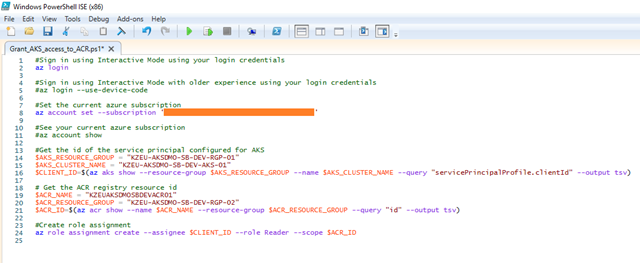
  1. When an AKS cluster is created a service principal is also created to manage cluster operability with Azure resources. This service principal can also be used for authentication with an ACR registry. To do so, a role assignment needs to be created to grant the service principal read access to the ACR resource.
  2. The following sample can be used to complete this operation.

    Open the Windows PowerShell ISE (x86) in your local machine and run the below script.

    #Sign in using Interactive Mode using your login credentials
    
    az login
    
    #Sign in using Interactive Mode with older experience using your login credentials
    
    #az login --use-device-code
    
    #Set the current azure subscription
    
    az account set --subscription ''
    
    #See your current azure subscription
    
    #az account show
    
    #Get the id of the service principal configured for AKS
    
    $AKS_RESOURCE_GROUP = "KZEU-AKSDMO-SB-DEV-RGP-01"
    
    $AKS_CLUSTER_NAME = "KZEU-AKSDMO-SB-DEV-AKS-01"
    
    $CLIENT_ID=$(az aks show --resource-group $AKS_RESOURCE_GROUP --name $AKS_CLUSTER_NAME --query "servicePrincipalProfile.clientId" --output tsv)
    
    # Get the ACR registry resource id
    
    $ACR_NAME = "KZEUAKSDMOSBDEVACR01"
    
    $ACR_RESOURCE_GROUP = "KZEU-AKSDMO-SB-DEV-RGP-02"
    
    $ACR_ID=$(az acr show --name $ACR_NAME --resource-group $ACR_RESOURCE_GROUP --query "id" --output tsv)
    
    #Create role assignment
    
    az role assignment create --assignee $CLIENT_ID --role Reader --scope $ACR_ID
    

    s81

Output of the above PowerShell Script:

s82

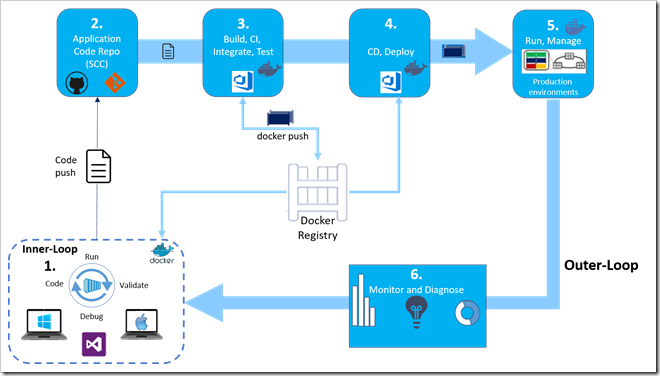
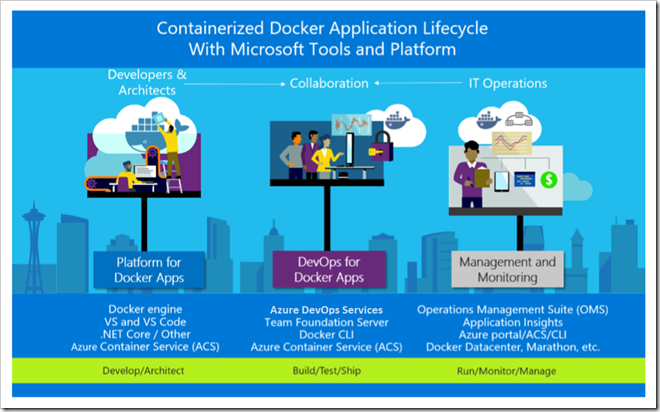
Docker application DevOps workflow with Microsoft tools

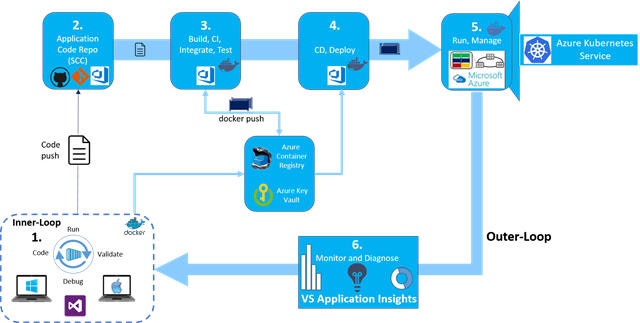
Visual Studio, Azure DevOps and Application Insights provide a comprehensive ecosystem for development and IT operations that allow your team to manage projects and to rapidly build, test, and deploy containerized applications:

s83

Microsoft tools can automate the pipeline for specific implementations of containerized applications (Docker, .NET Core, or any combination with other platforms) from global builds and Continuous Integration (CI) and tests with Azure DevOps, to Continuous Deployment (CD) to Docker environments (Dev/Staging/Production), and to provide analytics information about the services back to the development team through Application Insights. Every code commit can trigger a build (CI) and automatically deploy the services to specific containerized environments (CD).

Developers and testers can easily and quickly provision production-like dev and test environments based on Docker by using templates from Azure.

The complexity of containerized application development increases steadily depending on the business complexity and scalability needs. Examples of these are applications based on Microservices architecture. To succeed in such kind of environment your project must automate the whole lifecycle—not only build and deployment, but also management of versions along with the collection of telemetry. In summary, Azure DevOps and Azure offer the following capabilities:

  • Azure DevOps source code management (based on Git or Team Foundation Version Control), agile planning (Agile, Scrum, and CMMI are supported), continuous integration, release management, and other tools for agile teams.
  • Azure DevOps include a powerful and growing ecosystem of first- and third-party extensions that allow you to easily construct a continuous integration, build, test, delivery, and release management pipeline for microservices.
  • Run automated tests as part of your build pipeline in Azure DevOps.
  • Azure DevOps tightens the DevOps lifecycle with delivery to multiple environments –  not just for production environments,but also for testing, including A/B experimentation, canary releases, etc.
  • Docker, Azure Container Registry and Azure Resource Manager. Organizations can easily provision Docker containers from private images stored in Azure Container Registry along with any dependency on Azure components (Data, PaaS, etc.) using Azure Resource Manager (ARM) templates with tools they are already comfortable working with.

Steps in the outer-loop DevOps workflow for a Docker application

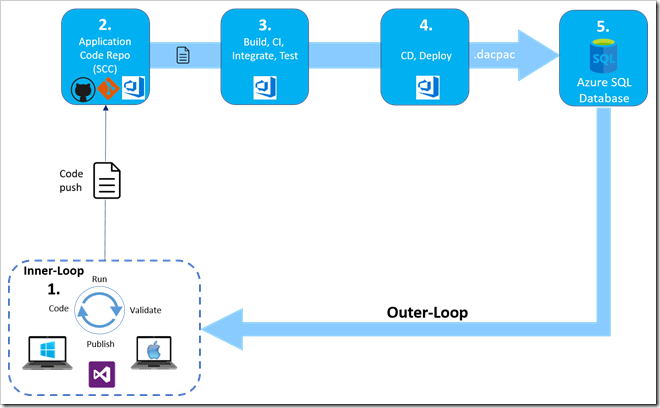
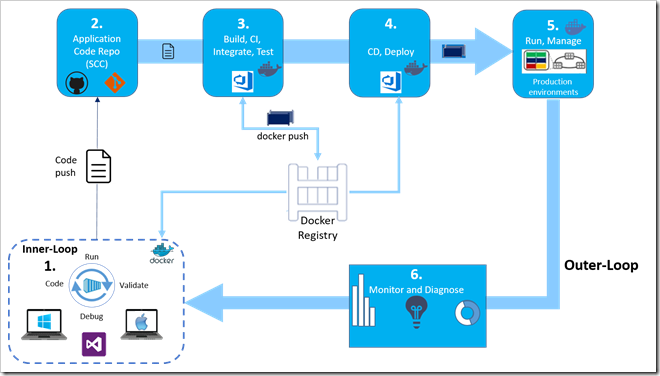
The outer-loop workflow is end-to-end represented in the above Figure. Now, let’s drill down on each of its steps.

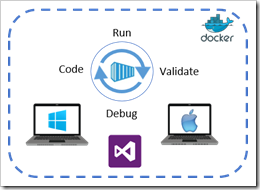
Step 1. Inner loop development workflow for Docker applications

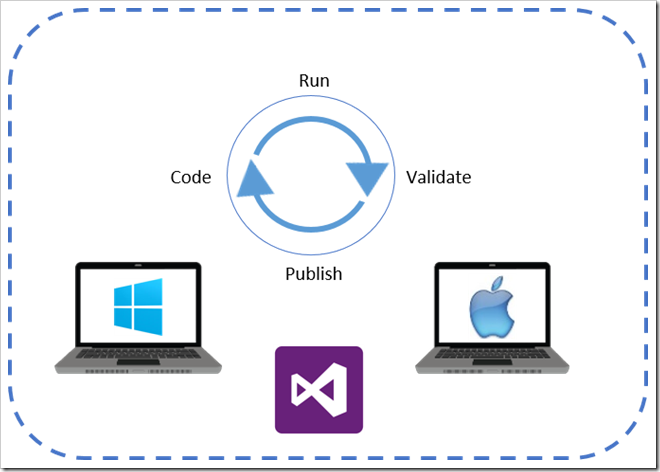
This step was explained in detail in the Part-2 blog, but here is where the outer-loop also starts, in the very precise moment when a developer pushes code to the source control management system (like Git) triggering Continuous Integration (CI) pipeline executions.

Share your code with Visual Studio 2017 and Azure DevOps Git

In Part-3 blog, you already published your code into Azure DevOps by creating the new team project named as AKSDemo.

Changing branch from master to dev in VS2017

Before making changes to your project, first you need to change the branch from master to dev.

  1. Visual Studio uses the Sync view in Team Explorer to fetch changes. Changes downloaded by fetch are not applied until you Pull or Sync the changes.
  2. Open your AKSDemo solution in VS2017, then open up the Synchronization view in Team Explorer by selecting the Home icon and choosing Sync:

    s84

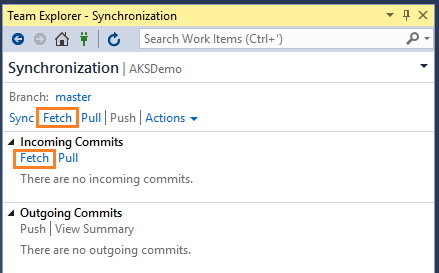
  3. Choose Fetch to update the incoming commits list. (There are two Fetch links, one near the top and one in the Incoming Commits section. You can use either one as they both do the same thing.):

    image

  4. You can review the results of the fetch operation in the Incoming Commits section. Right now you don’t have any Incoming Commits, but the new branch created in Part-3 blog came here while doing the fetch operation.

    Note:

    You will need to fetch the branch before you can see it and swap to it in your local repo.

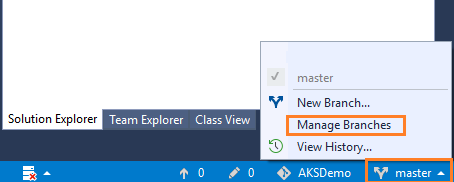
  5. After that right click on master branch and choose the Manage Branches:

    image

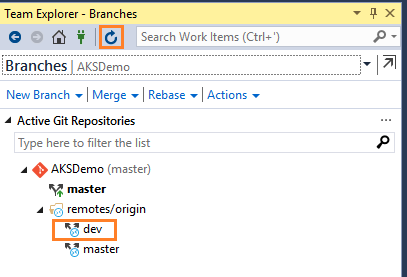
  6. Click on the Refresh icon located at the top; after that expand the remotes/origin and then double click on the dev branch. With that you are automatically redirected to the dev branch from the master branch:

    image

  7. Now you can work on dev branch.
Commit and push updates

Changes in APIApplication project

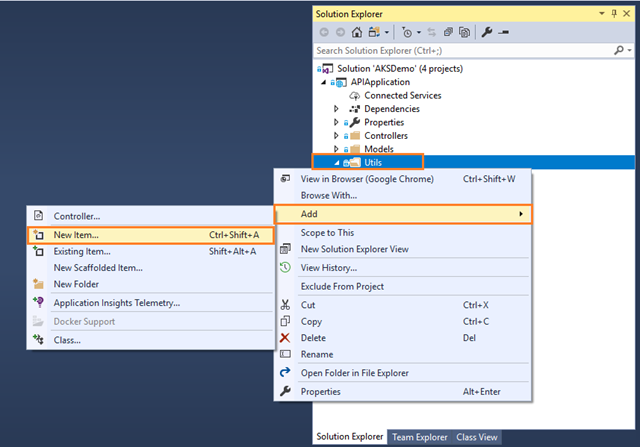
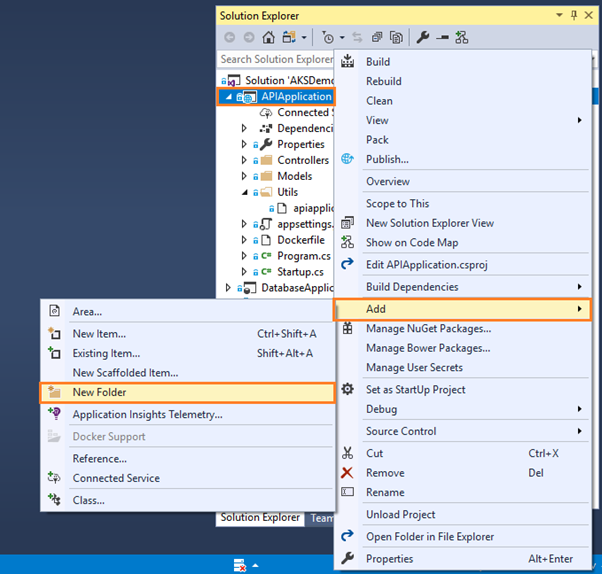
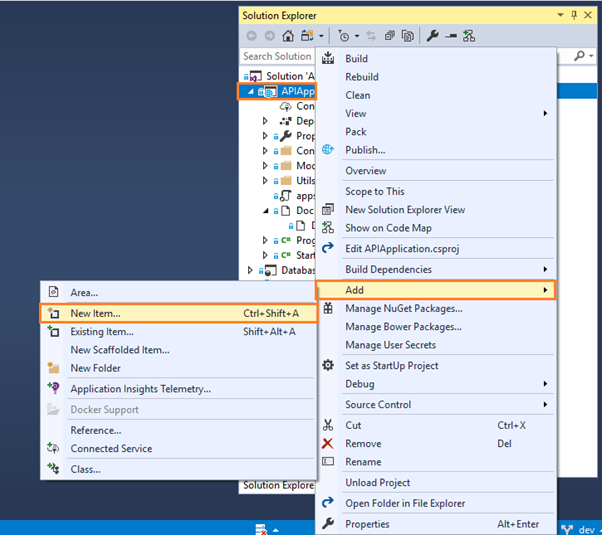
  1. Right click on your APIApplication project then click on Add and choose the New Folder:
    image
  • Enter the New Folder name as Utils.
  • Right click on Utils folder, then click on Add and choose New Item:s231
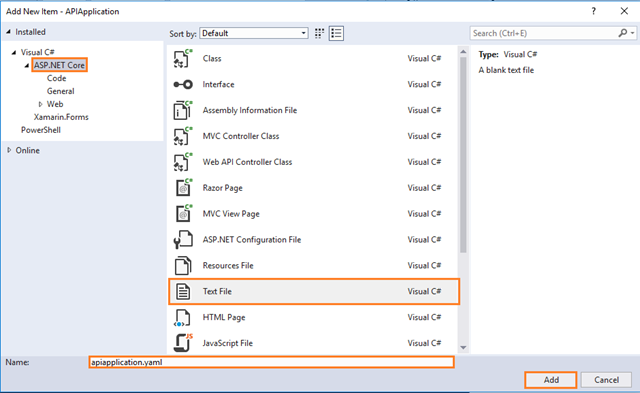
  • Complete the Add New Item dialog:
    • In the left pane, tap ASP.NET Core
    • In the center pane, tap Text File
    • Name of the Text File as apiapplication.yaml
    • Click Add button

      s232

  • Open the apiapplication.yaml file under the Utils folder of your APIApplication project; then add the below lines of code:
    apiVersion: apps/v1beta1
    kind: Deployment
    metadata:
      name: apiapplication
    spec:
      template:
        metadata:
          labels:
            app: apiapplication
        spec:
          containers:
          - name: apiapplication
            image: kzeuaksdmosbdevacr01.azurecr.io/apiapplication:#{Version}#
            env:
            - name: ConnectionStrings_DBConnection
              value: "Server=tcp:kzeu-aksdmo-sb-dev-sq-01.database.windows.net,1433;Initial Catalog=KZEU-AKSDMO-SB-DEV-SDB-01;Persist Security Info=False;User ID=kishore;Password=iSMAC2016;MultipleActiveResultSets=False;Encrypt=True;TrustServerCertificate=False;Connection Timeout=30;"
            ports:
            - containerPort: 80
            imagePullPolicy: Always
    ---
    apiVersion: v1
    kind: Service
    metadata:
      name: apiapplication
    spec:
      type: LoadBalancer
      ports:
      - port: 80
      selector:
        app: apiapplication
    
    Be aware – yaml files want spaces, not tabs, and it expects the indent hierarchy to be as above. If you get the indentations wrong, it will not work.

Note:

If you can’t validate the code inside .yml files, you can refer to this link.s86
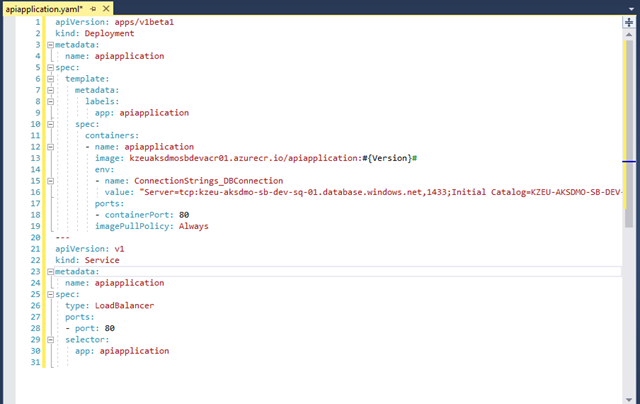
The above yaml contains the type: LoadBalancer. This means, after the container is deployed to Kubernetes, then Kubernetes assigns the proper IP Address to this (apiapplication) container.

I’m not delving into the explanations here, but as you can probably figure out this defines some of the necessary things to describe the container.

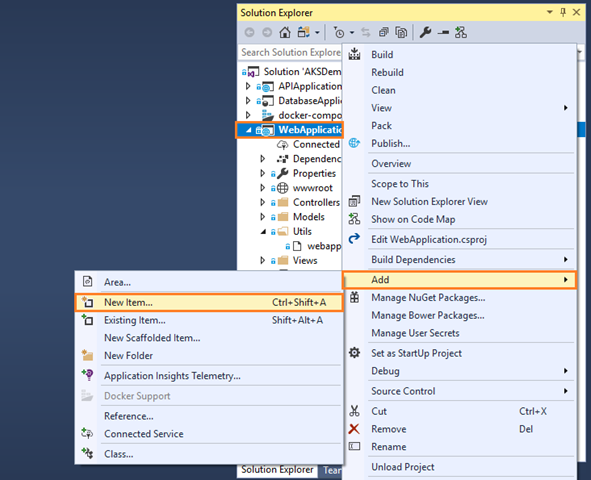
  1. You also need a slightly different Dockerfile for this, so add one called Dockerfile.CI in your APIApplication project.
  2. Right click on your APIApplication project, then click on Add and choose the Add New Item:

    image

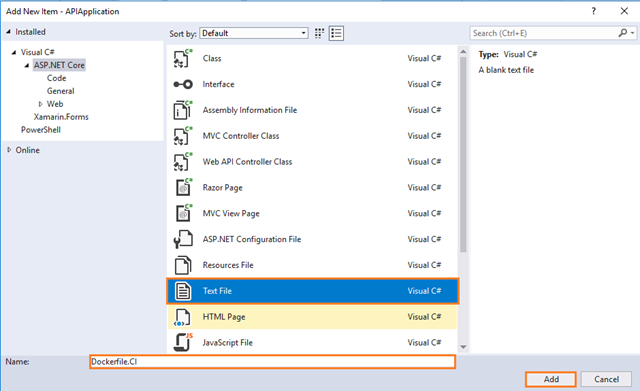
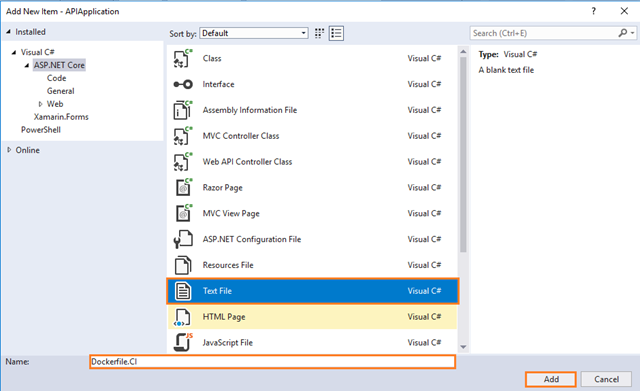
  3. Complete the Add New Item dialog:
    • In the left pane, tap ASP.NET Core
    • In the center pane, tap Text File
    • Name the Text File as Dockerfile.CI
    • Click Add button.s235

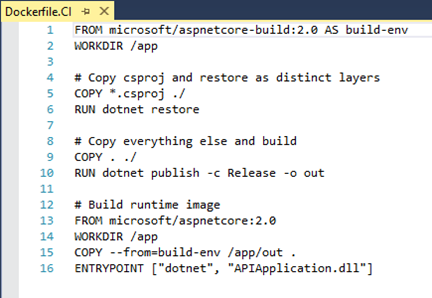
  • Open the Dockerfile.CI file under the main Dockerfile of your APIApplication project and then add the below lines of code:

    FROM microsoft/aspnetcore-build:2.0 AS build-env
    WORKDIR /app
    
    # Copy csproj and restore as distinct layers
    COPY *.csproj ./
    RUN dotnet restore
    
    # Copy everything else and build
    COPY . ./
    RUN dotnet publish -c Release -o out
    
    # Build runtime image
    FROM microsoft/aspnetcore:2.0
    WORKDIR /app
    COPY --from=build-env /app/out .
    ENTRYPOINT ["dotnet", "APIApplication.dll"]
    

    image

Changes in WebApplication project

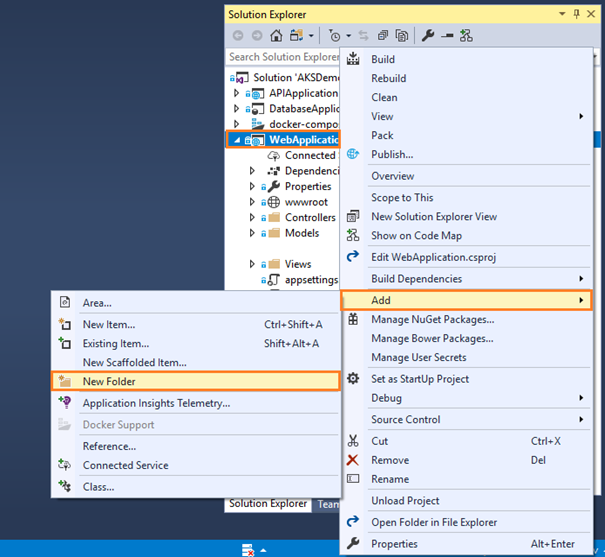
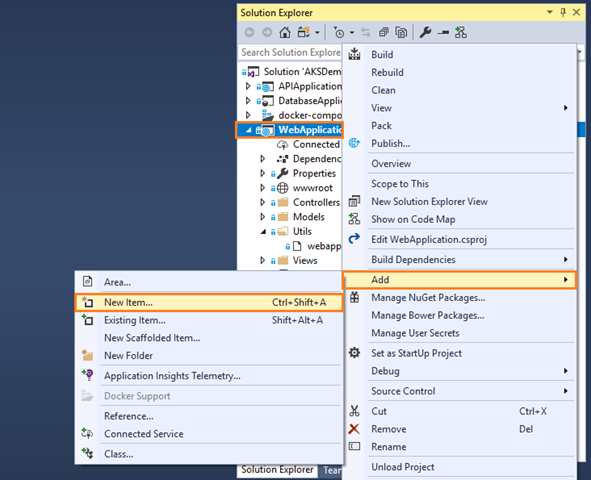
  1. Right click on your WebApplication project, then click on Add and choose the New Folder:image:
  2. Enter the New Folder name as Utils.
  3. Right click on Utils folder, then click on Add and choose New Item:s241
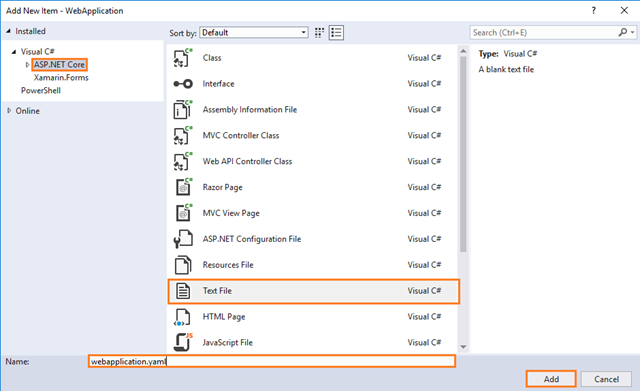
  4. Complete the Add New Item dialog:
    • In the left pane, tap ASP.NET Core
    • In the center pane, tap Text File
    • Name of the Text File as webapplication.yaml
    • Click Add button.s239
  5. Open the webapplication.yaml file under the Utils folder of your APIApplication project and then add the below lines of code:

    apiVersion: apps/v1beta1
    kind: Deployment
    metadata:
      name: webapplication
    spec:
      template:
        metadata:
          labels:
            app: webapplication
        spec:
          containers:
          - name: webapplication
            image: kzeuaksdmosbdevacr01.azurecr.io/webapplication:#{Version}#
            env:
            - name: AppSettings_APIURL
              value: http://40.87.88.177/
            ports:
            - containerPort: 80
            imagePullPolicy: Always
    ---
    apiVersion: v1
    kind: Service
    metadata:
      name: webapplication
    spec:
      type: LoadBalancer
      ports:
      - port: 80
      selector:
        app: webapplication
    

    Be aware – yaml files want spaces, not tabs, and it expects the indent hierarchy to be as above. If you get the indentations wrong it will not work.

    Note:

    If you can’t validate the code inside .yml files, you can refer to this link.
    image

    The above yaml contains the environment variable named as AppSettings_APIURL and also contains the type: LoadBalancer. This means after the container is deployed to Kubernetes, then Kubernetes assigns the proper IP Address to this (webapplication) container

Note:

If you want more information about handling the environment variables in kubernetes deployment file, you can refer to the below link:

https://pascalnaber.wordpress.com/2017/11/29/handling-settings-and-environment-variables-of-your-net-core-2-application-hosted-in-a-docker-container-during-development-and-on-kubernetes-helm-to-the-resque/

  • I’m not delving into the explanations here, but as you can probably figure out this defines some of the necessary things to describe the container.
  • We also need a slightly different Dockerfile for this, so add one called Dockerfile.CI in your WebApplication project
  • Right click on your WebApplication project, then click on Add and choose the Add New Item:

    s241

  • Complete the Add New Item dialog:
    • In the left pane, tap ASP.NET Core
    • In the center pane, tap Text File
    • Name of the Text File as Dockerfile.CI
    • Click Add button.

      s235

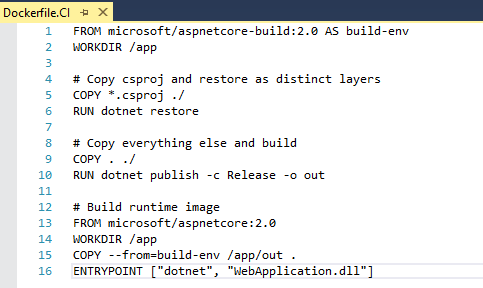
  • Open the Dockerfile.CI file under the main Dockerfile of your WebApplication project and then add the below lines of code:
    FROM microsoft/aspnetcore-build:2.0 AS build-env
    WORKDIR /app
    
    # Copy csproj and restore as distinct layers
    COPY *.csproj ./
    RUN dotnet restore
    
    # Copy everything else and build
    COPY . ./
    RUN dotnet publish -c Release -o out
    
    # Build runtime image
    FROM microsoft/aspnetcore:2.0
    WORKDIR /app
    COPY --from=build-env /app/out .
    ENTRYPOINT ["dotnet", "WebApplication.dll"]
    

    image

    • As you write your code, your changes are automatically tracked by Visual Studio. You can commit changes to your local Git repository by selecting the pending changes icon clip_image069 from the status bar.
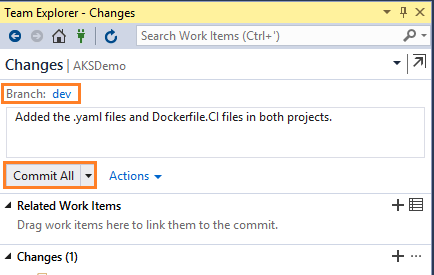
  • On the Changes view in Team Explorer, add a message describing your update and commit your changes:image
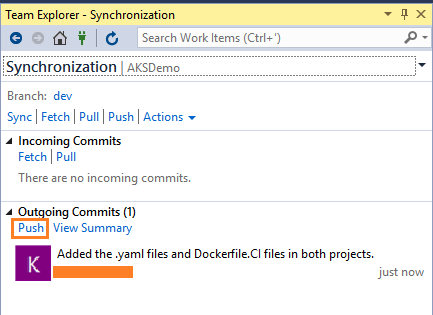
  • Select the unpublished changes status bar icon clip_image072 (or select Sync from the Home view in Team Explorer). Select Push to update your code in Azure DevOps:image
Get changes from others

Sync your local repo with changes from your team as they make updates. For that you can refer to this link.

Step 2. SCC integration and management with Azure DevOps and Git

At this step, you need to have a Version Control system to gather a consolidated version of all the code coming from the different developers in the team.

Even when SCC and source-code management might sound trivial to most developers, when developing Docker applications in a DevOps lifecycle, it is critical to highlight that the Docker images with the application must not be submitted directly to the global Docker Registry (like Azure Container Registry or Docker Hub) from the developer’s machine.

On the contrary, the Docker images to be released and deployed to production environments have to be created based on the source code that is being integrated in your global build/CI pipeline of your source-code repository (like Git).

The local images generated by the developers should be used just by the developer when testing within his/her own machine. This is why it is critical to have the DevOps pipeline triggered from the SCC code.

Microsoft Azure DevOps support Git and Team Foundation Version Control: You can choose between them and use it for an end-to-end Microsoft experience. However, you can also manage your code in external repositories (like GitHub, on-premises Git repos or Subversion) and still be able to connect to them and get the code as the starting point for your DevOps CI pipeline.

Note:

Here, we are currently using Azure DevOps and Git for managing the source code pushed by developers into a specified repository (for example AKSDemo). We are also creating the Build and Release Pipelines here.

Alright, now you have everything set up for creating specifications of your pipeline from Visual Studio to a running containers. We need two definitions for this:

  • How Azure DevOps should build and push the resulting artifacts to ACR.
  • How AKS should deploy the containers.

Step 3. Build, CI, Integrate with Azure DevOps and Docker

There are two ways you can approach handling of the building process.

You can push the code into the repo, build the code “directly”, pack it into a Docker image, and push the result to ACR.

The other approach is to push the code to the repo, “inject” the code into a Docker image for the build, have the output in a new Docker image, and then push the result to ACR. This would for instance allow you to build things that aren’t supported natively by Azure DevOps.

I seem to get the second approach to run slightly faster. So, here we will choose the second approach.

The AKS part and the Azure DevOps part takes turns in this game. First you built Continuous Integration (CI) on Azure DevOps, then you built a Kubernetes cluster (AKS), and now the table is turned towards Azure DevOps again for Continuous Deployment (CD). So, before building the CD pipeline let’s set up a CI pipeline.

Building a CI pipeline
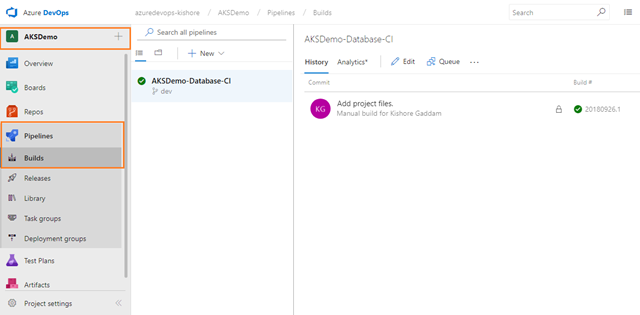
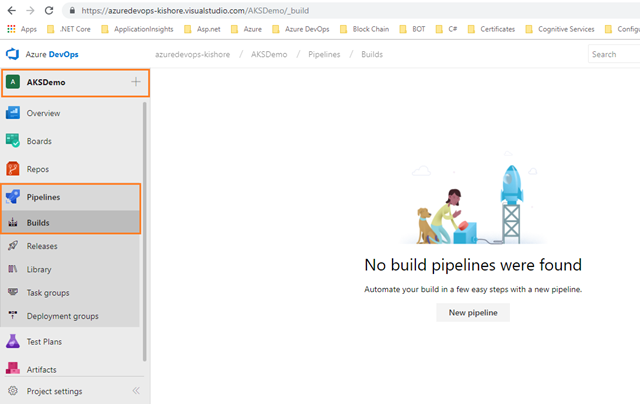
  1. Login to your Azure DevOps account, Select Azure Pipelines, it should automatically take you to the Builds page:

    s88

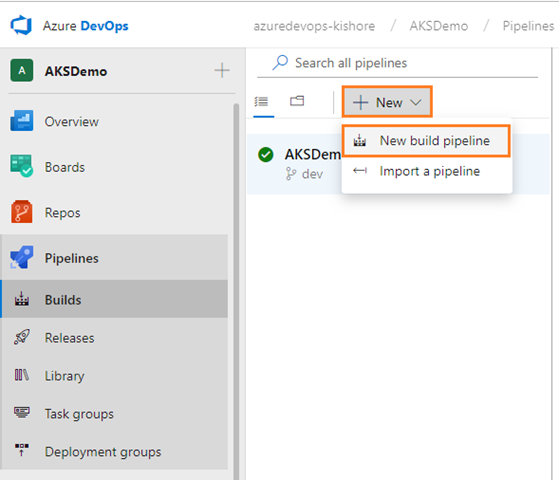
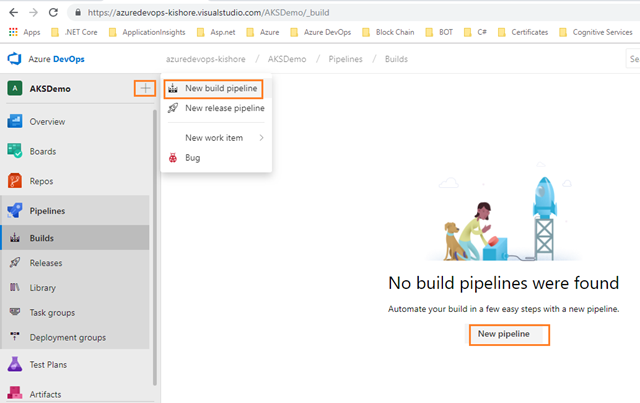
  2. Create a New build pipeline:

    s89

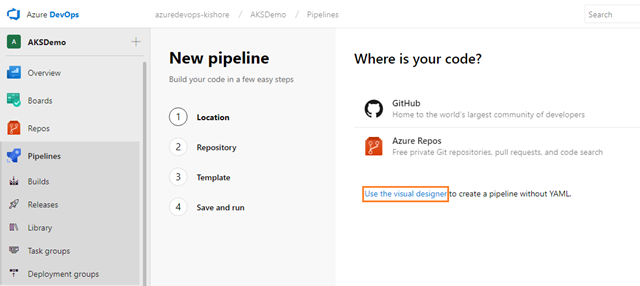
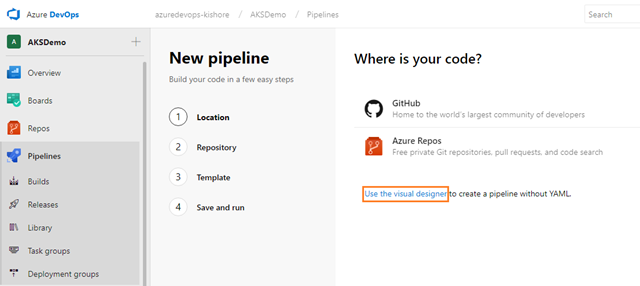
  3. Click on Use the visual designer to create build pipeline without YAML:

    s24

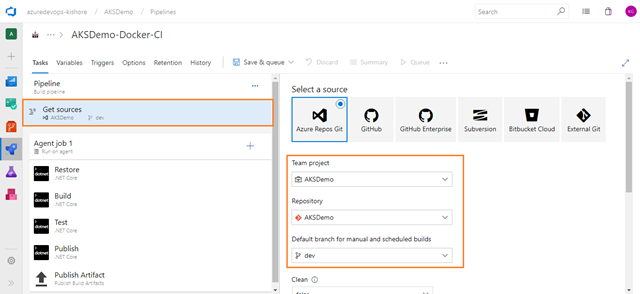
  4. Make sure that the Source, Team project name along with Repository and Default branch which you are working, as shown in the  figure below, and click on the Continue button:

    s25

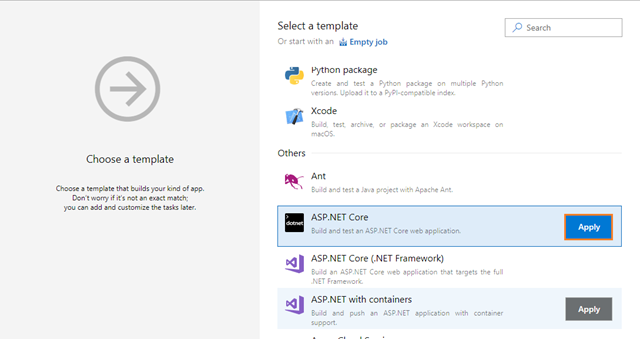
  5. Choose template as ASP.NET Core:

    s90

  6. On the left side, select Pipeline and specify a Name of your choice. For the Agent pool, select Hosted Ubuntu 1604:

    s91

  7. After that click on the Get sources; with that all values are selected by default for getting the code from a specified repository along with a specified branch. If you want to change the default values then you can change here:

    s92

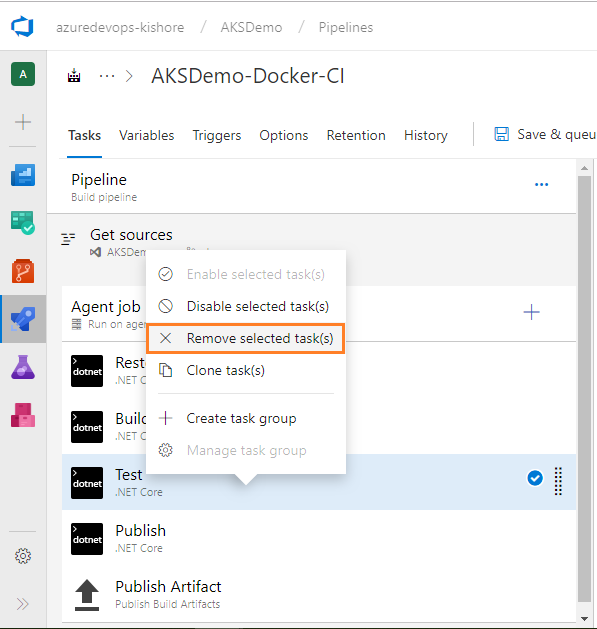
  8. By default the ASP.NET Core template will provide the Restore, Build, Test, Publish and Publish Artifact tasks. You can remove the Test task from the current build pipeline, because you are not doing any testing.
  9. Right click on Test task choose Remove selected task(s):

    s93

  10. There is no need to modify the Restore and Build tasks of .NET Core.
Publish
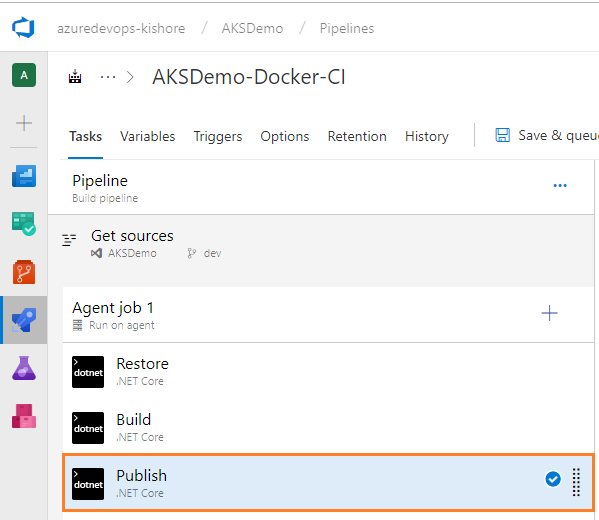
  1. Next, on the left side, select your new Publish task:

    s94

  2. Now you need to modify the Publish task to publish your .NET Core project using the .NET Core task with the Command set to publish.
  3. Configure the .NET Core task as follows:
    • Display name: Publish
    • Command: publish
    • Path to project(s): The path to the csproj file(s) to use. You can use wildcards (e.g. **/.csproj for all .csproj files in all subfolders). Example: **/*.csproj
    • Uncheck “Publish Web Projects“.
    • Arguments: Arguments to the selected command. For example configuration $(BuildConfiguration) –output $(build.artifactstagingdirectory)
    • Uncheck “Zip Published Projects“.
    • Uncheck “Add project name to publish path“.s95
  4. Next, you need to add four Docker tasks (not Docker Compose). Coming to the Docker part, you need to do build and push images to the Azure Container Registry. Currently AKSDemo project contains applications like WebApplication and APIApplication, so, you need to add two build Docker tasks and two push Docker tasks.
Build an image for APIApplication
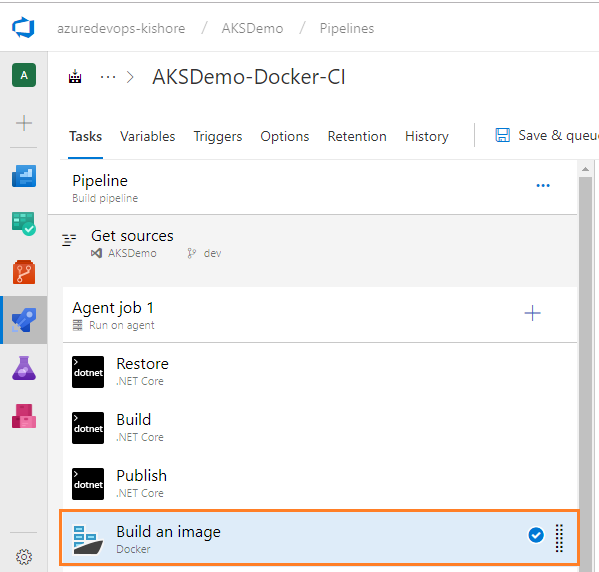
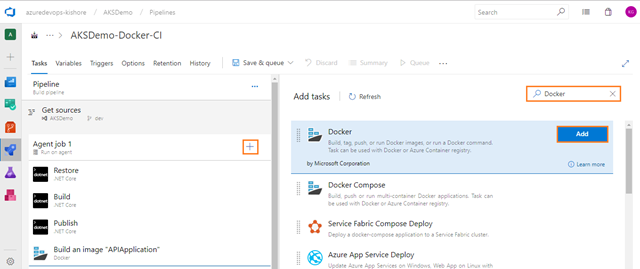
  1. On the Tasks tab, select the plus sign (+) to add a task to Job 1. On the right side, type “Docker” in the search box and click on the Add button of Docker build task as shown in the figure below:

    s96

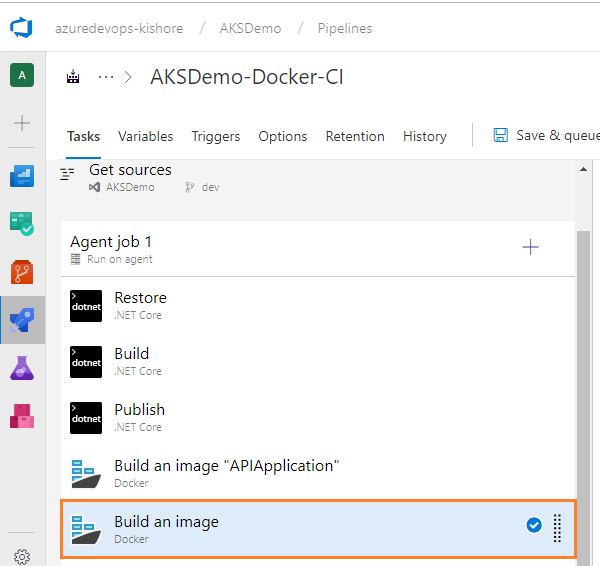
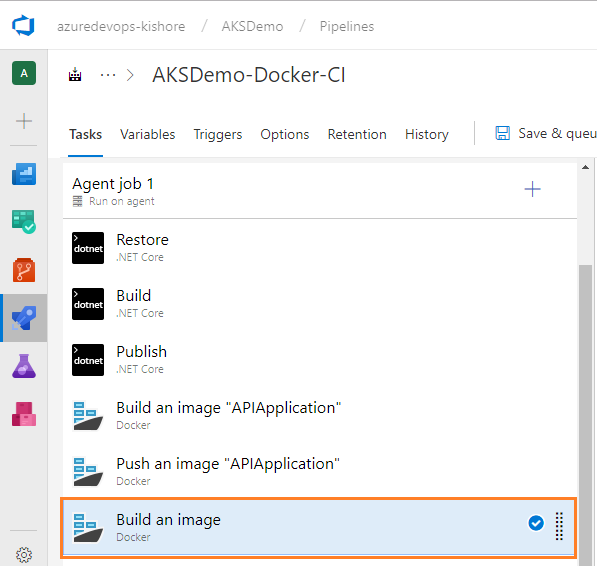
  2. On the left side, select your new Docker task:

    s97

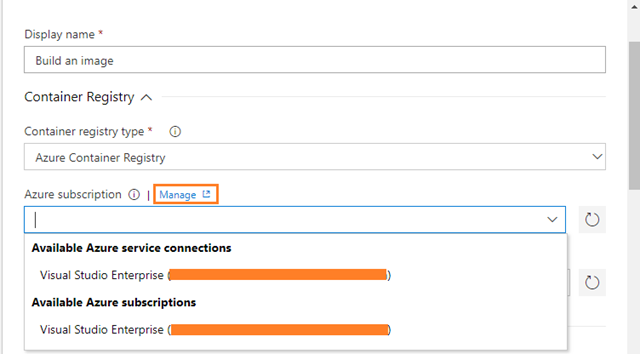
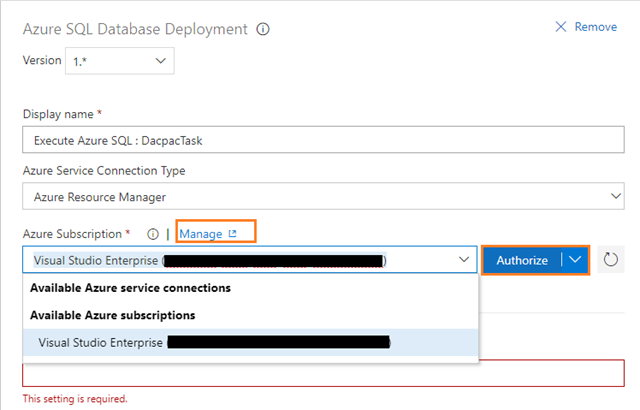
  3. Firstly, configure the Docker tasks for APIApplication. For this you need Azure Resource Manager Subscription connection. If your Azure DevOps account is already linked to an Azure subscription, then it will automatically display under Azure subscription drop down as shown in below screenshot. Otherwise click on Manage:

    s98

Azure Resource Manager Endpoint

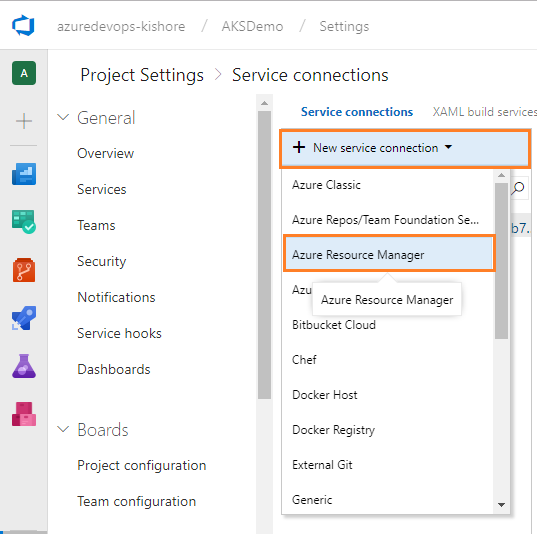
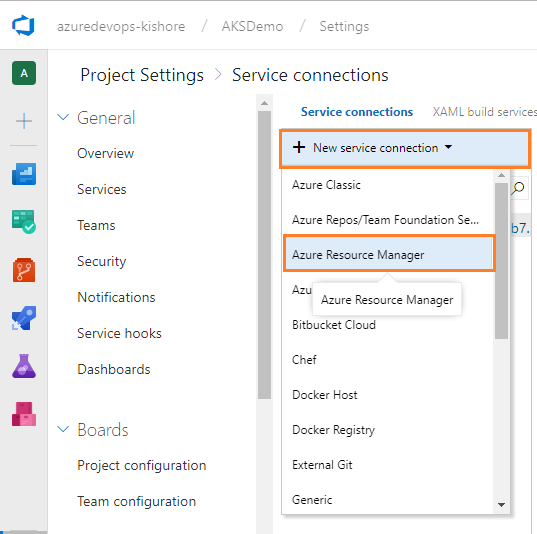
  1. In above step when you click on Manage link. It navigates to Settings tab, select New service connection option on the left pane:

    s56

  2. Whenever you click on the New Service Endpoint a dropdown list will open. From that you can select Azure Resource Manager endpoint:

    s57

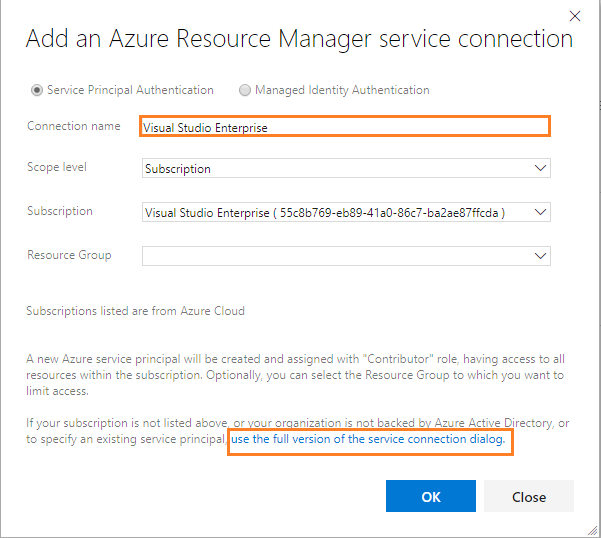
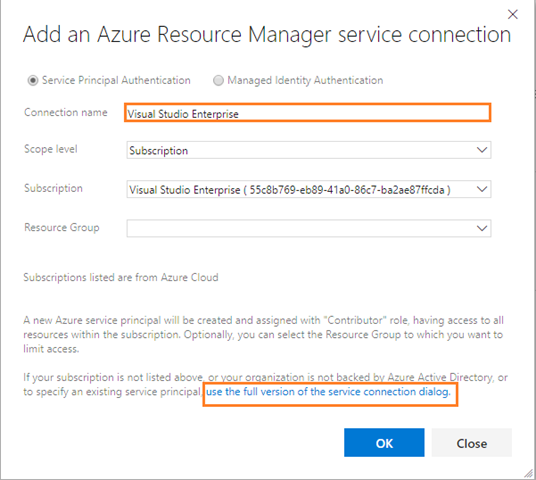
  3. If your work is already backed by your azure service principal, then give a name to your service endpoint and select the Azure subscription from the dropdown:

    s58

  4. If not backed by Azure then click on the hyperlink ‘use the full version of the service connection dialog’ as shown in above screenshot.
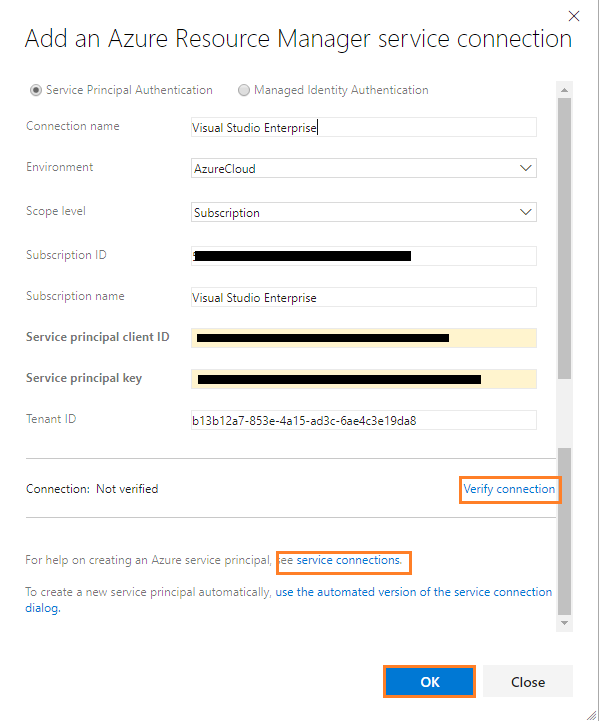
  5. If you have your service principal details, you can enter directly and click on Verify connection. If the Connection is verified successfully, then click on the OK button. Otherwise you can reference the service connections link provided on the same popup as marked in below screenshot:

    s59

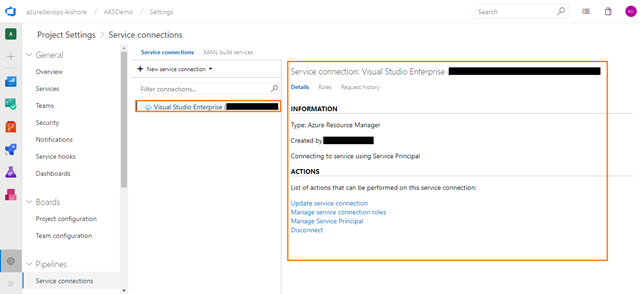
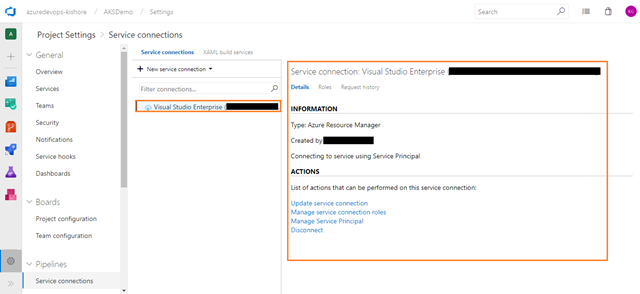
  6. Once you are done adding a service principal successfully, you will see something like the figure below:

    s60

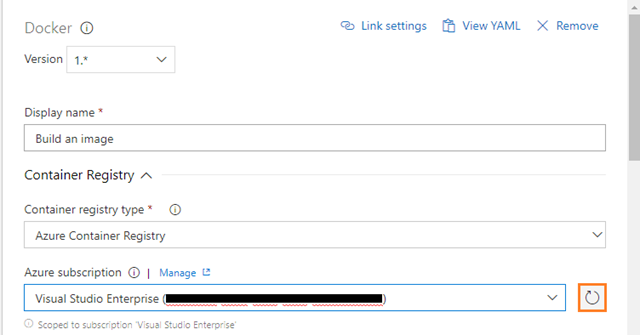
  7. Now go back to your Build definition page, and click on refresh icon. It should display the Azure Resource Manager endpoint in the Azure subscription dropdown list which you created in the previous step:

    s99

Configure first Docker task

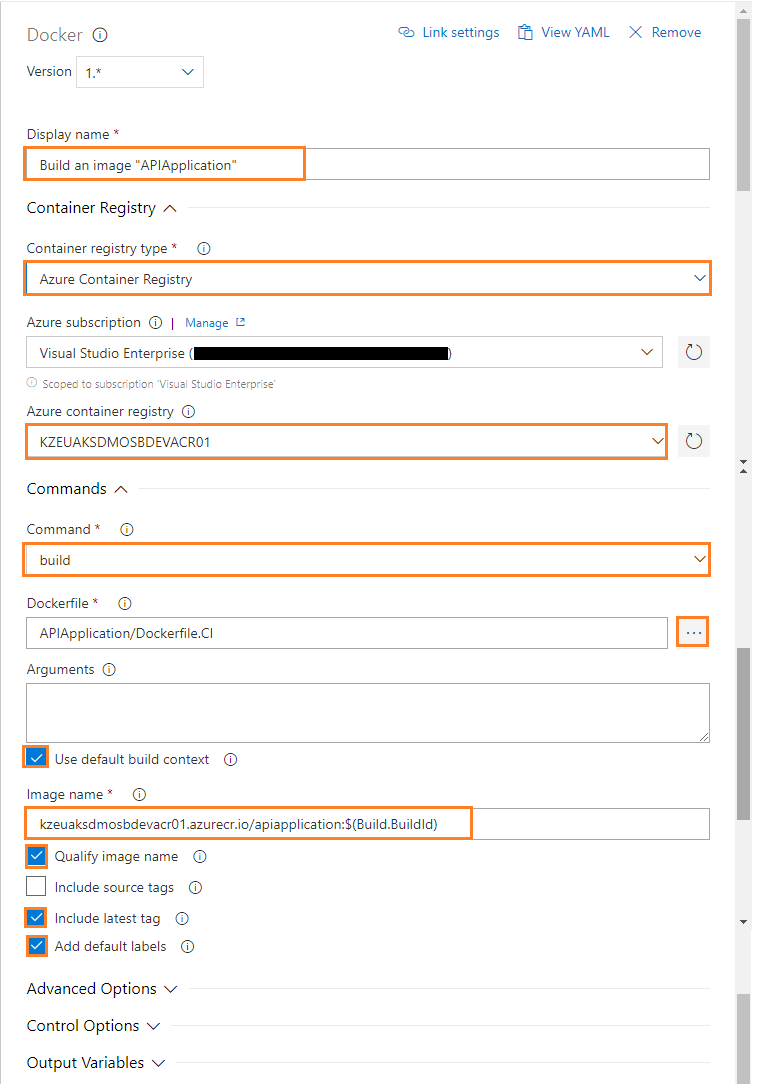
  1. Configure the Docker task for Build an Image of APIApplication as follows:
    • Display name: Build an image “APIApplication”
    • Container Registry Type: Select a Container Registry Type. For example: Azure Container Registry
    • Azure Subscription: Select an Azure subscription
    • Azure Container Registry: Select an Azure Container Registry. For example: KZEUAKSDMOSBDEVACR01
    • Command: Select a Docker command. For example: build
    • Dockerfile: Path to the Docker file to use. Must be within the Docker build context. For example: APIApplication/Dockerfile.CI
    • Check the Use Default Build Context: Set the build context to the directory that contains the Docker file.
    • Image Name: Name of the Docker image to build. For example: kzeuaksdmosbdevacr01.azurecr.io/apiapplication:$(Build.BuildId)
    • Check the Qualify Image Name: Qualify the image name with the Docker registry connection’s hostname if not otherwise specified.
    • Check the Include Latest Tag. (While we’re not actively using it we still want to have it available just in case.): Include the ‘latest’ tag when building or pushing the Docker image:

      s100

Push an image of APIApplication
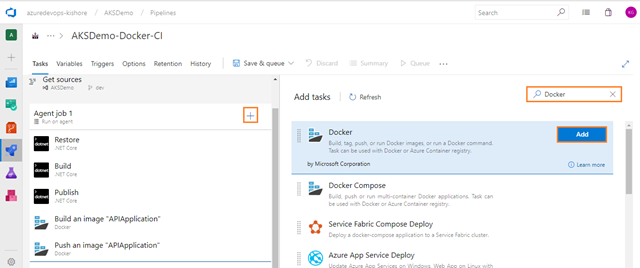
  1. Next add one more Docker task for pushing the image of APIApplication into Azure Container Registry. For that select the Tasks tab, select the plus sign (+) to add a task to Job 1. On the right side, type “Docker” in the search box and click on the Add button of Docker build task, as shown in the figure below:

    s101

  2. On the left side, select your new Docker task:

    s102

Configure second Docker task

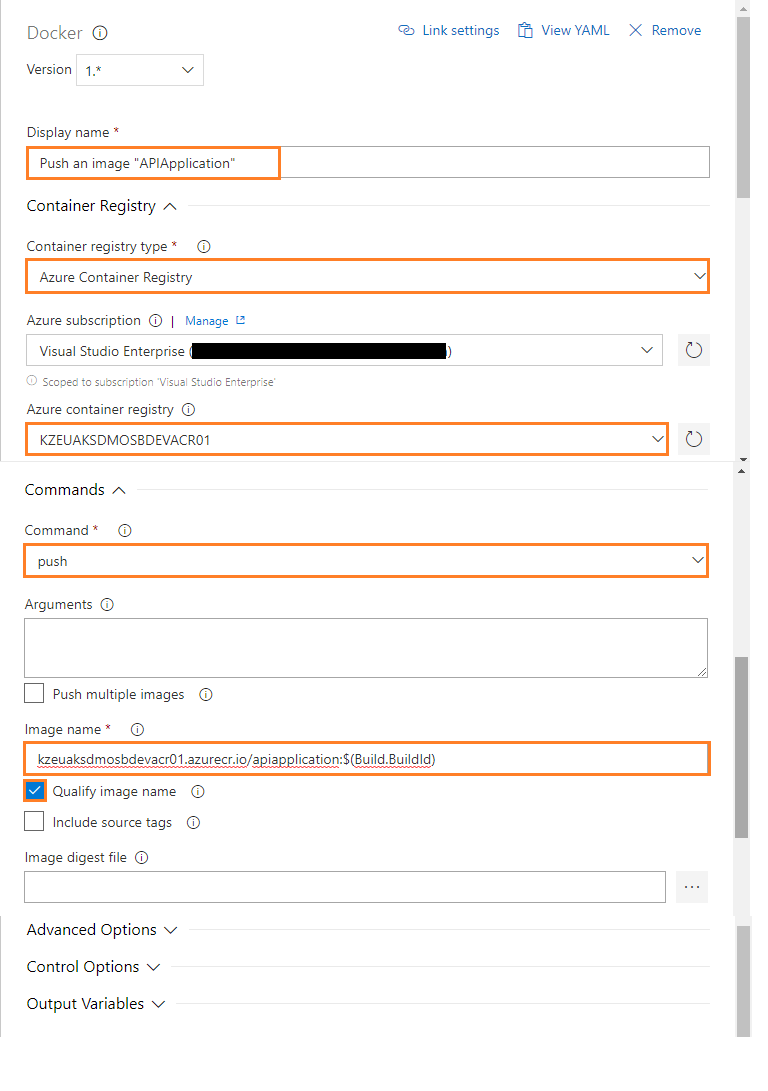
  1. Configure the above Docker task for Push an Image of APIApplication as follows:
    • Display name: Push an image “APIApplication”
    • Container registry type: Select a Container Registry Type. For example: Azure Container Registry
    • Azure subscription: Select an Azure subscription
    • Azure container registry: Select an Azure Container Registry. For example: KZEUAKSDMOSBDEVACR01
    • Command: Select a Docker action. For example: push
    • Image name: Name of the Docker image to push. For example: kzeuaksdmosbdevacr01.azurecr.io/apiapplication:$(Build.BuildId)
    • Check the Qualify image name: Qualify the image name with the Docker registry connection’s hostname, if not otherwise specified.s103
Build an Image for WebApplication
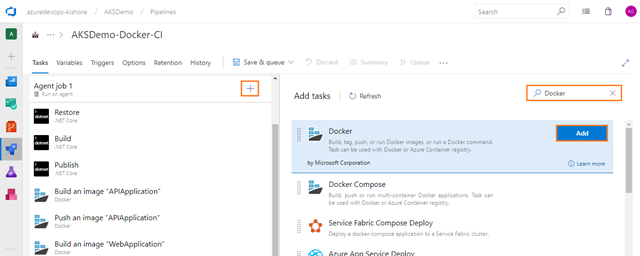
  1. Next, add one more Docker task for building the image of WebApplication. For that select the Tasks tab, then select the plus sign (+) to add a task to Job 1. On the right side, type “Docker” in the search box and click on the Add button of Docker build task, as shown in the figure below:

    s104

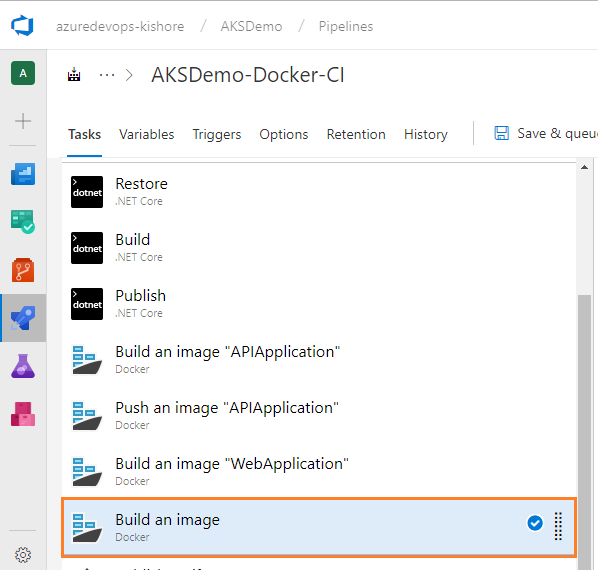
  2. On the left side, select your new Docker task:

    s105

Configure third Docker task

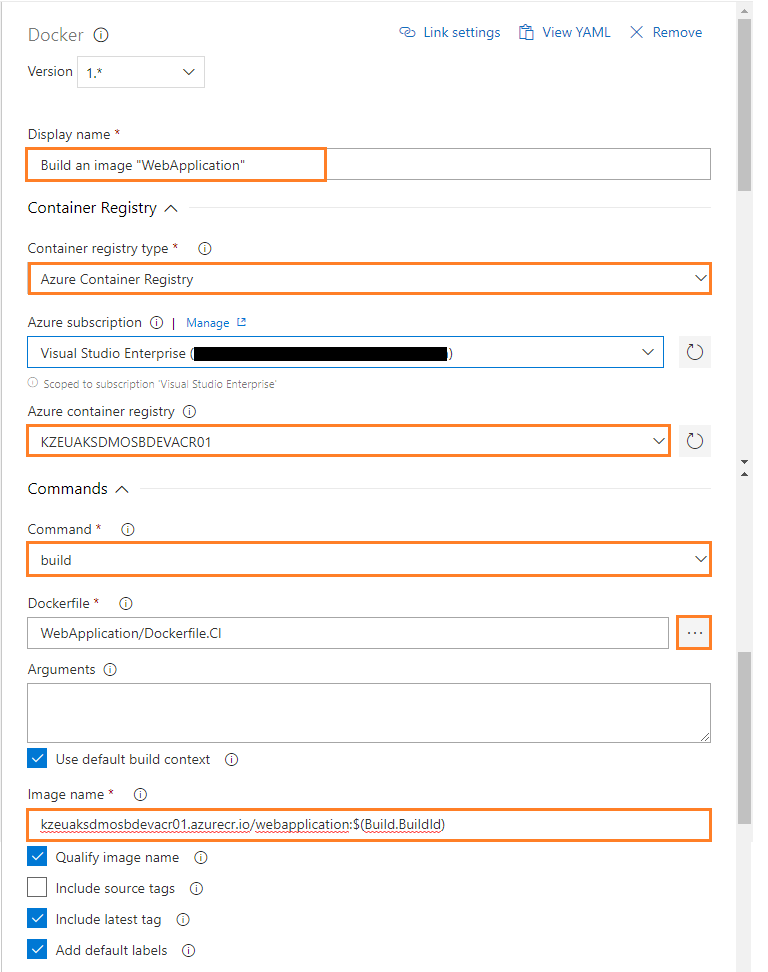
  1. Configure the above Docker task for Build an Image of WebApplication as follows:
    • Display name: Build an image “WebApplication”
    • Container registry type: Select a Container Registry Type. For example: Azure Container Registry
    • Azure subscription: Select an Azure subscription
    • Azure container registry: Select an Azure Container Registry. For example: KZEUAKSDMOSBDEVACR01
    • Command: Select a Docker command. For example: build
    • Dockerfile: Path to the Docker file to use. Must be within the Docker build context. For example: WebApplication/Dockerfile.CI
    • Check the Use default build context: Set the build context to the directory that contains the Docker file.
    • Image name: Name of the Docker image to build. For example: kzeuaksdmosbdevacr01.azurecr.io/webapplication:$(Build.BuildId)
    • Check the Qualify image name: Qualify the image name with the Docker registry connection’s hostname if not otherwise specified.
    • Check the Include latest tag. (While we’re not actively using it we still want to have it available just in case.): Include the ‘latest’ tag when building or pushing the Docker image.

      s106

Push an image of WebApplication
  1. Next, add one more Docker task for pushing the image of WebApplication into Azure Container Registry. For that select Tasks tab, select the plus sign (+) to add a task to Job 1. On the right side, type “Docker” in the search box and click on the Add button of Docker build task as shown in the figure below:

    s107

  2. On the left side, select your new Docker task.

    s108

Configure fourth Docker task

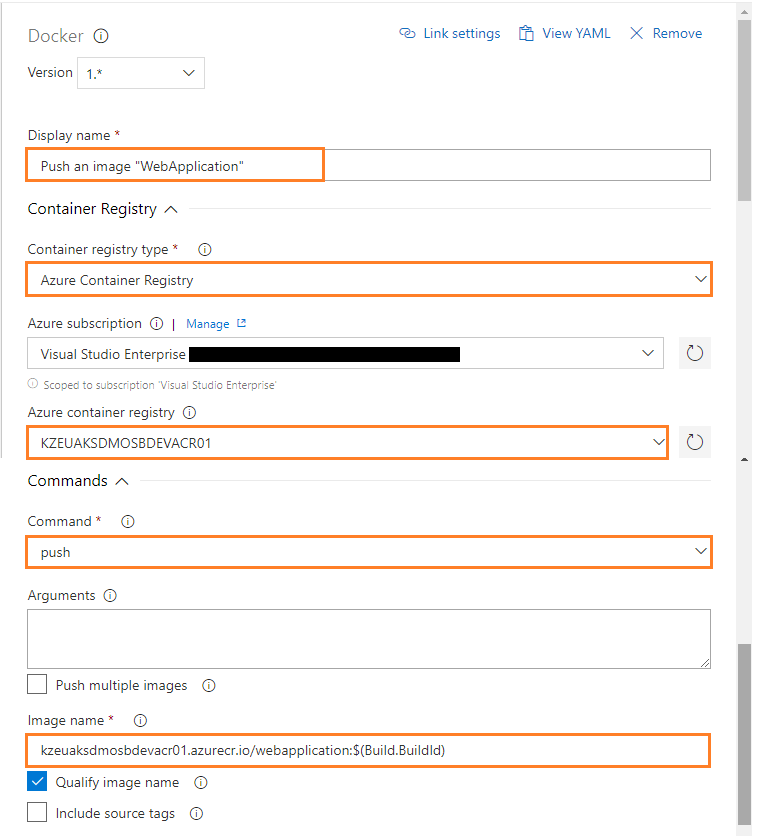
  1. Configure the above Docker task for Push an Image of WebApplication as follows:
    • Display name: Push an image “WebApplication”
    • Container registry type: Select a Container Registry Type. For example: Azure Container Registry
    • Azure subscription: Select an Azure subscription
    • Azure container registry: Select an Azure Container Registry. For example: KZEUAKSDMOSBDEVACR01
    • Command: Select a Docker action. For example:push
    • Image name: Name of the Docker image to push. For example: kzeuaksdmosbdevacr01.azurecr.io/apiapplication:$(Build.BuildId)
    • Check the Qualify image name: Qualify the image name with the Docker registry connection’s host name, if not otherwise specified.s109
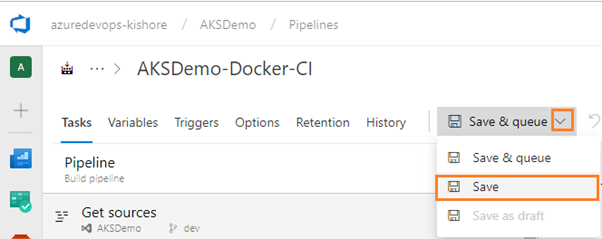
  2. Click on Save:image

Install Replace Tokens Azure DevOps task from Marketplace
  1. You used a variable as Version in webapplication.yaml and apiapplication.yaml for the image tag, but it doesn’t automatically get translated; so you need a separate task for this i.e Replace Tokens. But it’s currently not in Azure DevOps, therefore, add a task from the Azure DevOps marketplace.
  2. For that click on Browse Marketplace:

    s110

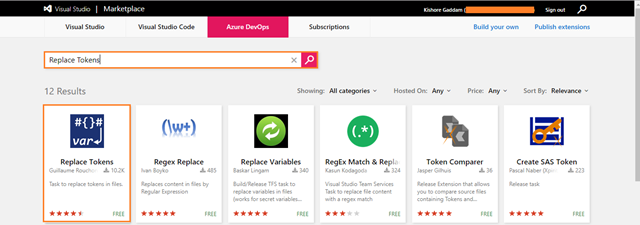
  3. Next, it will navigate to a new page for Marketplace:  enter “Replace Tokens” on the Search Box and select from the top most result search list as shown in the figure below:

    s111

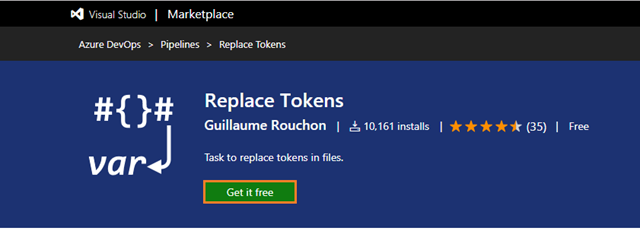
  4. Click on Get it free button:

    s112

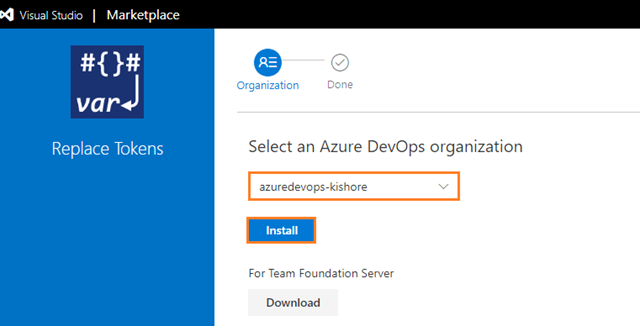
  5. Select an Azure DevOps Organization and then click on Install:

    s113

    Note:

    If you want more information about Replace Tokens task, you can refer to this link

    https://marketplace.visualstudio.com/items?itemName=qetza.replacetokens

  6. After having installed the above extension from Azure DevOps Marketplace go back to your build pipeline and refresh your current browser page.
Replace tokens in apiapplication.yaml
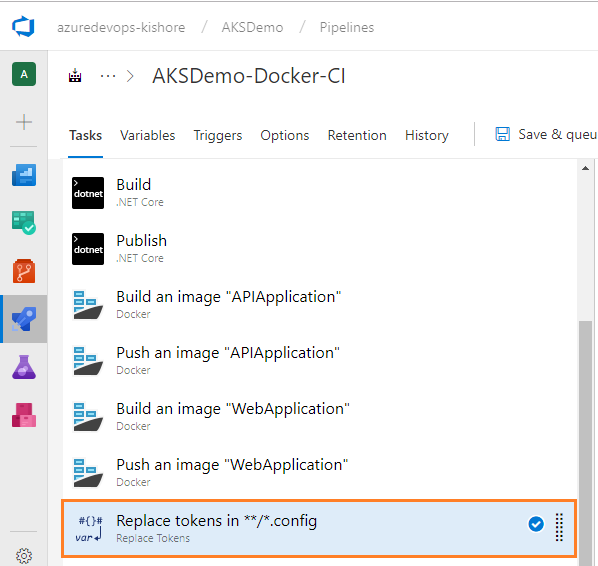
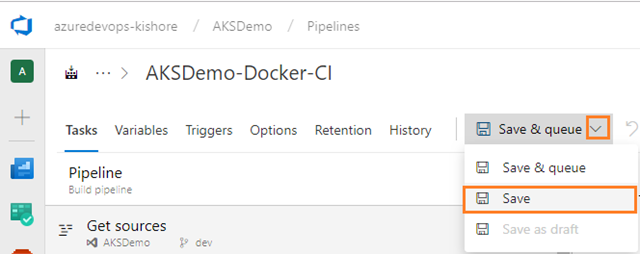
  1. On the Tasks tab, select the plus sign (+) to add a task to Job 1. On the right side, type “Replace Tokens” in the search box and click on the Add button of Replace Tokens build task, as shown in the figure below:
    s115

  2. On the left side, select your new Replace Tokens task:
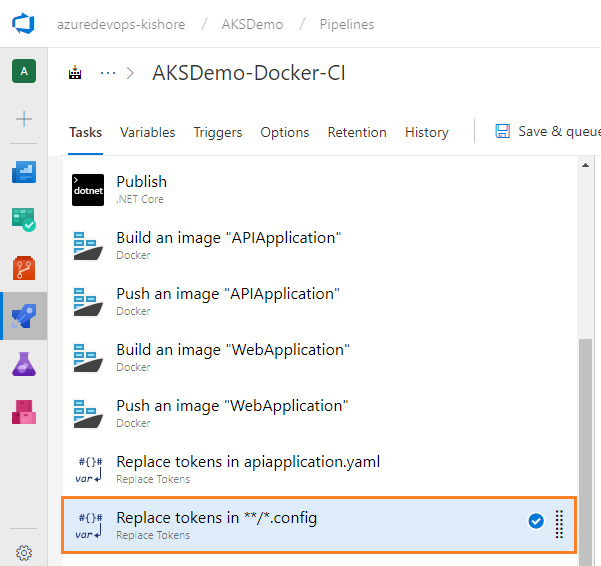
    s116

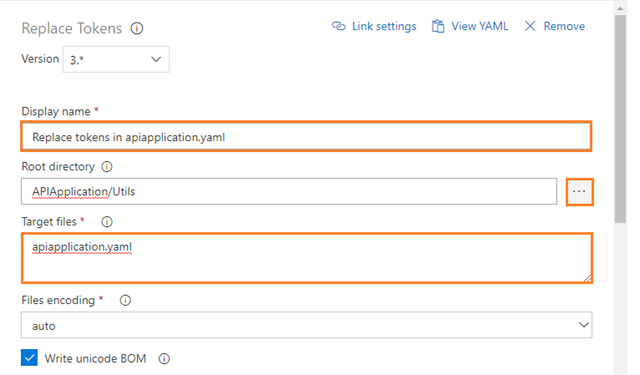
  3. Configure the above Replace Tokens task for replacing the tokens in apiapplication.yaml file as follows:
    • Display name: Replace tokens in apiapplication.yaml
    • Root directory: Base directory for searching files. If not specified, the default working directory will be used. For Example: APIApplication/Utils
    • Target files: Absolute or relative comma or newline-separated paths to the files to replace tokens. Wildcards can be used. For Example: apiapplication.yaml
    • Leave the remaining parameter values as default values.

      s117

Replace tokens in webapplication.yaml
  1. Next, add one more Replace Tokens task for replacing tokens in the webapplication.yaml file. For that select Tasks tab and then select the plus sign (+) to add a task to Job 1. On the right side, type “Replace Tokens” in the search box and click on the Add button of Replace Tokens build task, as shown in the figure below:s114
  2. On the left side, select your new Replace Tokens task:s118
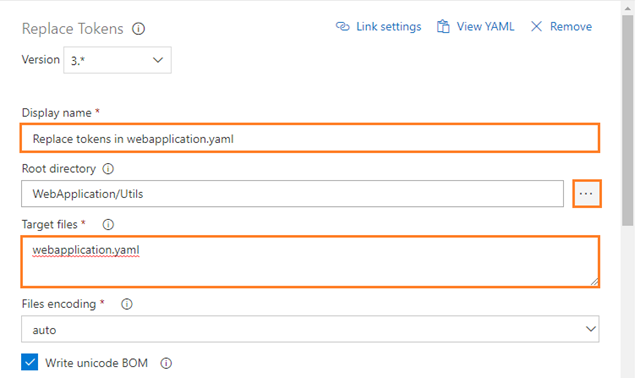
  • Configure the above Replace Tokens task for replacing the tokens in webapplication.yaml file as follows:
    • Root directory: Base directory for searching files. If not specified the default working directory will be used. For Example: WebApplication/Utils
    • Target files: Absolute or relative comma or newline-separated paths to the files to replace tokens. Wildcards can be used. For Example: webapplication.yaml
    • Leave the remaining parameter values as default values.

      s119

    • Display name: Replace tokens in webapplication.yaml

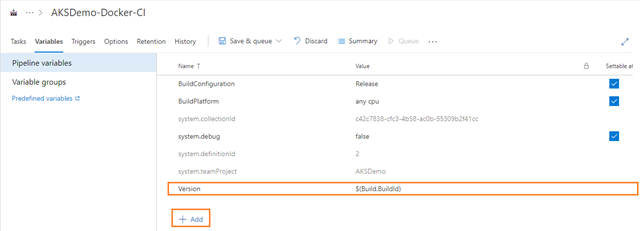
  • To define which variable to replace head to the Variables tab and add the name “Version” and value $(Build.BuildId):s120

Copy Files
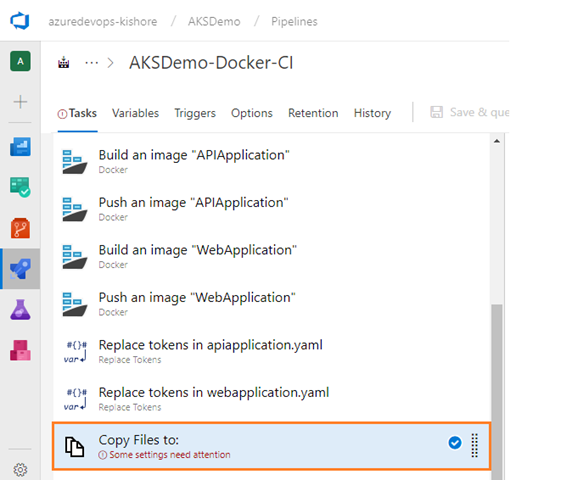
  1. Go back to the Tasks tab then add Copy Files task, for copying the files from source folder to target folder using match patterns. For that select Tasks tab and then select the plus sign (+) to add a task to Job 1. On the right side, type “Copy Files” in the search box and click on the Add button of Copy Files build task, as shown in the figure below:

    s121

  2. On the left side, select your new Copy Files task:

    s122

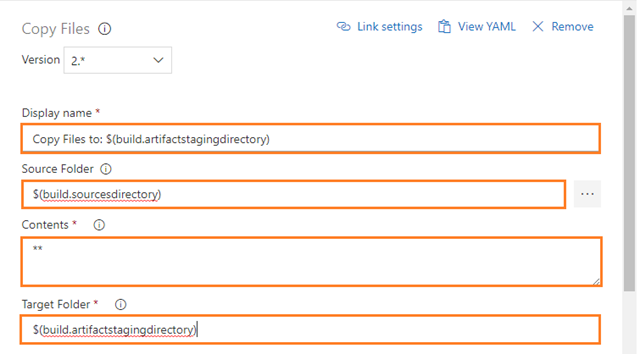
  3. Configure the above Copy Files task for copying the files from the source folder to the target folder using match patterns as follows:
    • Display name: Copy Files to: $(build.artifactstagingdirectory)
    • Source Folder: The source folder that the copy pattern(s) will be run from. Empty is the root of the repo. For example: $(build.sourcesdirectory)
    • Contents: File paths to include as part of the copy. Supports multiple lines of match patterns. For example: **
    • Target Folder: The target folder or UNC path files will copy to. For example: $(build.artifactstagingdirectory)

      s123

Note:

If you want more information about Copy Files task you can refer this link

https://docs.microsoft.com/en-us/azure/devops/pipelines/tasks/utility/copy-files?view=vsts

Publish Build Artifacts
  1. This Publish Build Artifacts task is automatically added whenever you choose ASP.NET Core as a template.
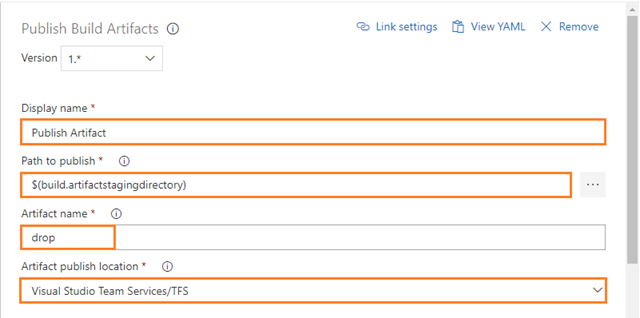
  2. Configure the above Publish Build Artifacts task as follows:
    • Display name: Copy Files to: Publish Artifact
    • Path to publish: The folder or file path to publish. This can be a fully-qualified path or a path relative to the root of the repository. Wildcards are not supported. For example: $(build.artifactstagingdirectory)
    • Artifact name: The name of the artifact to create in the publish location. For example: drop
    • Artifact publish location: Choose whether to store the artifact in Azure DevOps/TFS  or to copy it to a file share that must be accessible from the build agent. For example: Visual Studio Team Services/TFS

      s124

Note:

If you want  more information about Publish Build Artifacts task, you can refer to this link.

https://docs.microsoft.com/en-us/azure/devops/pipelines/tasks/utility/publish-build-artifacts?view=vsts

Enable continuous integration
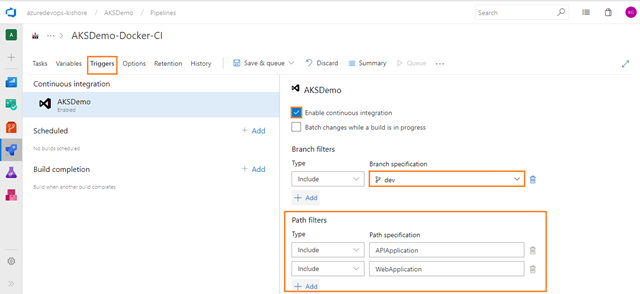
  1. Select the Triggers tab and check the Enable continuous integration option.
  2. Add the Path filters as shown in the figure below:

s125

The above build will be triggered only if you modify the files in APIApplication and WebApplication of your team project i.e AKSDemo. This build will not be triggered, if you modify the files in the DatabaseApplication of your team project i.e AKSDemo.

Note:

Here I am adding Path filters for APIApplication and WebApplication in Triggers tab because this AKSDemo repository contains the DatabaseApplication. If not adding to the Path filters here, then you are getting the error during execution of the build. This is because currently you are using Hosted Ubuntu 1604 as Agent pool; by using this agent you are not able to restore the packages and build the DatabaseApplication. That’s why you created separated CI and CD for this DatabaseApplication in the Part-3 blog.

Specify Build number format
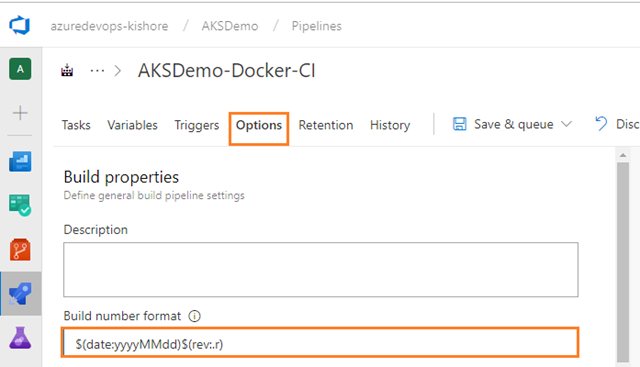
  1. Select the Options tab and give the Build number format like (for example $(date:yyyyMMdd)$(rev:.r) ) this figure below:

    s126

Complete Build Pipeline
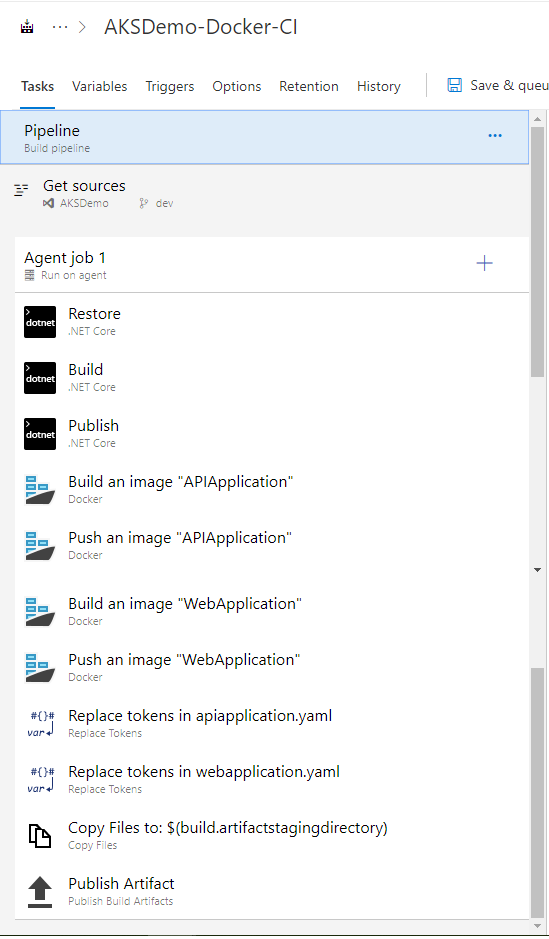
  1. Go to the Tasks tab, then see your completed pipeline like this:

    s127

Save and queue the build

Save and queue a build manually and test your build pipeline.

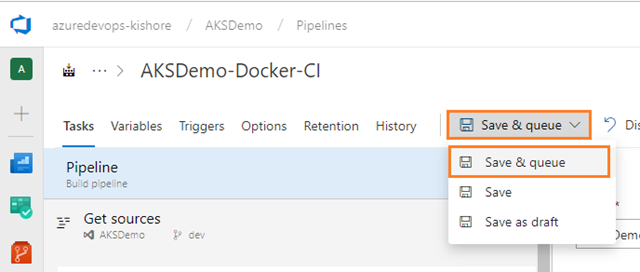
  1. Select Save & queue, and then select Save & queue:

    s128

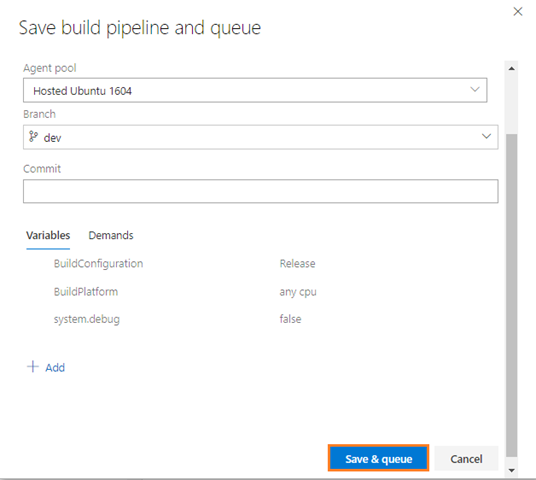
  2. On the dialog box, select Save & queue once more:

    s129

  3. This queues a new build on the Hosted Ubuntu 1604 agent.
  4. You see a link to the new build on the top of the page:

    s130

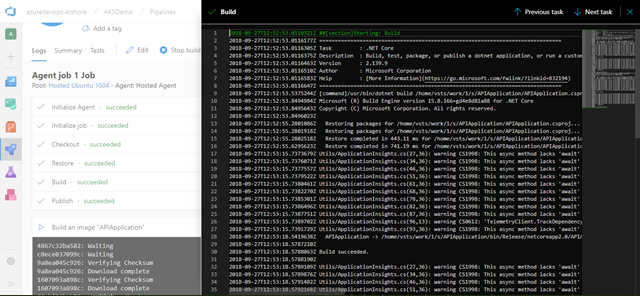
  5. Choose the link to watch the new build as it happens. Once the agent is allocated, you’ll start seeing the live logs of the build:

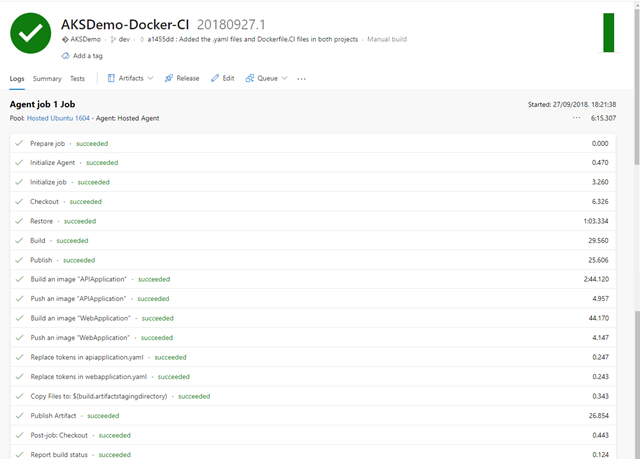
    s131

  6. The process will take several minutes to complete this build, but with a bit of luck you will have a complete list of green checkmarks:

    s132

    If something fails there should be a hint in the logs to suggest why.

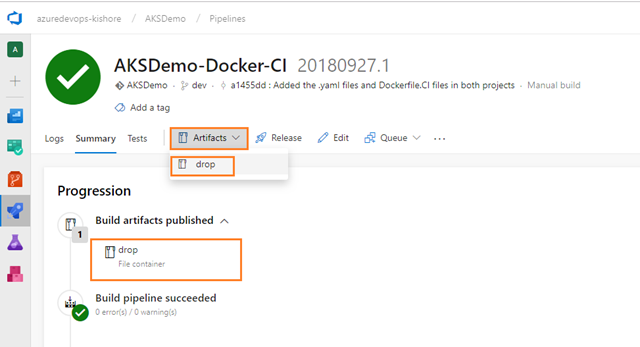
  7. After successful build, go to the build summary. On the Artifacts tab of the build, notice that the drop is published as an artifact:

    s133

Step 4. Continuous Delivery (CD), Deploy

Building a CD pipeline

Provided the above build for APIApplication and WebApplication worked, you can nnow define our CD pipeline. Remember; CI is about building and testing the code as often as possible, and CD is about taking the (successful) results of these builds (Artifacts) and deploy into a cluster as often as possible. In general every CD definition containts the Dev, QA, UAT, Staging and Production environments. But for now this CD definition contains the Dev environment only.

Define the process for deploying the .yaml files into Azure Kubernetes Service in one stage.

  1. Go to the Pipelines tab and then select Releases. Next, select the action to create a New pipeline. If a release pipeline is already created, select the plus sign (+ New) and then select Release pipeline:

    s134

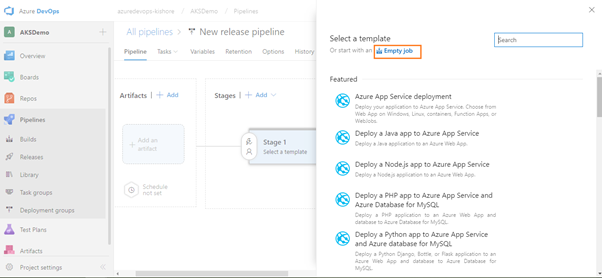
  2. Select the action to start with an Empty job:

    image

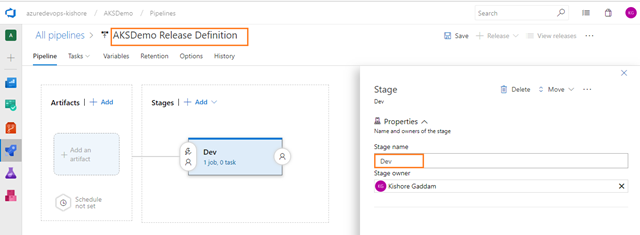
  3. Name the stage Dev and change the Release name as AKSDemo Release Definition:

    s135

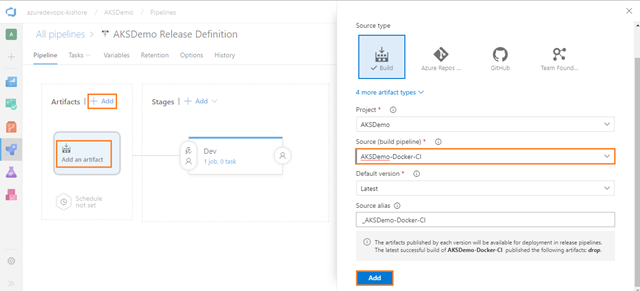
  4. In the Artifacts panel, select + Add and specify a Source (Build pipeline). Select Add:

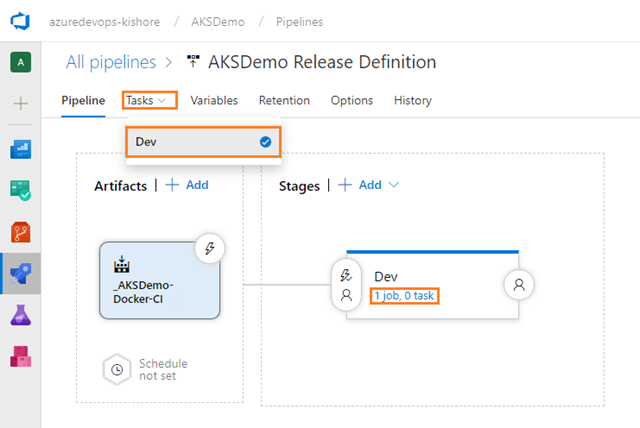
    s136

  5. Select the Tasks tab and select your Dev stage:

    s137

  6. On Tasks page, select Agent pool as Hosted Ubuntu 1604:

    s138

Deploy .NET Core Web API Application to Kubernetes Cluster
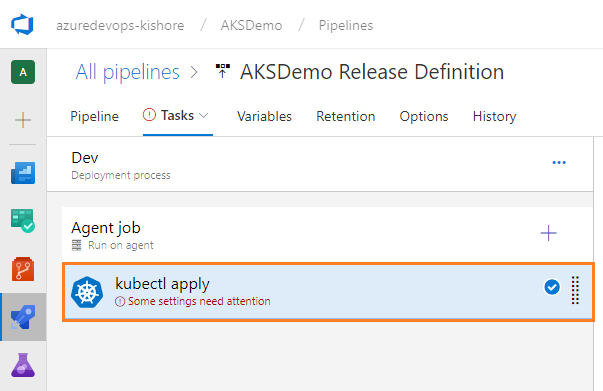
  1. Add a Deploy to Kubernetes task, for Deploy, configure, and update your Kubernetes cluster in Azure Kubernetes Service by running kubectl commands. For that select Tasks tab and then select the plus sign (+) to add a task to Agent job. On the right side, type “kubernetes” in the search box and click on the Add button of Deploy to Kubernetes task, as shown in the figure below:

    s139

  2. On the left side, select your new Deploy to Kubernetes task:

    s140

Configure Deploy to Kubernetes task

  1. Configure the above Deploy to Kubernetes task for Deploy, configure and update your Kubernetes cluster in Azure Kubernetes Service by running kubectl commands.
    • Display name: Deploy APIApplication to Kubernetes
    • Service connection type: Select a service connection type. Here I can choose type as Azure Resource Manager.
    • Azure subscription: Select the Azure Resource Manager subscription, which contains Azure Container Registry.Note: To configure new service connection, select the Azure subscription from the list and click ‘Authorize’. If your subscription is not listed or if you want to use an existing Service Principal, you can setup an Azure service connection using ‘Add’ or ‘Manage’ button.

      Note: To configure a new service connection select the Azure subscription from the list and click ‘Authorize’.

      If your subscription is not listed or if you want to use an existing service principal, you can setup an Azure service connection using the ‘Add’ or ‘Manage’ button.

    • Resource group: Select an Azure resource group which contains Azure kubernetes service. For Example: KZEU-AKSDMO-SB-DEV-RGP-01
    • Kubernetes cluster: Select an Azure managed cluster. For Example: KZEU-AKSDMO-SB-DEV-AKS-01
    • Namespace: Set the namespace for the kubectl command by using the –namespace flag. If the namespace is not provided, the commands will run in the default namespace. For Example: default
    • Command: Select or specify a kubectl command to run. For Example: apply
    • Check the Use configuration files to Use Kubernetes configuration file with the kubectl command. Filename, directory, or URL to Kubernetes configuration files can also be provided.
    • Configuration file: Filename, directory, or URL to kubernetes configuration files that will be used with the commands. For Example: $(System.DefaultWorkingDirectory)/_AKSDemo-Docker-CI/drop/APIApplication/Utils/apiapplication.yaml

      s141

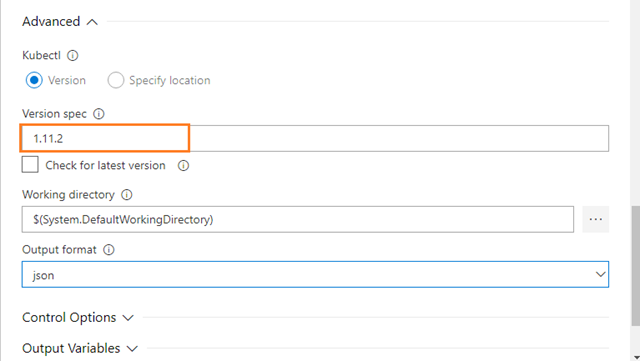
    • Under Advanced, specify the Kubectl version to use:

      s142

Deploy .NET Core Web Application to Kubernetes Cluster
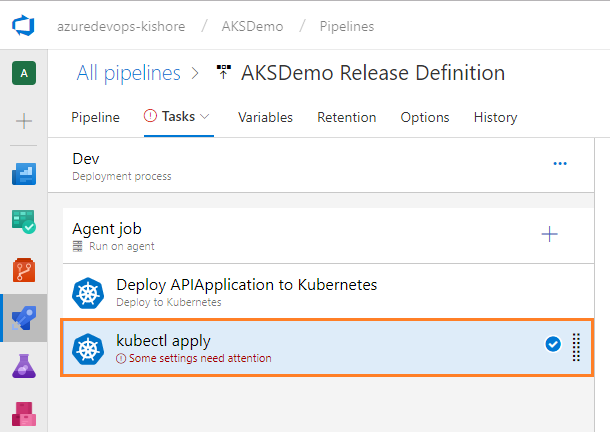
  1. Next, add one more Deploy to Kubernetes task, for Deploy, configure, and update your Kubernetes cluster in Azure Kubernetes Service by running kubectl commands For that select Tasks tab and then select the plus sign (+) to add a task to Agent job. On the right side, type “kubernetes” in the search box and click on the Add button of Deploy to Kubernetes task, as shown in the  figure below:

    s139

  2. On the left side, select your new Deploy to Kubernetes task:

    s144

Configure Deploy to Kubernetes task

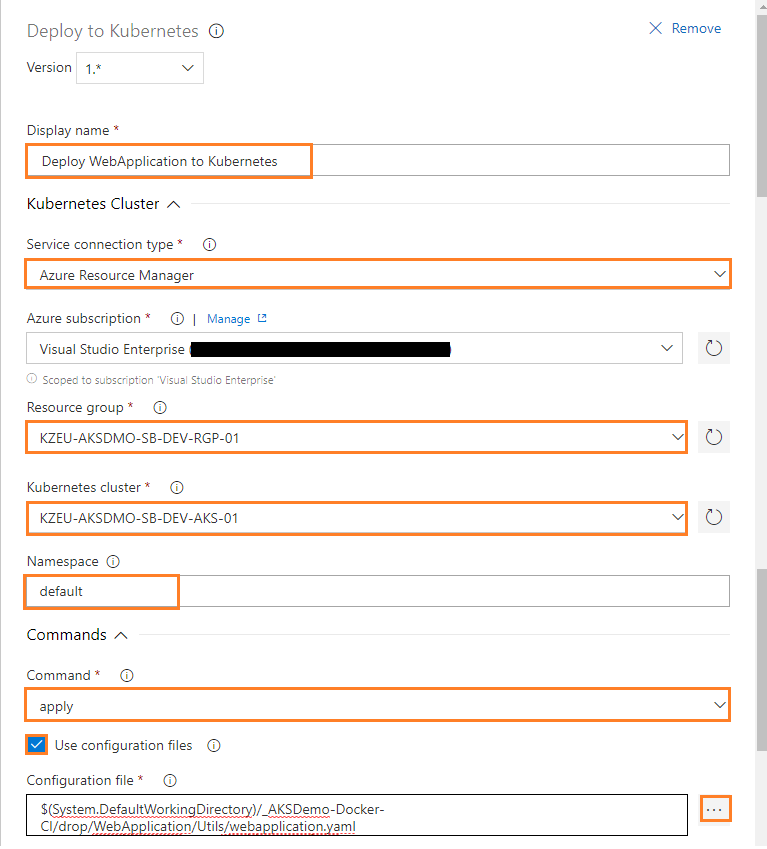
  1. Configure the above Deploy to Kubernetes task to deploy, configure, and update your Kubernetes cluster in Azure Kubernetes Service. For this, run the following kubectl commands.
    • Display name: Deploy WebApplication to Kubernetes
    • Service connection type: Select a service connection type. Here I can choose type as Azure Resource Manager.
    • Azure subscription: Select the Azure Resource Manager subscription, which contains Azure Container Registry. Note: To configure a new service connection, select the Azure subscription from the list and click ‘Authorize’. If your subscription is not listed or if you want to use an existing Service Principal, you can setup an Azure service connection using the ‘Add’ or ‘Manage’ button.

      Note: To configure new a service connection, select the Azure subscription from the list and click ‘Authorize’.

      If your subscription is not listed or if you want to use an existing service principal, you can setup an Azure service connection using the ‘Add’ or ‘Manage’ button.

    • Resource group: Select an Azure resource group which contains Azure kubernetes service. For Example: KZEU-AKSDMO-SB-DEV-RGP-01
    • Kubernetes cluster: Select an Azure managed cluster. For Example: KZEU-AKSDMO-SB-DEV-AKS-01
    • Namespace: Set the namespace for the kubectl command by using the –namespace flag. If the namespace is not provided, the commands will run in the default namespace. For Example: default
    • Command: Select or specify a kubectl command to run. For Example: apply
    • Check the Use configuration files to Use Kubernetes configuration file with the kubectl command. Filename, directory, or URL to Kubernetes configuration files can also be provided.
    • Configuration file: Filename, directory, or URL to kubernetes configuration files that will be used with the commands. For Example: $(System.DefaultWorkingDirectory)/_AKSDemo-Docker-CI/drop/WebApplication/Utils/webapplication.yaml

      s145

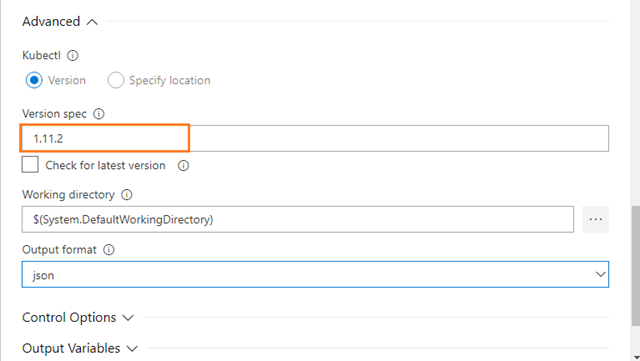
    • Under Advanced, specify the Kubectl version to use:

      s142

Specify Release number format
  1. Select the Options tab and give the Release number format, as  (for example Database Release-$(rev:r) ) in the figure below:

    s146

Enable continuous deployment trigger
  1. Go the Pipeline on the Releases tab, Select the Lightning bolt to trigger continuous deployment and then enable the Continuous deployment trigger on the right:

    s147

  2. Click on Save:

    s148

Complete Release Pipeline
  1. Go to the Pipeline tab, then see your completed release pipeline like this:

    s149

Deploy a release
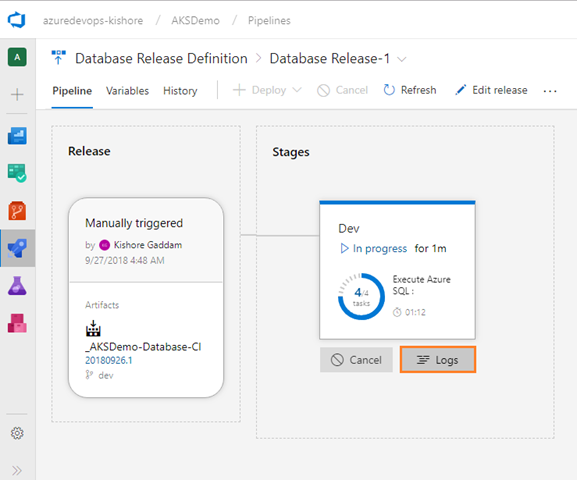
  1. Create a new release:

    s150

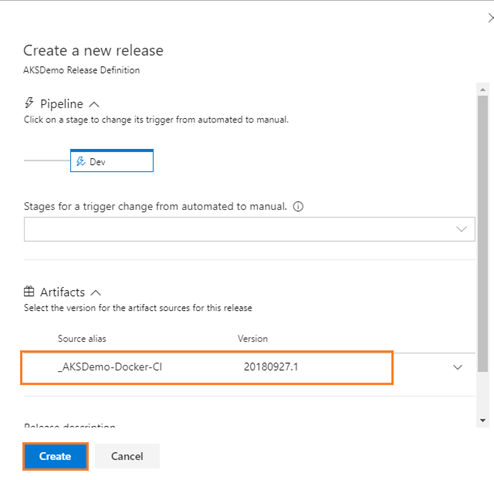
  2. Define the trigger settings and artifact source for the release and then select Create:

    s151

  3. Open the release you just created:

    s152

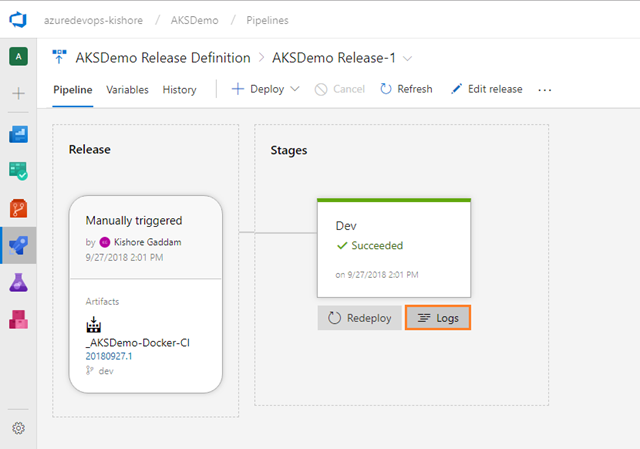
  4. View the logs to get real-time data about the release:

    s153

    Note: You can track the progress of each release to see if it has been deployed to all the stages. You can track the commits that are part of each release, the associated work items, and the results of any test runs that you’ve added to the release pipeline.

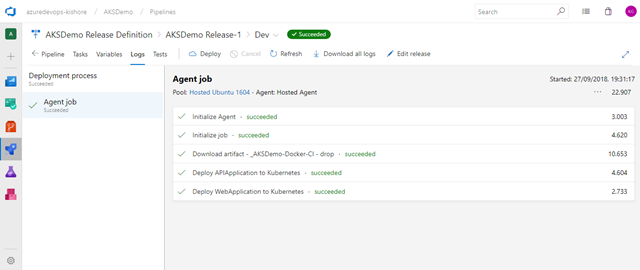
  5. If the pipeline runs successful, you should see a list of green checkmarks here, just like you saw in the the release pipeline:

    s154

If something fails, there should be a hint in the logs to suggest why.

Now everything completed to setup the build and release definitions for Web Application and API Application. But while doing the initial setup, you have to create the build and release manually without using automatic triggers of the build and release definitions.

From next time onwards, you can modify the code in either API Application or Web Application and check-in your code. This time it will automatically build and then get deployed all the way to the Dev stage, because you already enabled the automatic triggers for both build and release definitions.

Step 5. Run and manage

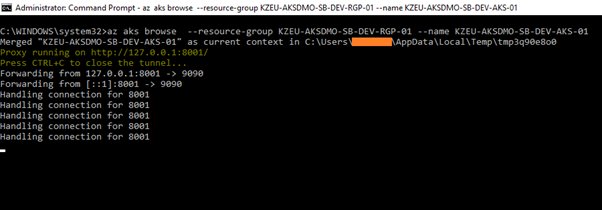
Once the above build and release succeeded, open the command prompt in administrator mode in your local machine and enter the below command:

az aks browse –resource-group <Resource Group Name> –name <AKS Cluster Name>

For example: az aks browse –resource-group KZEU-AKSDMO-SB-DEV-RGP-01 –name KZEU-AKSDMO-SB-DEV-AKS-01

image

Note:
If you are getting the error by running the above command, then you need to follow Connect to the cluster steps.

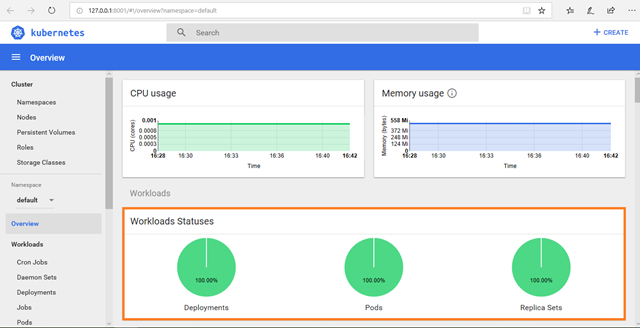
This will launch a browser tab for you with a graphical representation:

s255

In the above kubernetes dashboard you can see the Workloads Statuses with complete Green. This means that there are no failures.

Deployments:

s155

Pods:

s156

Replica Sets:

s157

Services

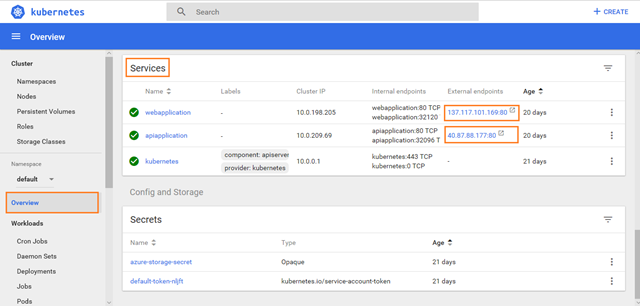
Further down on the same page you will see the Services section where you can observe the External Endpoints of your images like webapplication and apiapplciation:

s158

Click on the above External Endpoints of webapplication and apiapplication services.

apiapplication:

s159

webapplication:

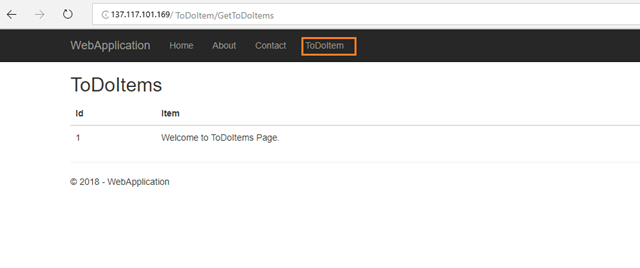
s160

Step 6. Monitor and diagnose

This step is not explained here. But after some time I will come up with a new blog to monitor and diagnose.

Building and Deploying Micro Services with Azure Kubernetes Service (AKS) and Azure DevOps Part-3

Database application DevOps workflow with Microsoft tools

s4

Steps in the outer-loop DevOps workflow for a Database application

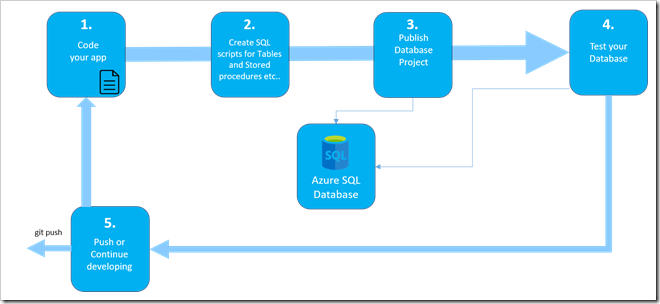
The outer-loop end-to-end workflow is represented in the above Figure. Now, let’s drill down on each of its steps.

Prerequisites for the outer-loop

  1. Microsoft Azure Account: You will need a valid and active Azure account for this blog/document. If you do not have one, you can sign up for a free trial
    • If you are a Visual Studio Active Subscriber, you are entitled for a $50-$150 Azure credit per month. You can refer to this link to find out more including how to activate and start using your monthly Azure credit.
    • If you are not a Visual Studio Subscriber, you can sign up for the FREE Visual Studio Dev Essentials program to create Azure free account (includes 1 year of free services, $200 for 1st month).
  2. You will need an Azure DevOps Account. If you do not have one, you can sign up for free here

Step 1. Inner loop development workflow for a Database application

This step was explained in detail in the Part-2 blog/document, but here is where the outer-loop also starts, in the very precise moment when a developer pushes code to the source control management system (like Git) triggering Continuous Integration (CI) pipeline executions.

Share your code with Visual Studio 2017 and Azure DevOps Git

Share your Visual Studio solution i.e AKSDemo.sln in a new Azure DevOps Git repo.

Create a local Git repo for your project
  1. Go to Solution Explorer i.e AKSDemo.sln in your Visual Studio 2017,
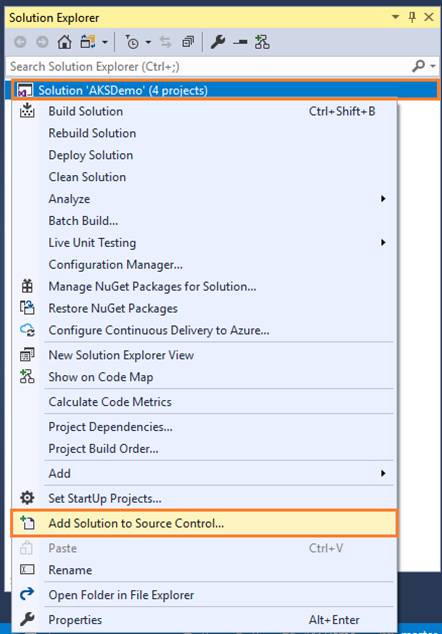
  2. Create a new local Git repo for your project by selecting clip_image001 on the status bar in the lower right hand corner of Visual Studio. Or you can also right-click your solution in Solution Explorer and choose Add Solution to Source Control:

    image

This will create a new repository in the folder of the solution and commit your code there. Once you have a local repo, select items in the status bar to quickly navigate between Git tasks in Team Explorer:

image

clip_image002 Shows the number of unpublished commits in your local branch. Selecting this will open the Sync view in Team Explorer.

clip_image003 Shows the number of uncommitted file changes. Selecting this will open the Changes view in Team Explorer.

clip_image005 Shows the current Git repo. Selecting this will open the Connect view in Team Explorer.

clip_image006 Shows your current Git branch. Selecting this displays a branch picker to quickly switch between Git branches or create new branches.

Note

If you don’t see any icons such as clip_image001[4] orclip_image003, ensure that you have a project open that is part of a Git repo. If your project is brand new or not yet added to a repo, you can add it to one by selecting clip_image004 on the status bar, or by right-clicking your solution in Solution Explorer and choosing Add Solution to Source Control.

Publish your code to Azure DevOps
  1. Navigate to the Push view in Team Explorer by choosing the clip_image001[7] icon in the status bar. Or you can also select Sync from the Home view in Team Explorer.
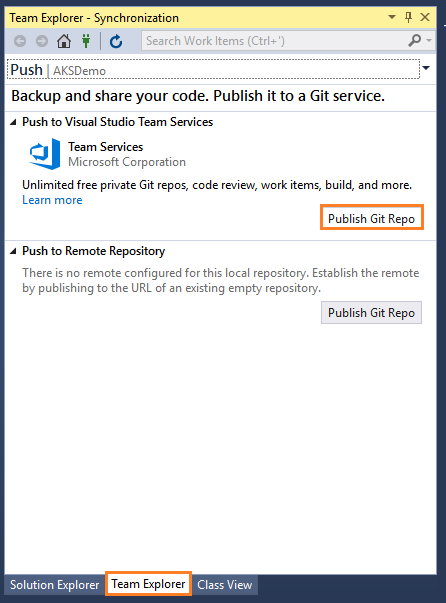
  2. In the Push view in Team Explorer, select the Publish Git Repo button under Push to Visual Studio Team Services:

    clip_image002

  3. Choose Azure DevOps user account from dropdown list, if your account is not there in the dropdown list then click on Add an account and then enter your Azure DevOps account login credentials:

    clip_image003[5]

  4. Select your account in the Team Services Domain drop-down.
  5. Enter your repository name and select Publish repository:

    clip_image004[5]

    This creates a new project in your account with the same name as the repository. To create the repo in an existing project, click Advanced next to Repository name and select a project.

  6. Your code is now in an Azure DevOps repo. You can view your code on the web by selecting See it on the web:

    clip_image005

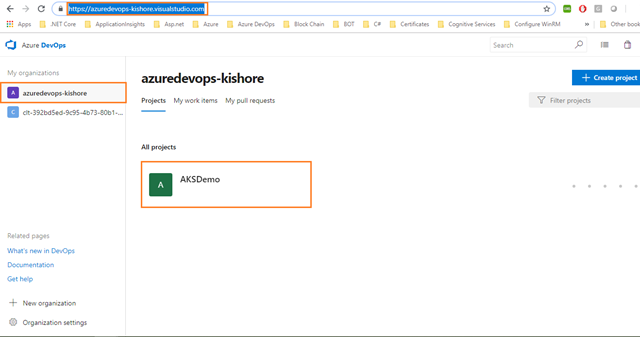
  7. Now your new team project is available in your Azure DevOps account:

    s17

    Note:

    The new repository contains the four projects like DatabaseApplication, APIApplication, WebApplication and docker-compose.
Create a new branch from the web
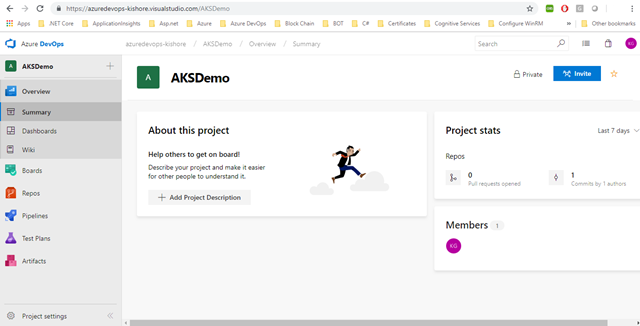
  1. Open your team project AKSDemo by double click on it:

    s18

  2. Navigate to Repos then choose Branches:

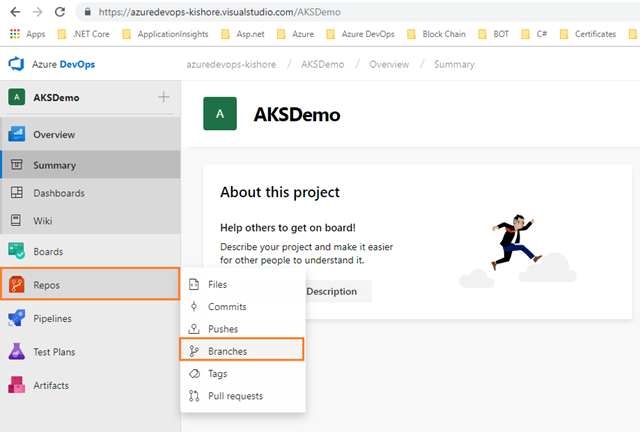
    s19

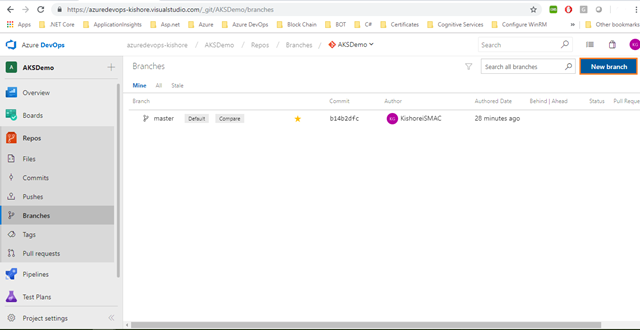
  3. Select the New branch button in the upper right corner of the page:

    s20

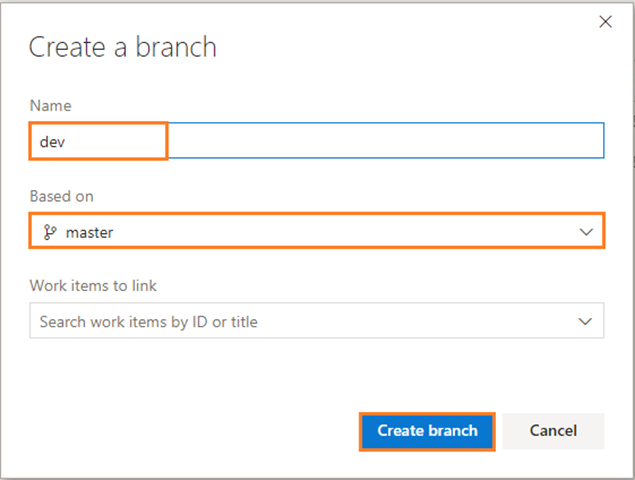
  4. In the Create a branch dialog, enter a name for your new branch, select a branch to base the work of, and associate any work items:

    image

  5. Select Create branch. Now, a new branch is ready for you to work in.

Note:

You will need to fetch the branch before you can see it and swap to it in your local repo.

Step 2. SCC integration and management with Azure DevOps

Here, we are using Azure DevOps and Git for managing the source code pushed by developers into specified repository (for example AKSDemo) and creating the Build and Release Pipelines.

Now, we are ready to create specifications of our pipeline from Visual Studio to a deploy database application. We need two definitions for this:

  • How Azure DevOps should build the code of Database application
  • How Azure DevOps should deploy DACPAC file into Azure SQL Database

Step 3. Build, CI, Integrate with Azure DevOps

Use Azure Pipelines in the visual designer

You can create and configure your build and release pipelines in the Azure DevOps web portal with the visual designer:

  1. Configure Azure Pipelines to use your Git repo.
  2. Use the Azure Pipelines visual designer to create and configure your build and release pipelines.
  3. Push your code to your version control repository which triggers your pipeline, running any tasks such as building or testing code.
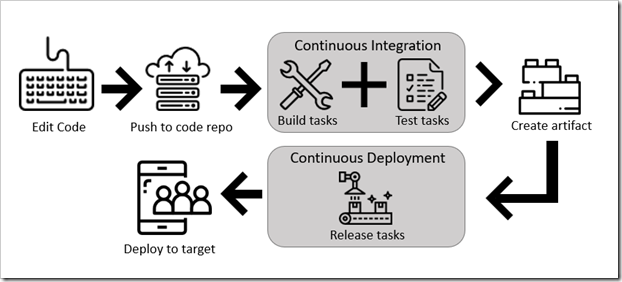
  4. The build creates an artifact that is used by the rest of your pipeline, running any tasks such as deploying to staging or production.
  5. Your code is now updated, built, tested, and packaged and can be deployed to any target.

clip_image016

Benefits of using the visual designer

The visual designer is great for users who are new to CI and CD.

  • The visual representation of the pipelines makes it easier to get started
  • The visual designer is located in the same hub as the build results, making it easier to switch back and forth and make changes if needed
Create a build pipeline
  1. Create a build pipeline that’s to build your DatabaseApplication and create artifacts.
  2. Select Azure Pipelines, it should automatically take you to the Builds page:

    s22

  3. Create a new pipeline:

    s23

  4. Click on Use the visual designer to create a pipeline without YAML:

    s24

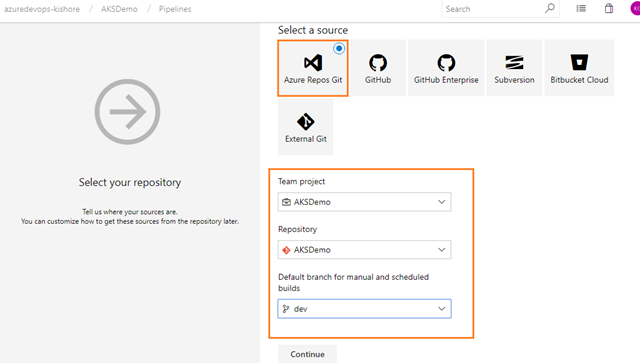
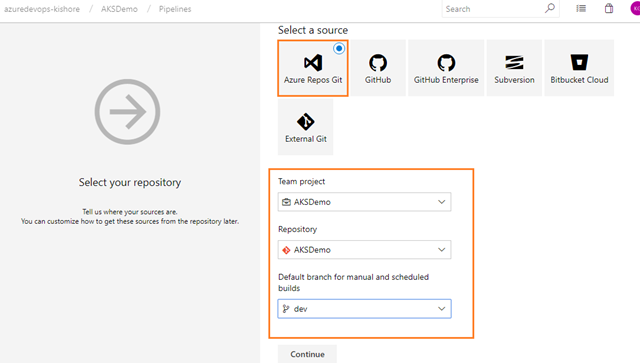
  5. Make sure that the Source, Team project name along with the Repository and Default branch which you are working are reflected correctly as shown in the figure below and then click on the Continue button:

    s25

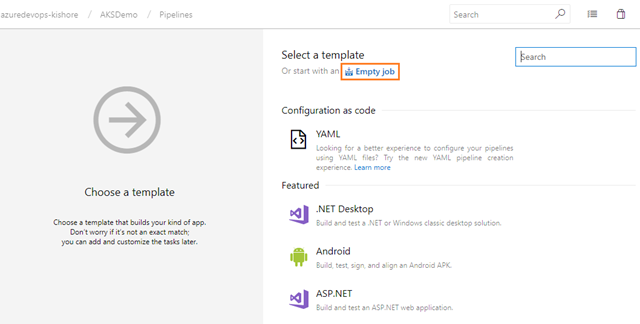
  6. Start with an Empty job:

    s26

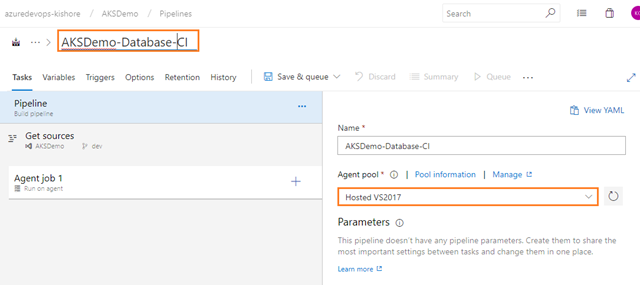
  7. On the left side, select Pipeline and specify whatever Name you want to use. For the Agent pool, select Hosted VS2017:
    s27

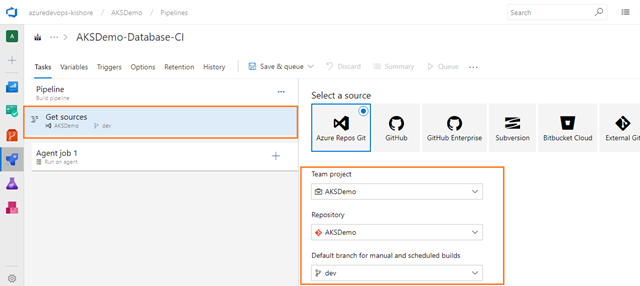
  8. After that click on the Get sources, in that all values are selected by default for getting the code from specified repository along with specified branch; if you want to change the default values then you can change here:

    s28

MSBuild
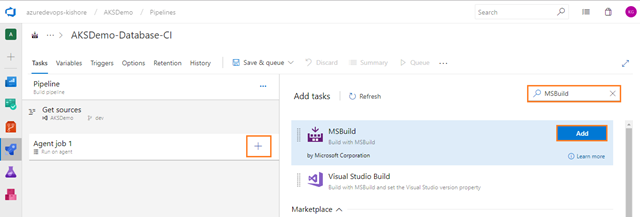
  1. On the left side, select the plus sign (+) to add a task to Job 1. On the right side, type “MSBuild” in the search box and click on the Add button of MSBuild build task as shown in below figure:

    s30

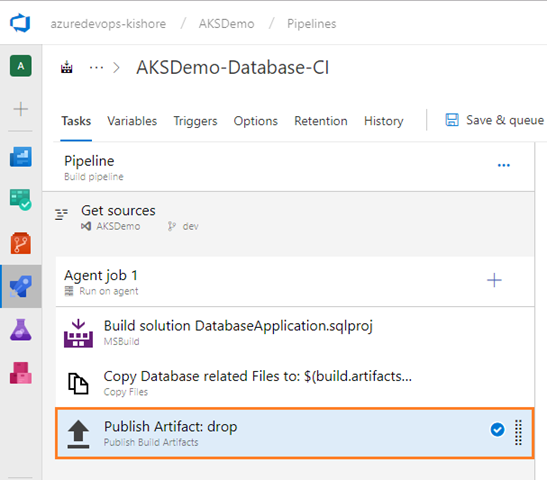
  2. On the left side, select your new MSBuild task:

    clip_image033

  3. Now, you want to configure the above MSBuild task for building your database project.
  4. Configure the MSBuild task as follows:
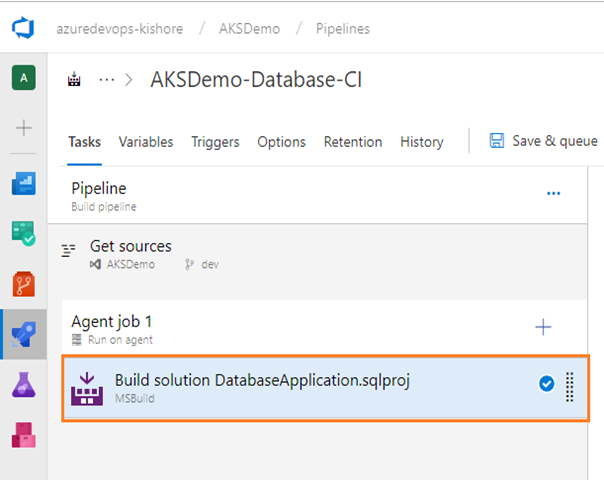
    • Display name: Build solution DatabaseApplication.sqlproj
    • Project: Relative path from repo root of the project(s) or solution(s) to run. Wildcards can be used. For Example: DatabaseApplication/DatabaseApplication.sqlproj
    • MSBuild Version: If the preferred version cannot be found, the latest version found will be used instead. On a macOS agent, xbuild (Mono) will be used if version is lower than 15.0. For Example: Latest
    • MSBuild Architecture: Optionally supply the architecture (x86, x64) of MSBuild to run. For Example: MSBuild x86
    • MSBuild Arguments: Additional arguments passed to MSBuild (on Windows) and xbuild (on macOS). For Example: /t:build /p:CmdLineInMemoryStorage=True

Note:

If you want to know more about  the MSBuild task, you can refer to this link

https://docs.microsoft.com/en-us/azure/devops/pipelines/tasks/build/msbuild?view=vsts

Copy Files
  1. Next, add Copy Files task for copying the files from source folder to target folder using match patterns. On the Tasks tab, select the plus sign (+) to add a task to Job 1. On the right side, type “Copy Files” in the search box, and click on the Add button of Copy Files build task as shown in the figure below:

    s33

  2. On the left side, select your new Copy Files task:

    s34

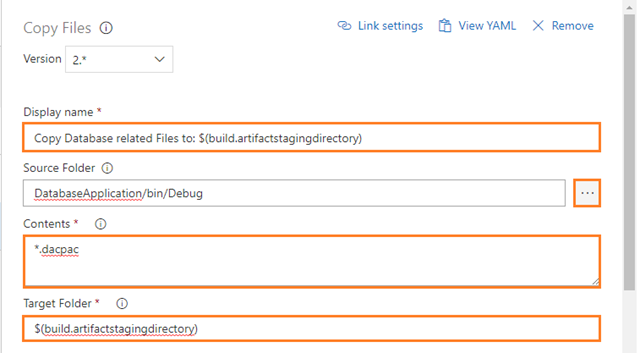
  3. Configure the above Copy Files task for copying the files from the source folder to the target folder using match patterns as follows:
    • Display name: Copy Database related Files to: $(build.artifactstagingdirectory)
    • Source Folder: The source folder that the copy pattern(s) will be run from. Empty is the root of the repo. For example: DatabaseApplication/bin/Debug
    • Contents: File paths to include as part of the copy. Supports multiple lines of match patterns. For example: *.dacpac
    • Target Folder: Target folder or UNC path files will copy to.
    • For example: $(build.artifactstagingdirectory)

      s35

Note:

If you want to know more about the Copy Files task, you can refer to this link

https://docs.microsoft.com/en-us/azure/devops/pipelines/tasks/utility/copy-files?view=vsts

Publish Build Artifacts
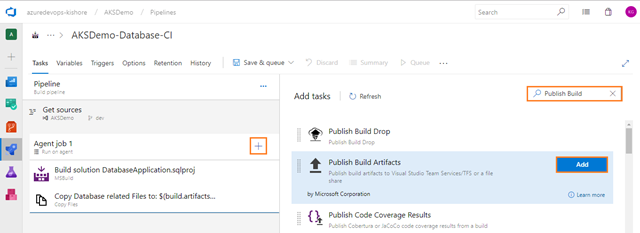
  1. Next, add Publish Build Artifacts task for Publish build artifacts to Visual Studio Team Services. On the Tasks tab, select the plus sign (+) to add a task to Job 1. On the right side, type “Publish Build” in the search box and click on the Add button of Publish Build Artifacts, as shown in the figure below:

    s36

  2. On the left side, select your new Publish Build Artifacts task:

    clip_image043

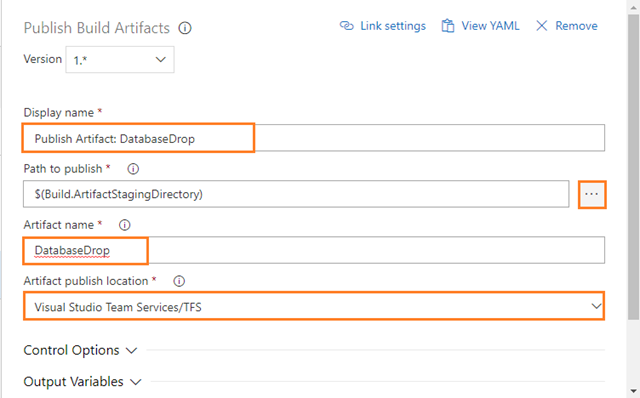
  3. Configure the above Publish Build Artifacts task as follows:
    • Display name: Publish Artifact: DatabaseDrop
    • Path to publish: The folder or file path to publish. This can be a fully-qualified path or a path relative to the root of the repository. Wildcards are not supported. For example: $(build.artifactstagingdirectory)
    • Artifact name: The name of the artifact to create in the publish location. For example: DatabaseDrop
    • Artifact publish location: Choose whether to store the artifact in Visual Studio Team Services/TFS, or to copy it to a file share that must be accessible from the build agent. For example: Visual Studio Team Services/TFS or Azure Artifacts/TFS

      s38

Note:

If you want to know more about the Publish Build Artifacts task, you can refer to this link

https://docs.microsoft.com/en-us/azure/devops/pipelines/tasks/utility/publish-build-artifacts?view=vsts

Note:

Artifacts are the files that you want your build to produce. Artifacts can be nearly anything your team needs to test or deploy your app. For example, you have  .DLL and .EXE executable files and .PDB symbols file of a C# or C++ .NET Windows app.
To produce artifacts, we provide tools such as copying with pattern matching and a staging directory in which you can gather your artifacts before publishing them. See Artifacts in Azure Pipelines.

Enable continuous integration (CI)
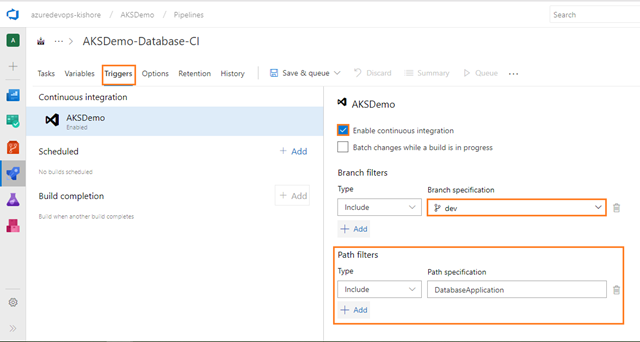
  1. Select the Triggers tab and check the Enable continuous integration option.
  2. Add the Path filters as shown in the figure below:

    s39

The above build is triggered only if you modify the files in the DatabaseApplication of your team project i.e AKSDemo. This build will not be triggered, if you modify the files in APIApplication and WebApplication of your team proejct i.e AKSDemo.

Note:

Here I am adding Path filters for the  DatabaseApplication in the Triggers tab because this AKSDemo repository contains APIApplication and WebApplication. If not added, the Path filters then for every commit this build will trigger. This is not recommended and that’s why I added the path filters for this build pipeline. This build will be triggered whenever developers modify the files in the  DatabaseApplication project and commit changes into your team project i.e AKSDemo.

One more reason to add the path filters for this build pipeline is that whenever developers modify the files in both the APIApplication and the WebApplication, they commit changes into your team project i.e AKSDemo. At that time you are getting the error while execution of this build. because currently you are using Hosted VS2017 as Agent pool.  By using this agent you are not able to build and push linux images into the Azure Container Registry. That’s why you have to create separate CI and CD for the APIApplication andthe WebApplication in the next part or further steps.

Note:

A continuous integration trigger on a build pipeline indicates that the system should automatically queue a new build whenever a code change is committed. You can make the trigger more general or more specific, and also schedule your build (for example, on a nightly basis). See Build triggers.

Specify Build number format
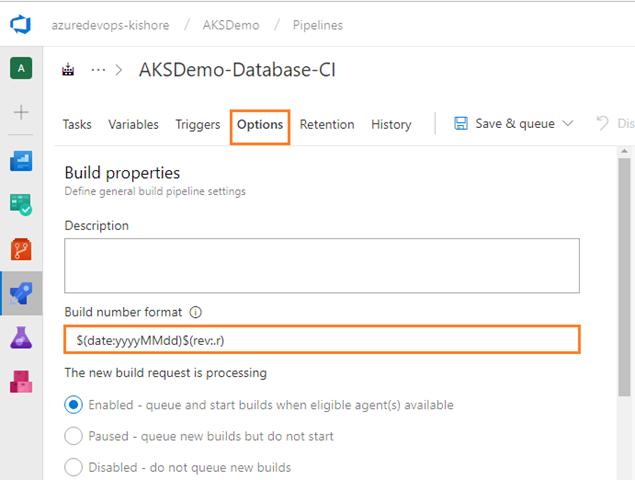
  1. Select the Options tab and give the Build number format, as shown (for example $(date:yyyyMMdd)$(rev:.r) ) in this figure below:

    s40

Complete Build Pipeline
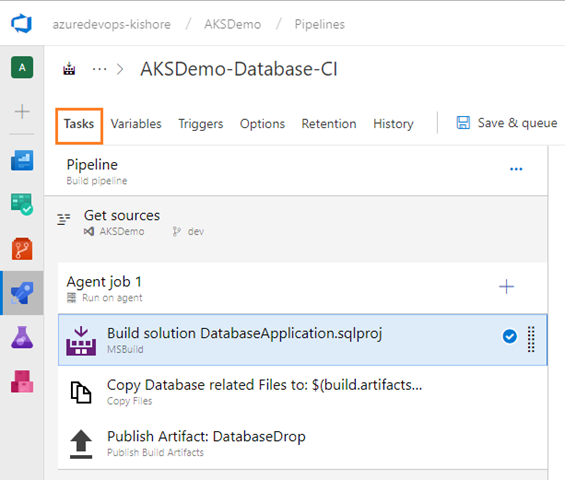
  1. Go to the Tasks tab, then see your completed pipeline like this:

    s41

Save and queue the build

Save and queue a build manually and test your build pipeline.

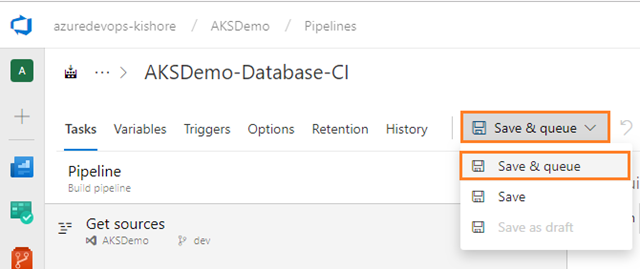
  1. Select Save & queue, and then select Save & queue:

    s42

  2. On the dialog box, select Save & queue once more:

    s43

    This queues a new build on the Microsoft-hosted agent.

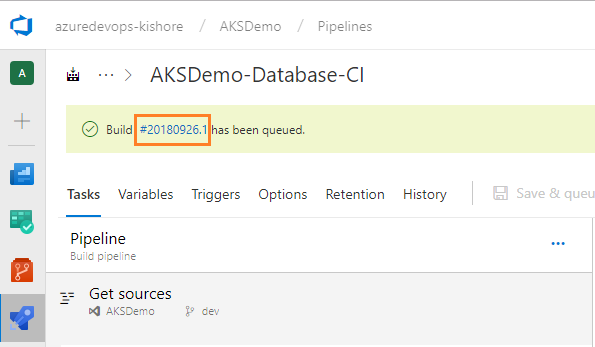
  3. You see a link to the new build on the top of the page:

    s44

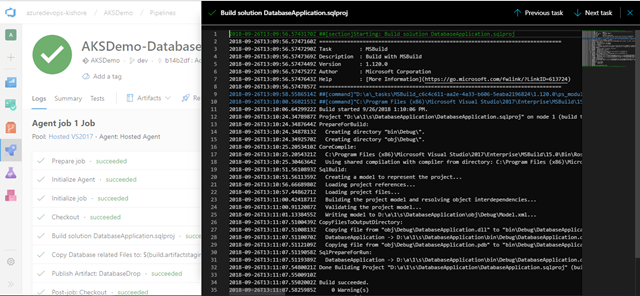
  4. Choose the link to watch the new build as it happens. Once the agent is allocated, you’ll start seeing the live logs of the build:

    s45

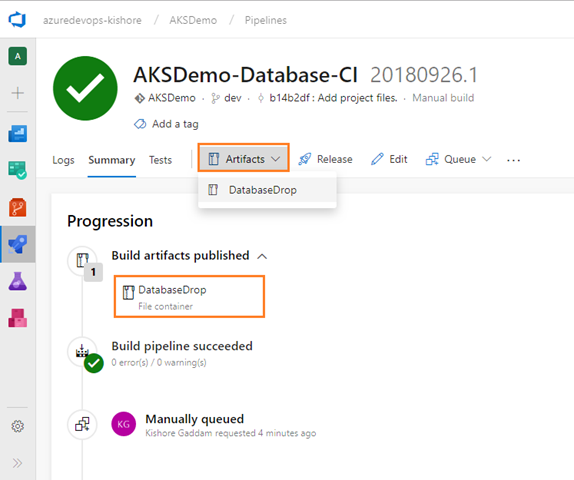
  5. After a successful build, go to the build summary. On the Artifacts tab of the build, notice that the DatabaseDrop is published as an artifact:

    s46

Step 4. Continuous Delivery (CD), Deploy

Provided the above build for the DatabaseApplication worked,  you can now define your CD pipeline. Remember; CI is about building and testing the code as often as possible, and CD is about taking the (successful) results of these builds (Artifacts) and deploy into a target resource as often as possible. In general every CD definition has the Dev, QA, UAT, Staging and Production environments. But for now this CD definition has the Dev environment, only.

Create a release pipeline

Define the process for deploying the .dacpac file into Azure SQL Database in one stage.

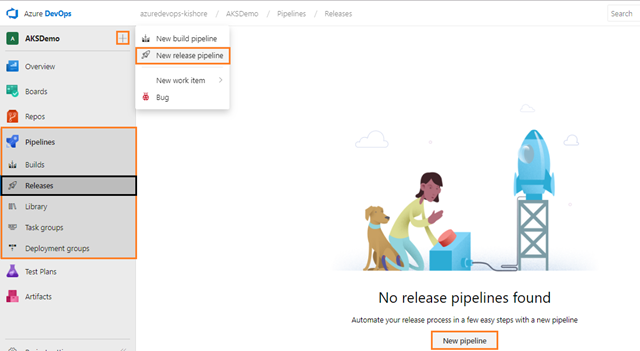
  1. Go to the Pipelines tab, and then select Releases. Next, select the action to create a New pipeline. If a release pipeline is already created, select the plus sign (+) and then select Create a release pipeline:

    s48

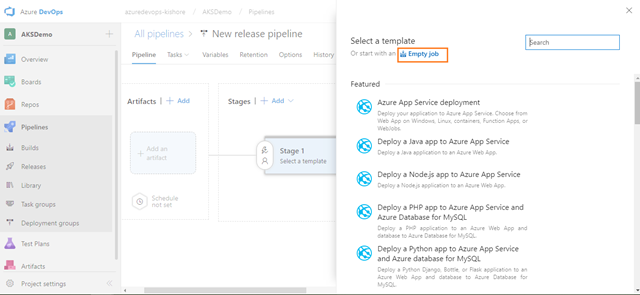
  2. Select the action to start with an Empty job:

    s49

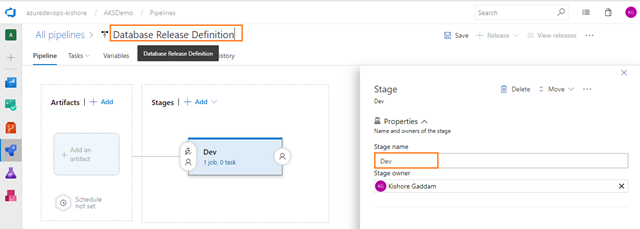
  3. Name the stage Dev and change the Release name as Database Release Definition:

    s50

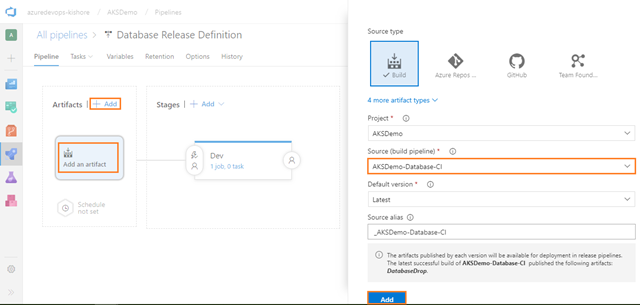
  4. In the Artifacts panel, select + Add and specify a Source (Build pipeline). Select Add:

    s51

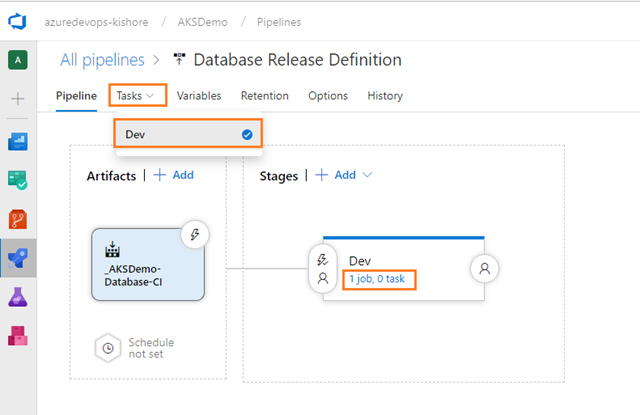
  5. Select the Tasks tab and select your Dev stage:

    s52

Azure SQL Database Deployment
  1. Add the Azure SQL Database Deployment task for deploying an Azure SQL Database to an existing Azure SQL Server by using either DACPACs or SQL Server scripts.
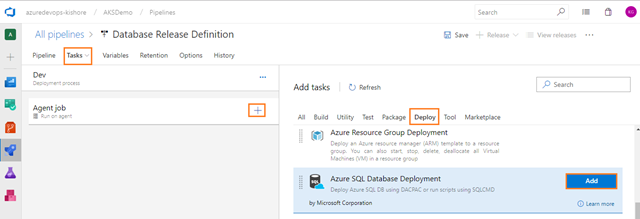
  2. Select the plus sign (+) for the job to add a task to the job. On the Add tasks dialog box, select Deploy, locate the Azure SQL Database Deployment task, and then select its Add button:

    s53

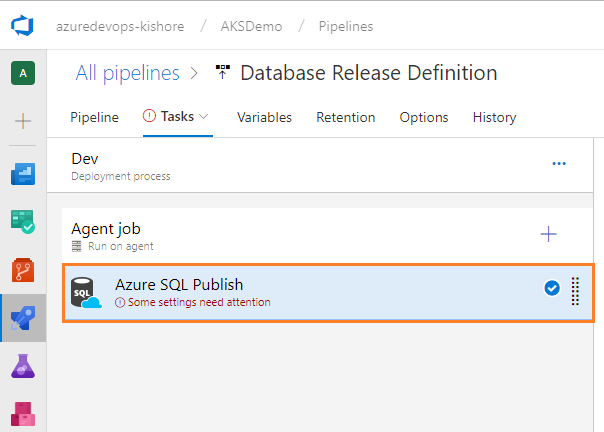
  3. On the left side, select your new Azure SQL Database Deployment task:

    s54

  4. Next, configure the Azure SQL Database Deployment task for the DatabaseApplication. For this you need the Azure Resource Manager Subscription connection. If your Azure DevOps account is already linked to an Azure subscription then it will automatically display in the Azure subscription drop down, as shown in the screenshot below, and click Authorize. Otherwise click on Manage:

    s55

Note:

Refer to the below link for Azure SQL Database Deployment task:

https://github.com/Microsoft/vsts-tasks/blob/master/Tasks/SqlAzureDacpacDeploymentV1/README.md

Azure Resource Manager Endpoint

  1. In the above step when clicking on Manage link, you get to the Settings tab; select the New service connection option on the left pane:

    s56

  2. Whenever you click on the New Service Endpoint a dropdown list will open; from that you can select the Azure Resource Manager endpoint.

    s57

  3. If your organization is already backed by your azure service principal authentication, then give a name to your service endpoint and select the Azure subscription from the dropdown:

    s58

  4. If not backed by Azure, then click on the hyperlink ‘use the full version of the service connection dialog’, as shown in the above screenshot.
  5. If you have your service principal details, you can enter directly and click on Verify connection; if the Connection is verified successfully, then click on the OK button; otherwise, you can refer to the service connections link provided on the same popup, as marked in the screenshot below:

    s59

  6. Once you added service principal successfully, then you will see the following:

    s60

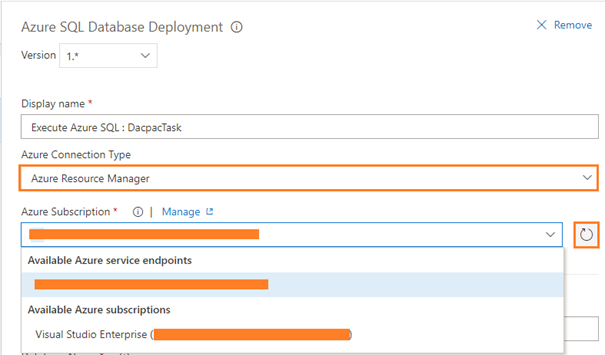
  7. Now, go back to your Release definition page and click on the refresh icon of the Azure SQL Database Deployment task. It should display the Azure Resource Manager endpoint in the Azure subscription dropdown list which you created in the previous step.

    image

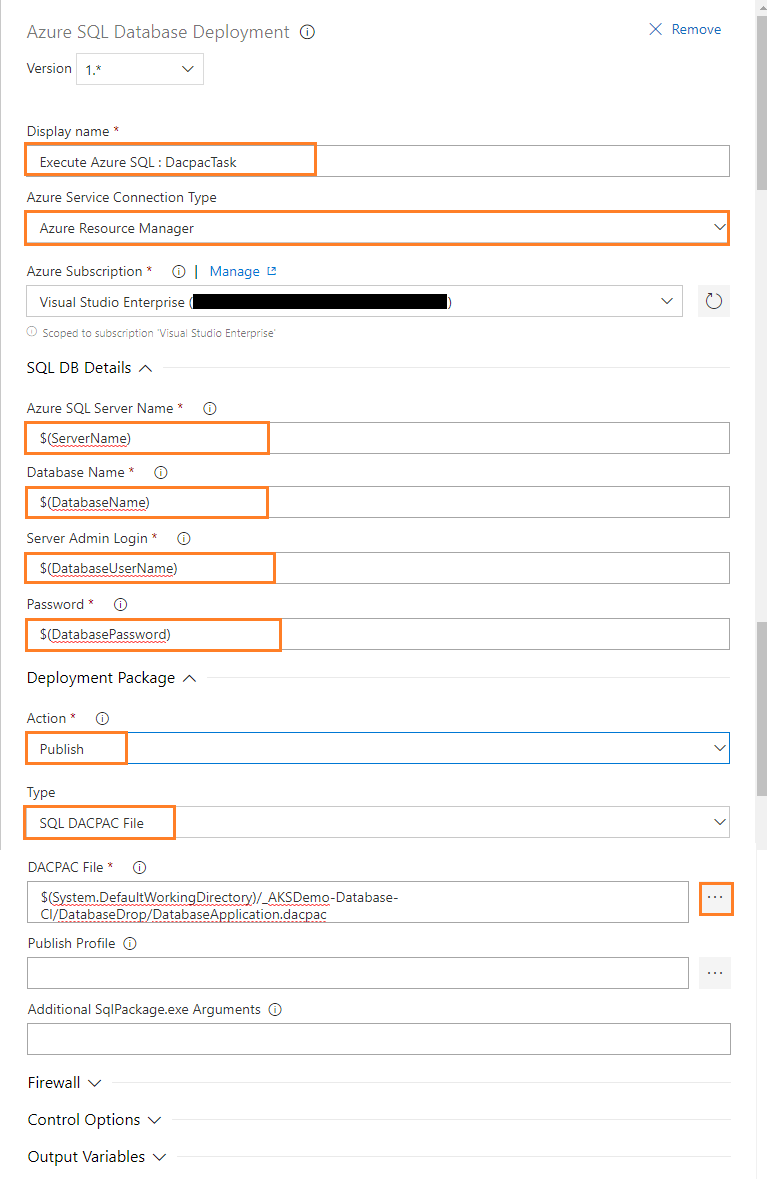
  8. Configure the above task for deploying the DatabaseApplication into Azure SQL Database as follows:
    • Display name: Execute Azure SQL : DacpacTask
    • Azure Connection Type: Select an Azure Connection Type. For example: Azure Resource Manager
    • Azure Subscription: Select an Azure subscription
    • Azure SQL Server Name: Azure SQL Server name
    • Database Name: Name of the Azure SQL Database, where the files will be deployed
    • Server Admin Login: Specify the Azure SQL Server administrator login
    • Password: Password for the Azure SQL Server administrator
    • Action: Choose one of the SQL Actions from the list. For Example: Publish
    • Type: Choose one of the type from the list. For Example: SQL DACPAC File
    • DACPAC File: Location of the DACPAC file on the automation agent. For Example: $(System.DefaultWorkingDirectory)/_AKSDemo-Database-CI/DatabaseDrop/DatabaseApplication.dacpac

      s61

Define the Variables
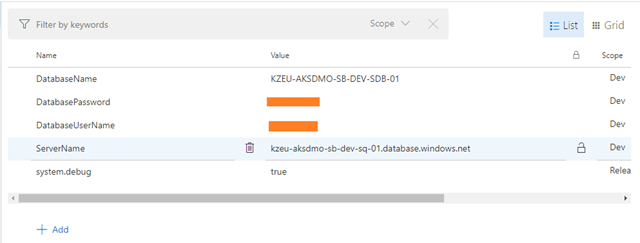
  1. Go to the Variables on the Releases tab, then click on Add; enter the Name and Value, and choose the Scope as Dev.

    s62

  2. For this release definition you need to define four variables, which are ServerName, DatabaseName, DatabaseUserName, and DatabasePassword.

    s72

Specify Release number format
  1. Select the Options tab and give the Release a number format, as shown (for example Database Release-$(rev:r) ) in the figure below:

    s64

Enable continuous deployment trigger
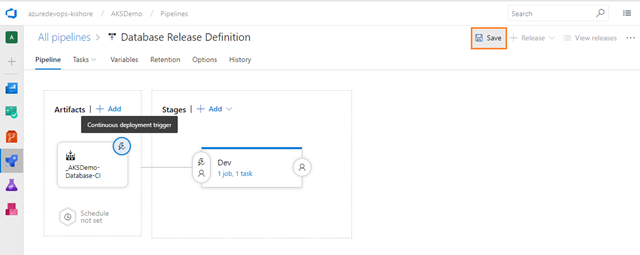
  1. Go to the Pipeline on the Releases tab, Select the Lightning bolt to trigger continuous deployment, and then enable the Continuous deployment trigger on the right:

    s65

  2. Click on Save:

    s66

Complete Release Pipeline
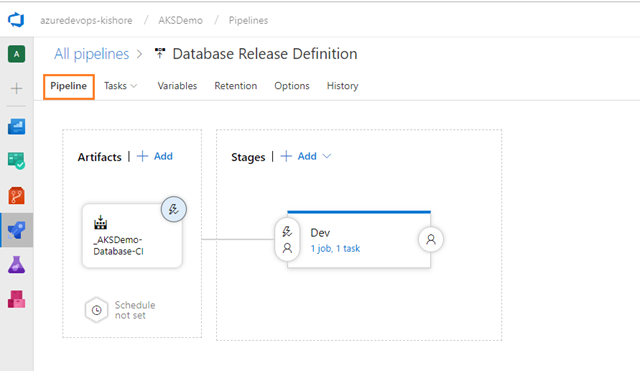
  1. Go to the Pipeline tab, then see your completed release pipeline like this:

    s67

Deploy a release
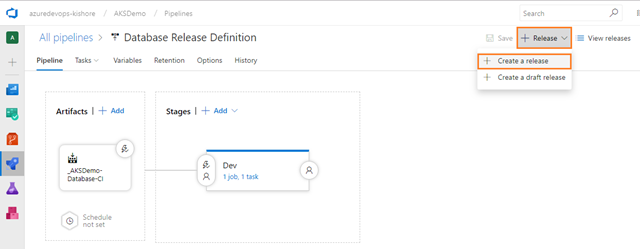
  1. Create a new release:

    s68

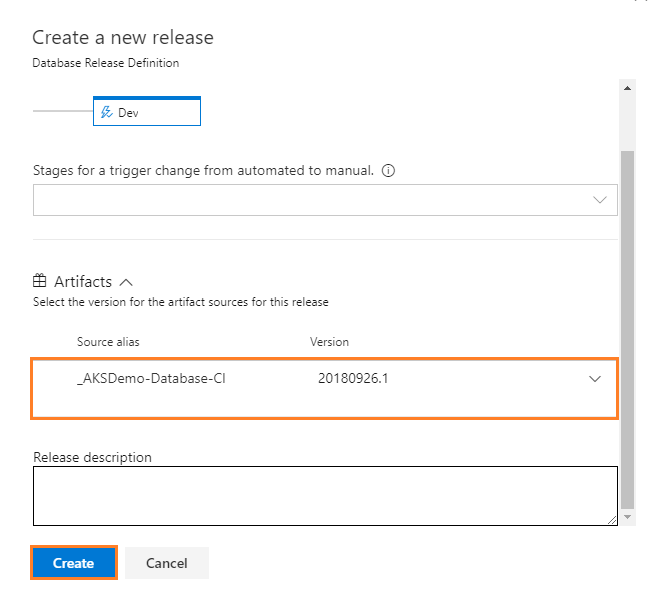
  2. Define the trigger settings and artifact source for the release and then select Create:

    s69

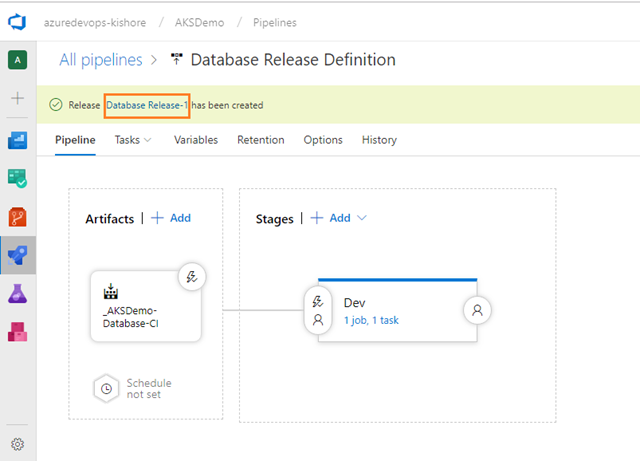
  3. Open the release that you just created:

    s70

  4. View the logs to get real-time data about the release:

    s71

    Note:

    You can track the progress of each release to see if it has been deployed to all the stages. You can track the commits that are part of each release, the associated work items, and the results of any test runs that you’ve added to the release pipeline.

  5. If the pipeline runs successfully you’ll get a list of green checkmarks,  just like the release pipeline:

    s73

Now everything completed to setup build and release definitions for the Database Application. But, while doing the initial setup of the build and release definitions you have to created build and release manually without using automatic triggers of build and release definitions.

From next time onward you can modify the files in the DatabaseApplication and check in your code with the automatic build, because you already enabled the automatic triggers for both build and release definitions. As a result your code gets automatically deployed all the way to the Dev stage

Building and Deploying Micro Services with Azure Kubernetes Service (AKS) and Azure DevOps – Part-2

Reference Architecture for Docker containerized applications

Here is the workflow for deploying Micro Services into Azure Kubernetes using Azure DevOps:

s1

  1. Change application source code
  2. Commit Application Code
  3. Continuous integration triggers application build, container image build, and unit tests
    • Container image pushed to Azure Container Registry
  4. Continuous deployment trigger orchestrates deployment of application artifacts with environment specific parameters
  5. Deployment to Azure Kubernetes Service
    • Container is launched using Container Image from Azure Container Registry
  6. Application Insights collects and analyses health, performance, and usage data

The above reference architecture has two loops:

  1. Inner-loop development workflow for Docker apps
  2. DevOps outer-loop workflow for Docker applications with Microsoft Tools

Inner-loop development workflow for Docker apps

It all starts from each developer’s local machine where a developer uses his/her preferred language/platform and unit tests it. In this specific workflow you are always developing and testing Docker containers, but first, we do development and debug locally.

Picture2

The container or instance of a Docker image will contain the following components:

  • An operating system (e.g., a Linux distribution or Windows)
  • Files added by the developer (e.g., app binaries, etc.)
  • Configuration (e.g., environment settings and dependencies) Instructions for what processes to run by Docker

The inner-loop development workflow that utilizes Docker can be set up as the following process. Take into account that the initial steps to set up the environment is not included, as that has to be done just once.

Workflow for building a single ASP.NET Core Web app inside a Docker container using Visual Studio

An app will be developed using  some code plus additional libraries (Dependencies).

The following basic steps are usually needed when building a Docker app, as illustrated in the below Figure.

Picture12

Before, you start developing your application, you must first start your local Docker, i.e. already installed in your local machine. After that, you have to switch local Docker from Windows containers to Linux containers. To learn more about Docker Settings, see Docker Settings.

Picture7

Step 1. Start coding in VS 2017 for Creating ASP.NET Core Web Application

The way you develop your application is pretty similar to the way you do it without Docker. The difference is that while developing, you are deploying and testing your application or services running within Docker containers placed in your local environment (like a Linux VM or Windows).

This step explains how to create ASP.NET Core Web application.

Before creating the ASP.NET core applications, you must have the following prerequisites in your development machine.

  • Visual Studio Enterprise 2017
  • Docker for windows
  • Install latest version of .Net Core 2.0 SDK

If you are not having the above prerequisites in your development machine, please follow the below steps:

Set up a local environment for Dockers

Set up Development environment for Docker apps

Create an ASP.NET Core web app
  1. Open your Visual Studio 2017

    s3

  2. From Visual Studio, select File > New > Project.

    s4

  3. Complete the New Project dialog:
    • In the left pane, tap .NET Core
    • In the center pane, tap ASP.NET Core Web Application (.NET Core)
    • Name the project “WebApplication” (It’s important to name the project    “WebApplication ” so when you copy code, the namespace will match.)
    • Name the solution “AKSDemo”
    • Tap OK

      s5

Step 2. Add Docker support to an web app

                1. Complete the New ASP.NET Core Web Application (.NET Core)WebApplication dialog:
                  • In the version selector drop-down box select ASP.NET Core 2.0
                  • Select Web Application(Model-View-Controller)
                  • Check the option as Enable Docker support checkbox
                  • Choose OS as Linux from dropdown list
                  • Tap OK.
                    s6
                2. Now the Solution Explorer in your Visual Studio 2017 will look like the below figure.

                  s9
                  When you add Docker support to a service project in your solution, Visual Studio is not just adding a DockerFile file to your project, it also adds a service section in your solution’s docker-compose.yml files (or creates the files if they didn’t exist). It’s an easy way to begin composing your multi container solution; you then can open the docker-compose.yml files and update them with additional features.

                  This action not only adds the DockerFile to your project, it also adds the required configuration lines of code to a global docker-compose.yml set at the solution level.

                  After you add Docker support to your solution in Visual Studio, you also will see a new node tree in Solution Explorer with the added docker-compose.yml files, as depicted in the below Figure.

                  s7

Docker assets overview

  • .dockerignore: Contains a list of file and directory patterns to exclude when generating a build context.
  • docker-compose.yml: The base Docker Compose file used to define the collection of images to be built and run with docker-compose build and docker-compose run, respectively.
  • docker-compose.override.yml: An optional file, read by Docker Compose, containing configuration overrides for services. Visual Studio executes docker-compose -f “docker-compose.yml” -f “docker-compose.override.yml” to merge these files.

A Dockerfile, the recipe for creating a final Docker image, is added to the project root. Refer to Dockerfilereference for an understanding the commands. This particular Dockerfile uses a multi-stage build containing four distinct, named build stages:

s12

The Dockerfile is based on the microsoft/aspnetcore image. This base image includes the ASP.NET Core NuGet packages, which have been pre-jitted to improve startup performance.

The docker-compose.yml file contains the name of the image that’s created when the project runs:

s13

In the preceding example, image: webapplication generates the image webapplication:dev when the app runs in Debug mode. The webapplication:latest image is generated when the app runs in Release mode.

Prefix the image name with the Docker Hub username (e.g. dockerhubusername/webapplication) if the image will be pushed to the registry. Alternatively, change the image name to include the private registry URL (e.g. privateregistry.domain.com/webapplication) depending on the configuration.

Right click on your docker-compose project, then select Set as StartUp Project option.

s21

Next, Go to Build menu, then click on Build Solution option or Press Ctrl+Shift+B.

s22

You will see the Output window in your visual studio will look like the below figure.
s23

The above Output window contains the following process:

Whenever you Build the Solution, it will create internally a Docker image with the name “webapplication:dev” (“dev” is a tag, like a specific version). You can take this step for each custom image you need to create for your composed Docker application with several containers.

You can find the existing images in your local repository (your dev machine) by Run the docker images command in the Package Manager Console (PMC) or Command Prompt window. The images on the machine are displayed:

s17

Step 3. Run your Docker app

Right click on your docker-compose project, then select Set as StartUp Project option then it will automatically select Docker in the toolbar.

s24

Debug
Go to Debug menu then click on Start Debugging or Press F5 to start the app in debugging mode. After few seconds the Docker view of the Output window shows the following actions taking place:

    • The microsoft/aspnetcore runtime image is acquired (if not already in the cache).
    • The microsoft/aspnetcore-build compile/publish image is acquired (if not already in the cache).
    • The ASPNETCORE_ENVIRONMENT environment variable is set to Development within the container.
    • Port 80 is exposed and mapped to a dynamically-assigned port for localhost. The port is determined by the Docker host and can be queried with the docker ps command.
    • The app is copied to the container.
    • The default browser is launched with the debugger attached to the container using the dynamically-assigned port like this below image.

      s25

The resulting Docker image is the dev image of the app with the microsoft/aspnetcore images as the base image. Run the docker images command in the Package Manager Console (PMC) or Command Prompt window. The images on the machine are displayed:

s17

Note: The dev image lacks the app contents, as Debug configurations use volume mounting to provide the iterative experience. To push an image, use the Release configuration.

Run the docker ps command in Command Prompt. Notice the app is running using the container:

s18

CONTAINER ID

IMAGE

COMMAND

CREATED

STATUS

PORTS

NAMES

d9af4b5f2ee3

webapplication:dev

“tail -f /dev/null”

51 seconds ago

Up 47 seconds

0.0.0.0:32769->80/tcp

dockercompose15545145863402767022_webapplication_1

Edit and continue

Changes to static files and Razor views are automatically updated without the need for a compilation step. Make the change, save, and refresh the browser to view the update.

Modifications to code files requires compiling and a restart of Kestrel within the container. After making the change, use CTRL + F5 to perform the process and start the app within the container. The Docker container isn’t rebuilt or stopped. Run the docker ps command in Command Prompt. Notice the original container is still running as of 10 minutes ago:

s19

CONTAINER ID IMAGE COMMAND CREATED STATUS PORTS NAMES
d9af4b5f2ee3 webapplication:dev “tail -f /dev/null” 10 minutes ago Up 10 minutes 0.0.0.0:32769->80/tcp dockercompose15545145863402767022_webapplication_1

(Optional) Publish Docker images

Once the develop and debug cycle of the app is completed, the Visual Studio Tools for Docker assist in creating the production image of the app. Change the configuration drop-down to Release and build the app. The tooling produces the image with the latest tag, which can be pushed to the private registry or Docker Hub.

Run the docker images command in Command Prompt to see the list of images:

REPOSITORY TAG IMAGE ID CREATED SIZE
webapplication latest 66d9e9e623a11 9 seconds ago 391MB
webapplication dev 66d9e9e623a1 About an hour ago 389MB
microsoft/aspnetcore 2.0   cdc2d48122e4 40 hours ago 389MB

Note

The docker images command returns intermediary images with repository names and tags identified as (not listed above). These unnamed images are produced by the multi-stage build Dockerfile. They improve the efficiency of building the final image—only the necessary layers are rebuilt when changes occur. When the intermediary images are no longer needed, delete them using the docker rmi command.

The production or release image may be smaller in size in comparison to the dev image, because the volume mapping, the debugger and app were running from the local machine instead of within the container. The latest image has packaged the necessary app code to run the app on a host machine. Therefore, the delta is the size of the app code.

Step 4. Test your Docker application (locally, in your local pc)

Note that this step will vary depending on what your app is doing.

The above .NET Core application named as WebApplication deployed as a single container/service, you’d just need to access the service by providing the TCP port specified in the Dockerfile, as in the following simple example.

Open a browser on the Docker host and navigate to that site, and you should see your app/service running.

s26

Note that it is using the port 80.

Run your .NET Core Web app without Docker

Visual Studio used a default template for the MVC project you just created. This is a basic starter project, and it’s a good place to start,

Go to Solution Explorer, then Right click on your project > Choose Set as StartUp Project option.

s10

Next, Tap F5 to run the app in debug mode or Ctrl-F5 in non-debug mode.

s11

  1. Visual Studio starts IIS Express and runs your app. Notice that the address bar shows localhost:port# and not something like example.com. That’s because localhost is the standard hostname for your local computer. When Visual Studio creates a web project, a random port is used for the web server. In the image above, the port number is 52376. The URL in the browser shows localhost: 52736. When you run the app, you’ll see a different port number.
  2. Launching the app with Ctrl+F5 (non-debug mode) allows you to make code changes, save the file, refresh the browser, and see the code changes. Many developers prefer to use non-debug mode to quickly launch the app and view changes.
  3. You can launch the app in debug or non-debug mode from the Debug menu item:

    s14

  4. You can debug the app by tapping the IIS Express button.

    s15

The default template gives you working Home, About and Contact links. The browser image above doesn’t show these links. Depending on the size of your browser, you might need to click the navigation icon to show them.

s16

If you were running in debug mode, tap Shift-F5 to stop debugging.

Reference Links

Build, Debug, Update and Refresh apps in a local Docker container:

https://azure.microsoft.com/en-us/documentation/articles/vs-azure-tools-docker-edit-and-refresh/

Deploy an ASP.NET container to a remote Docker host:

https://azure.microsoft.com/en-us/documentation/articles/vs-azure-tools-docker-hosting-web-apps-in-docker/

Workflow for building a single ASP.NET Core Web API inside a Docker container using Visual Studio

An app will be made up from you own services plus additional libraries (Dependencies).

The following diagram illustrates 5 steps for building a Docker app:

Picture12

Step 1. Start coding in VS 2017 for Creating ASP.NET Core Web API Application

The way you develop your application is pretty similar to the way you do it without Docker. The difference is that while developing, you are deploying and testing your application or services running within Docker containers placed in your local environment (like a Linux VM or Windows).

This step explains how to create ASP.NET Core Web API application.

Create a ASP.NET Core Web API Application
  1. Right click on your AKSDemo solution i.e. created in previous steps>Click Add>Choose New Project option.
  2. Complete the New Project dialog:
    • In the left pane, tap .NET Core
    • In the center pane, tap ASP.NET Core Web Application (.NET Core)
    • Name the project “APIApplication” (It’s important to name the project “APIApplication”   so when you copy code, the namespace will match.)
    • Tap OK
Step 2. Add Docker support to an Web API
  1. Complete the New ASP.NET Core Web Application (.NET Core)APIApplication dialog:
    • In the version selector drop-down box select ASP.NET Core 2.0
    • Select Web API
    • Check the option as Enable Docker support checkbox
    • Choose OS as Linux from dropdown list
    • Tap OK.

s29

2. Now the Solution Explorer in your Visual Studio 2017 will be looks like below figure.

s30

When you add Docker support to a service project in your solution, Visual Studio is not just adding a DockerFile file to your project, and it also is adding a service section in your solution’s docker-compose.yml files (or creating the files if they didn’t exist). It’s an easy way to begin composing your multi container solution; you then can open the docker-compose.yml files and update them with additional features.

This action not only adds the DockerFile to your project, it also adds the required configuration lines of code to a global docker-compose.yml set at the solution level.

After you add Docker support to your solution in Visual Studio, you will also see the updated files in docker-compose project at solution level.

s7

A Dockerfile, the recipe for creating a final Docker image, is added to the project root. Refer to Dockerfilereference for an understanding of the commands within it. This particular Dockerfile uses a multi-stage build containing four distinct, named build stages:

s31

The Dockerfile is based on the microsoft/aspnetcore image. This base image includes the ASP.NET Core NuGet packages, which have been pre-jitted to improve startup performance.

The docker-compose.yml file contains the name of the images that’s created when the project runs:

s32

In the preceding example, image: webapplication generated the image webapplication:dev and image: apiapplication generated the image apiapplication:dev, when the app runs in Debug mode. The webapplication:latest and apiapplication:latest images are generated when the app runs in Release mode.

Right click on your docker-compose project, then select Set as StartUp Project option.

s265

Next, Go to Build menu then click on Build Solution option or Press Ctrl+Shift+B.

s22

After that you will see the Output window in your visual studio will be looks like below figure.

s33

The above Output window contains the following process:

Whenever you Build the Solution, then internally it will create Docker images with the name “webapplication:dev” and “apiapplication:dev”(“dev” is a tag, like a specific version). You can take this step for each custom image you need to create for your composed Docker application with several containers.

You can find the existing images in your local repository (your dev machine) by Run the docker images command in the Package Manager Console (PMC) or Command Prompt window. The images on the machine are displayed:

s35

Step 3. Run your Docker app

Right click on your docker-compose project, then select Set as StartUp Project option then it will automatically Docker is selected in the toolbar.

s266

Debug
Go to Debug menu then click on Start Debugging or Press F5 to start app in debugging mode. After few seconds the Docker view of the Output window shows the following actions taking place:

  • The microsoft/aspnetcore runtime image is acquired (if not already in the cache).
  • The microsoft/aspnetcore-build compile/publish image is acquired (if not already in the cache).
  • The ASPNETCORE_ENVIRONMENT environment variable is set to Development within the container.
  • Port 80 is exposed and mapped to a dynamically-assigned port for localhost. The port is determined by the Docker host and can be queried with the docker ps command.
  • The apps are copied to the containers.
  • The default browser is launched with the debugger attached to the containers using the dynamically-assigned port like this below images.

By default the browser will launch the web application only.

WebApplication:

s36

So, you can manually run the API application URL on your favourite browser, for that you can see the port number of your .net core API application running inside the Docker then you can run docker ps command in the command prompt. Now you will see the port number of your .net core API application.

s38

CONTAINER ID IMAGE COMMAND CREATED STATUS PORTS NAMES
935ebf0ec20b apiapplication:dev “tail -f /dev/null” 5 minutes ago Up 5 minutes 0.0.0.0:32771->80/tcp dockercompose15545145863402767022_apiapplication_1
384d892368ed webapplication:dev “tail -f /dev/null” 5 minutes ago Up 5 minutes 0.0.0.0:32772->80/tcp dockercompose15545145863402767022_webapplication_1

After that, enter http://localhost:/api/ToDoItems URL in your favourite browser, then you will see the list To-Do Items.

APIApplication:

Whenever the default browser is launched with the debugger attached to the API app container using the dynamically-assigned port, then you must add the api/values at the end of default URL like this below image.

s37

The resulting Docker images are the dev image of the app with the microsoft/aspnetcore images as the base image. Run the docker images command in the Package Manager Console (PMC) or Command Prompt window. The images on the machine are displayed:

s35

Note: The dev image lacks the app contents, as Debug configurations use volume mounting to provide the iterative experience. To push an image, use the Release configuration.

Run the docker ps command in Command Prompt. Notice the app is running using the container:

s38

CONTAINER ID IMAGE COMMAND CREATED STATUS PORTS NAMES
935ebf0ec20b apiapplication:dev “tail -f /dev/null” 5 minutes ago Up 5 minutes 0.0.0.0:32771->80/tcp dockercompose15545145863402767022_apiapplication_1
384d892368ed webapplication:dev “tail -f /dev/null” 5 minutes ago Up 5 minutes 0.0.0.0:32772->80/tcp dockercompose15545145863402767022_webapplication_1
Edit and continue

Changes to static files and Razor views are automatically updated without the need for a compilation step. Make the change, save, and refresh the browser to view the update.

Modifications to code files requires compiling and a restart of Kestrel within the container. After making the change, use CTRL + F5 to perform the process and start the app within the container. The Docker container isn’t rebuilt or stopped. Run the docker ps command in Command Prompt. Notice the original container is still running as of 20 minutes ago:

CONTAINER ID IMAGE COMMAND CREATED STATUS PORTS NAMES
935ebf0ec20b apiapplication:dev “tail -f /dev/null” 20 minutes ago Up 20 minutes 0.0.0.0:32771->80/tcp dockercompose15545145863402767022_apiapplication_1
384d892368ed webapplication:dev “tail -f /dev/null” 20 minutes ago Up 20 minutes 0.0.0.0:32772->80/tcp dockercompose15545145863402767022_webapplication_1

Step 4. Test your Docker application (locally, in your local pc)

This step will vary depending on what your app is doing.

The above .NET Core application named as APIApplication deployed as a single container/service, you’d just need to access the service by providing the TCP port specified in the Dockerfile, as in the following simple example.

Open a browser on the Docker host and navigate to that site, and you should see your app/service running.

s37

Note that it is using the port 80.

Run your ASP.NET Core API Application without Docker

Go to Solution Explorer, then Right click on your project named as APIApplication> Choose Set as StartUp Project option.

s39

Next, Tap F5 to run the app in debug mode or Ctrl-F5 in non-debug mode.

Add the api/values at the end of default URL on the browser.

s40

Visual Studio starts IIS Express and runs your app. Notice that the address bar shows localhost:port# and not something like example.com. That’s because localhost is the standard hostname for your local computer. When Visual Studio creates an API project, a random port is used for the API server. In the image above, the port number is 61753. The URL in the browser shows localhost: 61753. When you run the app, you’ll see a different port number.

Launching the app with Ctrl+F5 (non-debug mode) allows you to make code changes, save the file, refresh the browser, and see the code changes. Many developers prefer to use non-debug mode to quickly launch the app and view changes.

You can launch the app in debug or non-debug mode from the Debug menu item:

s14

You can debug the app by tapping the IIS Express button

s15

The default template gives the functionality of Values API.

If you were running in debug mode, tap Shift-F5 to stop debugging.

Reference Architecture for Database Application

s4

Inner-loop development workflow for Database Application

Before triggering the outer-loop workflow spanning the whole DevOps cycle, it all starts from each developer’s machine working coding the app itself, using the preferred language/platform, and testing it locally. But in every case, you will have with a very important point in common no matter what language/framework/platforms you choose. In this specific workflow you are always developing and testing Database project locally.
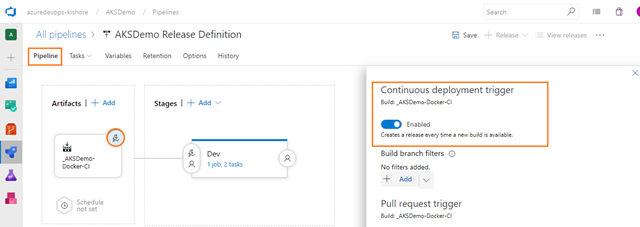
Picture14

Workflow for building a Database Application using Visual Studio

The following steps are the basic steps usually needed when building a Database application, as illustrated in the below Figure.

Picture6

Create Database application using State based Approach

The following prerequisites must be met to create a database:

Prerequisites

Note:

Before installing SSDT for Visual Studio 2017 (15.7.0)

  • uninstall “Microsoft Analysis Services Projects”
  • uninstall  “Microsoft Reporting Services Projects” extensions
  • Close all VS instances

Install the SSDT tools, and then open your previous VS Solution i.e AKSDemo.sln

Step 1. Create SQL Server Database Project
  1. Right click on your AKSDemo solution i.e. created in previous steps>Click Add>Choose New Project option.
    s27
  2. Complete the New Project dialog:
    • In the left pane, tap SQL Server
    • In the center pane, tap SQL Server Database Project
    • Name the project “DatabaseApplication” (It’s important to name the project “DatabaseApplication” so when you copy code, the namespace will match.)
    • Tap OK
      s41
  3. Now the Solution Explorer in your Visual Studio 2017 will looks like the below figure.
    s42
  4. Right click on database project and click Add. Here you can add many things like Table, View, Script, Stored Procedure, table valued function, Scaler valued function, etc.
  5. Right click on database project i.e DatabaseApplication and click Add >> select New Folder and enter the name as dbo like this below figure.
    s43
  6. Right click on dbo folder click Add >> select New Folder and enter the name as Tables.
    s44
Step 2. Create Table
  1. Right click on your Tables folder >> select Add then choose Table option.
    s45
  2. Complete the Add New Item dialog:
    • In the left pane, tap Tables and Views
    • In the center pane, tap Table
    • Name the table “ToDoItem”
    • Tap Add
      s46
  3.  You will see the following design,  e.g., here you can add columns with datatype.
    s47
  4. This is my table script for example ToDoItem.sql.
    s48
  5. Close the Table designer window. And you have done to edit the code in the Database project.
(Optional) Publish Database Project to SQL Server 2016/2017 from VS2017
Create Empty Database
  1. Before publishing the database project to SQL Server 2016, first you need to create an empty database, for example DockersDemoDB.
  2. To open SQL Server Management Studio (SSMS), Search for SSMS, select SQL Server Management Studio in the search results, and click it (or hit Enter).
    s267
  3. Next, SSMS will be open like this below figure.
    s268
  4. Click on Connect > Database Engine.
  5. A new Connect to Server window will open, in that you have to choose the Server name and Authentication like this below figure.
    s59
  6. Click on the Connect button.
  7. Now you see the list of databases by expanding Databases folder under the specified server.
  8. Right click on Databases folder then choose New Database option.
    s60
  9. Complete New Database Dialog:
    · Enter the Database name as DockersDemoDB
    ·
    Click on OK Button
    s61
  10. Finally, a new empty Database is created under the Databases folder.
    s62
Publish Database Project
    1. Right click on Database project i.e. DatabaseApplication> then click on Set as StartUp Project option.
      s49
    2. Right click on Database project then choose Properties option.
      s50
    3. In the Properties windows, click on Project Settings on the left pane, then Change Target platform to SQL Server 2016.
      s51
    4. Save the change and Close the Properties window.
    5. Right click on Database project i.e. DatabaseApplication > Click on Publish option.
      s52
    6. Complete the Publish Database Wizard:

        • Click on the Edit button under the Target Database Settings.
        •  A new Connect dialog will be open like this below figure.
          s53
        • Click on Browse in the above Connect dialog, then expand the
          Local. Now you will see the list of SQL Servers installed in your local machine.
        • Choose any of the SQL Server, select Authentication type as
          Windows Authentication, and select the Database from drop down list (e.g. DockersDemoDB.)
s54
        • Click on Test Connection to validate SQL Server connection.
          s55
        • If the Test Connection succeeded, then click on the OK button.
          s56

  1. You will see the Target database connection, Database name under Publish Database dialog.
    s63
  2. Click on Publish button.
  3. Your Database project is published into DockersDemoDB successfully.
    s64
Test your Database
  1. Go to SSMS> choose your Database i.e. DockersDemoDB> expand Tables folder, then you will see the ToDoItem table.
    s65
  2. Right click on your Database i.e. DockersDeomDB > choose New Query option. In that New query window you have to write the insert query for inserting some data into ToDoItem table.
    s66
    Note:
    The database generates the Id when a TodoItem is created/inserted. So, you don’t need to provide Id value explicitly while inserting the data into database.
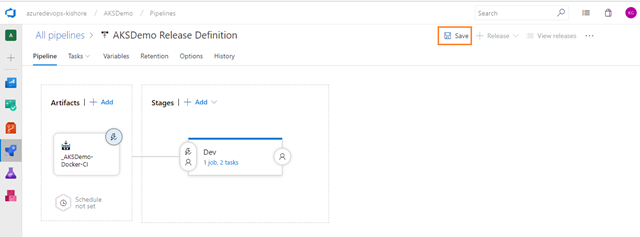
  3. Click on Execute option, for executing the insert query on target database.
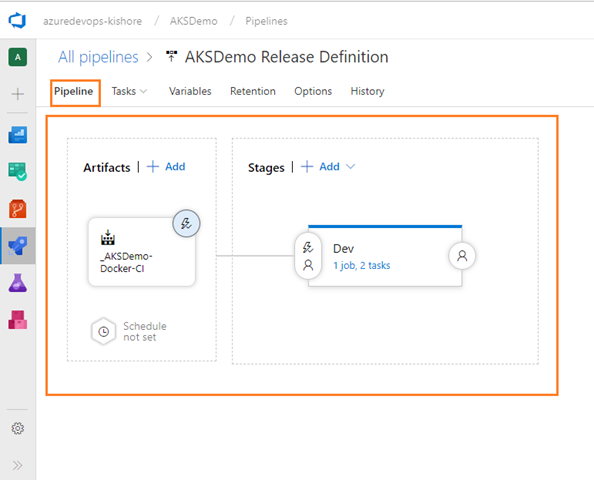
  4. If you want to see the inserted data of the ToDoItem table. Right click on dbo.ToDoItem> choose Select Top 1000 Rows, then you will see the Data inside it.
    s67
  5. Now, you have the Database with some data in your local machine.
Step 3. Publish Database Project to Microsoft Azure SQL Database V12 from VS2017
Log in to the Azure portal

Log in to the Azure portal.

Create a SQL Database

An Azure SQL database is created with a defined set of compute and storage resources. The database is created within an Azure resource group and in an Azure SQL Database logical server.

Follow these steps to create a SQL database.

  1. Click Create a resource in the upper left-hand corner of the Azure portal.
  2. Select Databases from the New page, and select Create under SQL Database on the New page.
    s5
  3. Fill out the SQL Database form with the following information, as shown on the preceding image:

    Setting Suggested value Description
    Database name KZEU-AKSDMO-SB-DEV-SDB-01 For valid database names, see Database Identifiers.
    Subscription Your subscription For details about your subscriptions, see Subscriptions.
    Resource group For example:
    KZEU-AKSDMO-SB-DEV-RGP-02
    For valid resource group names, see Naming rules and restrictions.
    Select source Blank database It creates empty Database.
  4. Under Server, click Configure required settings and fill out the SQL server (logical server) form with the following information, as shown on the following image:
    s6
Setting Suggested value Description
Server name Any globally unique name For valid server names, see Naming rules and restrictions.
Server admin login Any valid name For valid login names, see Database Identifiers.
Password Any valid password Your password must have at least 8 characters and must contain characters from three of the following categories: upper case characters, lower case characters, numbers, and non-alphanumeric characters.
Subscription Your subscription For details about your subscriptions, see Subscriptions.
Resource group For example: KZEU-AKSDMO-SB-DEV-RGP-02 For valid resource group names, see Naming rules and restrictions.
Location Any valid location For information about regions, see Azure Regions.
  • When you have completed the form, click Select.
  • Click Pricing tier to specify the service tier, the number of DTUs, and the amount of storage. Explore the options for the amount of DTUs and storage that is available to you for each service tier
  • For this scenario, select the Basic service tier.
    s7
  • After selecting the server tier, click Apply.
  • Now that you have completed the SQL Database form, click Create to provision the database. Provisioning takes a few minutes.
  • On the toolbar, click Notifications to monitor the deployment process.
    s72
Reference Link

If you want to configure the server-lever firewall rule, please go through this link.

Publish Database Project
  1. Right click on Database project then choose Properties option.
  2. In the Properties windows, click on Project Settings on the left pane, then Change Target platform to SQL Server 2016.
    s73
  3. Save the change and Close the Properties window.
  4. Right click on Database project i.e. DatabaseApplication > Click on Publish option.
    s52
  5. Complete the Publish Database Wizard:
    • Click on the Edit button under the Target Database Settings.
    • Next a new Connect dialog will open, like this below figure.
      s53
    • Click on Browse in the above Connect dialog.
    • Enter the Server Name, select Authentication type as SQL Server Authentication, enter User Name, Password and select the Database from the drop down list, for example KZEU-AKSDMO-SB-DEV-SDB-01.
      Note:
      If you have not seen your Databases from the drop down list, you have to configure the server level firewall rules by following this link.
      s8
    • Click on Test Connection to validate SQL Server connection.
      s55
    • If the Test Connection succeeded the click on OK button.
      s9
  6. After that you will see the Target database connection, Database name under Publish Database dialog.
    s10
  7. Click on Publish button.
  8. Now your Database project is published into Azure SQL Database i.e. KZEU-AKSDMO-SB-DEV-SDB-01 successfully.
Step 4. Test your Database
  1. Login to the Azure portal
  2. Open your Azure SQL Database (i.e. created in previous steps.)
  3. Click on Query editor (preview) on the left pane then click on the login button on top of the right pane.
    Picture8
  4. Next, enter your SQL Server login details.
    s11
  5. After login succeeded, Expand the Tables on the left pane then you have to see the dbo.ToDoItem table.
    s12
  6. In that New query window you have to write the insert query for inserting some data into ToDoItem table.
    s13
  7. Click on Run option, for executing the insert query on target database.
  8. If you want to see the inserted data of the ToDoItem table. See the below figure.
    s81
  9. Now, you have the Azure SQL Database with some data in Azure Cloud.

Add the custom code in ASP.NET Core Web API Application

Here you can add the .net core code for getting the list of To-Do items from the database i.e created in the previous steps.

Add a Model class

A model is an object representing the data in the app. In this case, the only model is a ToDoItem.

  1. In Solution Explorer, right-click the project i.e. APIApplication. Select Add > New Folder. Name the folder Models
    s82
  2. Right click on Models folder, then click on Add and Choose Class option.
    s83
  3. Complete the Add New Item dialog:
    • Give the Name of the class i.e. ToDoItem.cs
    • Click on Add option.
      s84
  4. Update the TodoItem class with the following code:
    namespace APIApplication.Models
    
    {
    
    public class ToDoItem
    
    {
    
    public int Id { get; set; }
    
    public string Item { get; set; }
    
    }
    
    }
    
  5. Build the project to verify you don’t have any errors. You now have a Model in your .NET Core Web API app.

Note:
the model classes can go anywhere in the project. The Models folder is used by convention for model classes.

Add a Controller

  1. Right click on Controllers folder, then click on Add and Choose New Scaffolded Item option.
    s85
  2. Complete the Add Scaffold dialog:
    • In the left pane, tap API
    • In the center pane, tap API Controller with read/write actions
    • Click on Add button.
      s86
  3. Whenever you click on Add button, then immediately a new popup will open like this below. In that enter the name of the controller for example ToDoItemsController
    s87
  4. Now a new controller will added under the Controllers folder of APIApplication with default functionality.

Handling settings and Environment Variables of your .NET Core 2 application hosted in a Docker container during development

Environment Variables and settings during development

If you configure secret settings in your settings files (appsettings.json), the secrets can be seen by everyone who has access to your Docker container. How to use secrets then during development? You can configure Environment Variables in Visual Studio in the launchSettings.json file.

  1. Expand the Properties folder of your API Application > open launchSettings.json file, then add the below lines of code under the environmentVariables of profiles section.
    “ConnectionStrings_DBConnection”: “Server=tcp:XXXXX.database.windows.net,1433;Initial Catalog=KZEU-AKSDMO-SB-DEV-SDB-01;Persist Security Info=False;User ID=XXXX;Password=XXXXX;MultipleActiveResultSets=False;Encrypt=True;TrustServerCertificate=False;Connection Timeout=30;”
  2. After added the above lines of code in launchSettings.json file, then it should be like this below figure.
    s14

Docker Compose and Environment Variables during development

When you debug your .NET Core Web API application itself, the solution above works great. If you have enabled Docker support and debug the docker-compose project, you should specify Environment Variables in Docker compose.

You can add the Environment Variables in docker-compose.override.yaml

version: '3.4'

services:
  webapplication:
    environment:
      - ASPNETCORE_ENVIRONMENT=Development
      - AppSettings_APIURL=http://104.209.160.99/
    ports:
      - "80"

  apiapplication:
    environment:
      - ASPNETCORE_ENVIRONMENT=Development
      - "ConnectionStrings_DBConnection=Server=tcp:kzeu-aksdmo-sb-dev-sq-01.database.windows.net,1433;Initial Catalog=KZEU-AKSDMO-SB-DEV-SDB-01;Persist Security Info=False;User ID=XXXXXX;Password=XXXXXXXXX;MultipleActiveResultSets=False;Encrypt=True;TrustServerCertificate=False;Connection Timeout=30;"
    ports:
      - "80"

Validate .yml or .yaml files

If you can validate the code inside .yml files, you can refer this link.

Reference Links

Handling settings and Environment Variables of your .NET Core 2 application hosted in a Docker container during development and on Kubernetes (Helm to the rescue)

https://pascalnaber.wordpress.com/2017/11/29/handling-settings-and-environment-variables-of-your-net-core-2-application-hosted-in-a-docker-container-during-development-and-on-kubernetes-helm-to-the-resque/

Get To-Do Items

  1. To get the To-Do Items, replace the following code in the TodoItemsController class:

    using Microsoft.AspNetCore.Mvc;
    using APIApplication.Models;
    using System.Data.SqlClient;
    using System.Data;
    using Microsoft.Extensions.Configuration;
    using System.Collections.Generic;
    using System;
    using System.Diagnostics;
    using APIApplication.Utils;
    
    namespace APIApplication.Controllers
    {
        [Produces("application/json")]
        [Route("api/ToDoItems")]
        public class ToDoItemsController : Controller
        {
            IConfiguration _iconfiguration;
            string dBConnectionString = string.Empty;
            public ToDoItemsController(IConfiguration iconfiguration)
            {
                _iconfiguration = iconfiguration;
    
                //Reading appsettings.json values
                //dBConnectionString = _iconfiguration.GetValue("ConnectionStrings:DBConnection");
    
                //Reading environment variables in launchSettings.json, docker-compose.override.yml and apiapplication.yaml
                dBConnectionString = _iconfiguration.GetSection("ConnectionStrings_DBConnection").Value;
            }
    
            // GET: api/ToDoItem
            [HttpGet]
            public async System.Threading.Tasks.Task<List> GetTodoItems()
            {
                List toDoItems = null;
                SqlConnection myConnection = null;
                try
                {
                    toDoItems = new List();
                    SqlDataReader reader = null;
                    myConnection = new SqlConnection();
                    myConnection.ConnectionString = dBConnectionString;
                    SqlCommand sqlCmd = new SqlCommand();
                    sqlCmd.CommandType = CommandType.Text;
                    sqlCmd.CommandText = "Select * from ToDoItem";
                    sqlCmd.Connection = myConnection;
                    myConnection.Open();
                    reader = sqlCmd.ExecuteReader();
                    ToDoItem toDoItem = null;
                    while (reader.Read())
                    {
                        toDoItem = new ToDoItem();
                        toDoItem.Id = Convert.ToInt32(reader.GetValue(0).ToString());
                        toDoItem.Item = reader.GetValue(1).ToString();
                        toDoItems.Add(toDoItem);
                    }
                }
                catch(Exception ex)
                {
                    Debug.WriteLine("Error returned from the service: {0}", ex.Message);
                }
                finally
                {
                    myConnection.Close();
                }
                return toDoItems;
    
            }
    
            // GET: api/ToDoItems/5
            [HttpGet("{id}", Name = "Get")]
            public string Get(int id)
            {
                return "value";
            }
    
            // PUT: api/ToDoItems/5
            [HttpPost]
            public void Put([FromBody]string value)
            {
            }
    
            // POST: api/ToDoItems
            [HttpPost]
            public void Post([FromBody]string value)
            {
            }
    
            // DELETE: api/ToDoItems/5
            [HttpPost]
            public void Delete([FromBody]string value)
            {
            }
    
        }
    }
    
  2. Open the Startup.cs class of your web API application i.e. APIApplication, then replace existing code with below lines of code.

    using Microsoft.AspNetCore.Builder;
    using Microsoft.AspNetCore.Mvc;
    using Microsoft.EntityFrameworkCore;
    using Microsoft.Extensions.DependencyInjection;
    using APIApplication.Models;
    using Microsoft.Extensions.Configuration;
    using Microsoft.AspNetCore.Hosting;
    using APIApplication.Utils;
    
    namespace APIApplication
    {
        public class Startup
        {
            public Startup(IConfiguration configuration, IHostingEnvironment env)
            {
                var builder = new ConfigurationBuilder()
                .SetBasePath(env.ContentRootPath)
                .AddJsonFile("appsettings.json", optional: true, reloadOnChange: true)
                .AddJsonFile($"appsettings.{env.EnvironmentName}.json", optional: true)
                .AddEnvironmentVariables();
                Configuration = builder.Build();
                Configuration = configuration;
            }
    
            public IConfiguration Configuration { get; }
    
            // This method gets called by the runtime. Use this method to add services to the container.
            public void ConfigureServices(IServiceCollection services)
            {
                services.AddMvc();
                services.AddSingleton(Configuration);
            }
    
            public void Configure(IApplicationBuilder app)
            {
                //app.UseDefaultFiles();
                //app.UseStaticFiles();
                app.UseMvc();
            }
        }
    }
    
  3. Now you are ready to run the above .NET Core API application in both local machine and local Docker.

Launch the ASP.NET Core API Application without Docker

If you don’t know how the application run from visual studio, please follow this steps.

Go to Solution Explorer, then Right click on your project named as APIApplication> Choose Set as StartUp Project option.

In Visual Studio, press CTRL+F5 to launch the app. Visual Studio launches a browser and navigates to http://localhost:/api/values, where is a randomly chosen port number. Navigate to the ToDoItems controller at http://localhost:/api/ToDoItems.

Now you will see the list of To-Do Items available in the ToDoItem table of your database.
image

Run your Docker app

If you run the application inside the local Docker, you can follow this steps.

By default the browser launch the web application only.

WebApplication:

image

So, you can manually run the API application URL on your favourite browser, for that you can see the port number of your .net core API application running inside the Docker then you can run docker ps command in the command prompt. Now you will see the port number of your .net core API application.

image

CONTAINER ID IMAGE COMMAND CREATED STATUS PORTS NAMES
935ebf0ec20b apiapplication:dev “tail -f /dev/null” 5 minutes ago Up 5 minutes 0.0.0.0:32771->80/tcp dockercompose15545145863402767022_apiapplication_1
384d892368ed webapplication:dev “tail -f /dev/null” 5 minutes ago Up 5 minutes 0.0.0.0:32772->80/tcp dockercompose15545145863402767022_webapplication_1

After that, enter http://localhost:/api/ToDoItems URL in your favourite browser, then you will see the list To-Do Items.

APIApplication:

image

Add the custom code in ASP.NET Core Web Application

Here you can add the .net core code for displaying the list of To-Do items in .NET Core web application by calling the .NET Core Web API (i.e developed in the previous steps).

The Model-View-Controller (MVC) architectural pattern separates an app into three main components: Model, View, and Controller. The MVC pattern helps you create apps that are more testable and easier to update than traditional monolithic apps. MVC-based apps contain:

  • Models: Classes that represent the data of the app. The model classes use validation logic to enforce business rules for that data. Typically, model objects retrieve and store model state in a database. In this blog/document, a ToDoItem model retrieves to-do-item data from a database, provides it to the view or updates it.
  • Views: Views are the components that display the app’s user interface (UI). Generally, this UI displays the model data.
  • Controllers: Classes that handle browser requests. They retrieve model data and call view templates that return a response. In an MVC app, the view only displays information; the controller handles and responds to user input and interaction.

    For example, the controller handles route data and query-string values, and passes these values to the model. The model might use these values to query the database.

    For example, http://localhost:<PortNumber>/Home/About has route data of Home (the controller) and About (the action method to call on the home controller). http://localhost:/Homoe/ToDoItem is a request to get the To-Do Items using the ToDoItemsController.

The MVC pattern helps you create apps that separate the different aspects of the app (input logic, business logic, and UI logic), while providing a loose coupling between these elements. The pattern specifies where each kind of logic should be located in the app.

The UI logic belongs in the view.

Input logic belongs in the controller.

Business logic belongs in the model.

This separation helps you manage complexity when you build an app, because it enables you to work on one aspect of the implementation at a time without impacting the code of another. For example, you can work on the view code without depending on the business logic code.

Here you can build WebAppication with MVC pattern app. The MVC project contains folders for the Controllers, Models and Views.

Add a Model class

In this section, you’ll add some classes for managing To-Do Items in a database. These classes will be the “Model” part of the MVC app.

A model is an object representing the data in the app. In this case, the only model is a ToDoItem.

The model classes you’ll create are known as POCO classes (from “plain-old CLR objects”) because they don’t have any dependency on database. They just define the properties of the data that will be stored in the database.

  1. Go to Solution Explorer i.e. AKSDemo.sln, then Right click on your project i.e WebApplication > Choose Set as StartUp Project option.
  2. Go to WebApplication, Right click on Models folder, then click on Add and Choose Class option.
    s100
  3. Complete the Add New Item dialog:
    • Give the Name of the class i.e. ToDoItem.cs

    • Click on Add option.
      image

  4. Update the TodoItem class with the following code:

    using System;
    using System.Collections.Generic;
    using System.Linq;
    using System.Threading.Tasks;
    
    namespace WebApplication.Models
    {
        public class ToDoItem
        {
            public int Id { get; set; }
            public string Item { get; set; }
        }
    }
    
  5. Build the project to verify you don’t have any errors. You now have a Model in your MVC app.

Note:
the model classes can go anywhere in the project. The Models folder is used by convention for model classes.

Handling settings and Environment Variables of your .NET Core 2 application hosted in a Docker container during development

Environment Variables and settings during development

If you configure secret settings in your settings files (appsettings.json), the secrets can be seen by everyone who has access to your Docker container. How to use secrets then during development? You can configure Environment Variables in Visual Studio in the launchSettings.json file.

  1. Expand the Properties folder of your Web Application > open launchSettings.json file, then add the below lines of code under the environmentVariables of profiles section.
    “AppSettings_APIURL”: “”
  2. After added the above lines of code in launchSettings.json file, then it should be like this below figure.
    image

Docker Compose and Environment Variables during development

When you debug your .NET Core Web application itself, the solution above works great. If you have enabled Docker support and debug the docker-compose project, you should specify Environment Variables in Docker compose.

You can add the Environment Variables in docker-compose.override.yaml

version: '3.4'

services:
  webapplication:
    environment:
      - ASPNETCORE_ENVIRONMENT=Development
      - AppSettings_APIURL=http://104.209.160.99/
    ports:
      - "80"

  apiapplication:
    environment:
      - ASPNETCORE_ENVIRONMENT=Development
      - "ConnectionStrings_DBConnection=Server=tcp:kzeu-aksdmo-sb-dev-sq-01.database.windows.net,1433;Initial Catalog=KZEU-AKSDMO-SB-DEV-SDB-01;Persist Security Info=False;User ID=kishore;Password=iSMAC2016;MultipleActiveResultSets=False;Encrypt=True;TrustServerCertificate=False;Connection Timeout=30;"
    ports:
      - "80"

Validate .yml or .yaml files

If you can validate the code inside .yml files, you can refer this link.

Reference Links

Handling settings and Environment Variables of your .NET Core 2 application hosted in a Docker container during development and on Kubernetes (Helm to the resque)

https://pascalnaber.wordpress.com/2017/11/29/handling-settings-and-environment-variables-of-your-net-core-2-application-hosted-in-a-docker-container-during-development-and-on-kubernetes-helm-to-the-resque/

Add a Controller

  1. Go to WebApplication, right-click on Controllers > Add > New Scaffolded Item.
    image
  2. Complete the Add Scaffold dialog:
    • In the left pane, tap MVC
    • In the center pane, tap MVC Controller with read/write actions
    • Click on Add button
      image
  3. Whenever you click on Add button, then immediately a new popup will open like this below. In that enter the name of the controller for example ToDoItemController
    image
  4. Now a new controller will added under the Controllers folder of WebApplication with default functionality.
  5. Replace the contents of Controllers/ToDoItemController.cs with the following:

    using System;
    using System.Collections.Generic;
    using System.Linq;
    using System.Net.Http;
    using System.Net.Http.Headers;
    using System.Threading.Tasks;
    using Microsoft.AspNetCore.Http;
    using Microsoft.AspNetCore.Mvc;
    using Microsoft.Extensions.Configuration;
    using Newtonsoft.Json;
    using WebApplication.Models;
    using WebApplication.Utils;
    
    namespace WebApplication.Controllers
    {
        public class ToDoItemController : Controller
        {
            string toDoItemResponse = string.Empty;
            IConfiguration _iconfiguration;
            public ToDoItemController(IConfiguration iconfiguration)
            {
                _iconfiguration = iconfiguration;
            }
    
            // GET: ToDoItem/GetToDoItems
            public async Task GetToDoItems()
            {
                List toDoItems = null;
                try
                {
                    using (var client = new HttpClient())
                    {
                        //Reading appsettings.json values
                        //var apiURL = _iconfiguration.GetValue("AppSettings:APIURL");
    
                        //Reading environment variables in launchSettings.json, docker-compose.override.yml and webapplication.yaml
                        var apiURL = _iconfiguration.GetSection("AppSettings_APIURL").Value;
                        //Passing service base url
                        client.BaseAddress = new Uri(apiURL);
    
                        client.DefaultRequestHeaders.Clear();
                        //Define request data format
                        client.DefaultRequestHeaders.Accept.Add(new MediaTypeWithQualityHeaderValue("application/json"));
                        //Sending request to find web api REST service resource GetToDoItem using HttpClient
                        HttpResponseMessage Res = await client.GetAsync("api/ToDoItems");
    
                        //Checking the response is successful or not which is sent using HttpClient
                        if (Res.IsSuccessStatusCode)
                        {
                            WebApplication.Utils.ApplicationInsights.StopTrackRequest("api/ToDoItems", Res.StatusCode);
                            //Storing the response details recieved from web api
                            toDoItemResponse = Res.Content.ReadAsStringAsync().Result;
    
                            //Deserializing the response recieved from web api and storing into the string varaible
                            toDoItems = JsonConvert.DeserializeObject<List>(toDoItemResponse);
                        }
                    }
                }
                catch (Exception ex)
                {
                }
                return View(toDoItems);
            }
        }
    }
    

Every public method in a controller is callable as an HTTP endpoint. In the sample above, GetToDoItems method return a list of To-Do items. Note the comments preceding each method.

An HTTP endpoint is a targetable URL in the web application, such as http://localhost:/ToDoItem/GetToDoItems, and combines the protocol used: HTTP, the network location of the web server (including the TCP port): localhost: and the target URI /ToDoItem/GetToDoItems.

The above comment on the GetToDItems method in the ToDoItemController, specifies an HTTP GET method that’s invoked by appending “/ToDoItem/GetToDoItems” to the URL.

The above GetToDoItems method contains the code for calling the .NET Core Web Api like api/ToDoItems, it will gives list of To-Do Items.

Add a View

  1. Views: Views are the components that display the app’s user interface (UI). Generally, this UI displays the model data.
  2. To create the Partial View to Get To-Do Items and display on it, Open the ToDoItemController.cs file, then right click on GetToDoItems method and click on “Add View
    image
  3. Complete Add MVC View dialog:
    • Choose Template as List

    • Choose the Model class for example ToDoItem (WebApplication.Models)

    • Click on Add Button.
      image

  4. Now you have GetToDoItems.cshtml under ToDoItem folder of Views in your Web Application.
    image
  5. Replace the contents of the Views/ToDoItem/GetToDoItems.cshtml Razor view file with the following:
    @model IEnumerable
    
    @{
        ViewData["Title"] = "GetToDoItems";
    }
    <h2>ToDoItems</h2>
    <table class="table">
    <thead>
    <tr>
    <th>
                        @Html.DisplayNameFor(model =&gt; model.Id)</th>
    <th>
                        @Html.DisplayNameFor(model =&gt; model.Item)</th>
    <th></th>
    </tr>
    </thead>
    <tbody>
    @foreach (var item in Model) {
    <tr>
    <td>
                    @Html.DisplayFor(modelItem =&gt; item.Id)</td>
    <td>
                    @Html.DisplayFor(modelItem =&gt; item.Item)</td>
    </tr>
    }</tbody>
    </table>
    
  6. Expand the Shared folder under Views folder of your web application, then open the _Layout.cshtml file and add the below lines of code after this line

  7. <a asp-area=”” asp-controller=”Home” asp-action=”Contact”>Contact</a>
  8.  

    under the

    section.


  9. <a asp-area=”” asp-controller=”ToDoItem” asp-action=”GetToDoItems”>ToDoItem</a>
  10. image

    @inject Microsoft.ApplicationInsights.AspNetCore.JavaScriptSnippet JavaScriptSnippet


        @ViewData["Title"] - WebApplication


        @Html.Raw(JavaScriptSnippet.FullScript)


    <div class="container">
    <div class="navbar-header">
                    
                        <span class="sr-only">Toggle navigation</span>
                        <span class="icon-bar"></span>
                        <span class="icon-bar"></span>
                        <span class="icon-bar"></span>
                    
                    <a class="navbar-brand">WebApplication</a></div>
    <div class="navbar-collapse collapse">
    <ul class="nav navbar-nav">
    	<li><a>Home</a></li>
    	<li><a>About</a></li>
    	<li><a>Contact</a></li>
    	<li><a>ToDoItem</a></li>
    </ul>
    </div>
    </div>
    
    <div class="container body-content">
            @RenderBody()
    
    <hr />
    
    <footer>© 2018 - WebApplication
    </footer></div>


        @RenderSection("Scripts", required: false)


  11. Open the Startup.cs class of your web application i.e. WebApplication, then replace existing code with below lines of code.

    using System;
    using System.Collections.Generic;
    using System.Linq;
    using System.Threading.Tasks;
    using Microsoft.AspNetCore.Builder;
    using Microsoft.AspNetCore.Hosting;
    using Microsoft.Extensions.Configuration;
    using Microsoft.Extensions.DependencyInjection;
    using WebApplication.Models;
    using WebApplication.Utils;
    
    namespace WebApplication
    {
        public class Startup
        {
            public Startup(IConfiguration configuration,IHostingEnvironment env)
            {
                var builder = new ConfigurationBuilder()
                .SetBasePath(env.ContentRootPath)
                .AddJsonFile("appsettings.json", optional: true, reloadOnChange: true)
                .AddJsonFile($"appsettings.{env.EnvironmentName}.json", optional: true)
                .AddEnvironmentVariables();
                Configuration = builder.Build();
                Configuration = configuration;
            }
    
            public IConfiguration Configuration { get; }
    
            // This method gets called by the runtime. Use this method to add services to the container.
            public void ConfigureServices(IServiceCollection services)
            {
                services.AddMvc();
                services.AddSingleton(Configuration);
            }
    
            // This method gets called by the runtime. Use this method to configure the HTTP request pipeline.
            public void Configure(IApplicationBuilder app, IHostingEnvironment env)
            {
                if (env.IsDevelopment())
                {
                    app.UseBrowserLink();
                    app.UseDeveloperExceptionPage();
                }
                else
                {
                    app.UseExceptionHandler("/Home/Error");
                }
    
                app.UseStaticFiles();
    
                app.UseMvc(routes =>
                {
                    routes.MapRoute(
                        name: "default",
                        template: "{controller=Home}/{action=Index}/{id?}");
                });
            }
        }
    }
    

Now you have a separate view for displaying the list of To-Do items in your .NET Core Web Application.

Launch the ASP.NET Core API Application and Web Application without Docker

Go to Solution Explorer, then Right click on your solution named as AKSDemo.sln> Choose Set as StartUp Projects option.
image

Next a new window of ‘AKSDemo’ Property Pages will open, for configuring the Multiple startup projects like this below figure.
image

Click on Apply and then click on OK button.

In Visual Studio, press CTRL+F5 to launch the both applications web and API.

Visual Studio launches a browser and navigates to http://localhost:/api/values, where is a randomly chosen port number. Navigate to the ToDoItems controller at http://localhost:/api/ToDoItems.

APIApplication:
image

And also Visual Studio launches a browser and navigates to http://localhost:/, where is a randomly chosen port number. Navigate to the ToDoItem at http://localhost:/ToDoItem/GetToDoItems.

WebApplication:
image

Run your Docker app

If you run the application inside the local Docker, you can follow this steps.

fg
hh

using Microsoft.AspNetCore.Mvc;
using APIApplication.Models;
using System.Data.SqlClient;
using System.Data;
using Microsoft.Extensions.Configuration;
using System.Collections.Generic;
using System;
using System.Diagnostics;
using APIApplication.Utils;


Building and Deploying Micro Services with Azure Kubernetes Service (AKS) and Azure DevOps Part-1

Overview of this 4-Part Blog series

This blog outlines the process to

  • Compile a Database application and Deploy into Azure SQL Database 
  • Compile Docker-based ASP.NET Core Web application, API application 
  • Deploy web and API applications into to a Kubernetes cluster running on Azure Kubernetes Service (AKS) using the Azure DevOps

s161

The content of this blog is divided up into 4 main parts:
Part-1: Explains the details of Docker & how to set up local and development environments for Docker applications
Part-2: Explains in detail the Inner-loop development workflow for both Docker and Database applications
Part-3: Explains in detail the Outer-loop DevOps workflow for a Database application
Part-4: Explains in detail how to create an Azure Kubernetes Service (AKS), Azure Container Registry (ACR) through the Azure CLI, and an Outer-loop DevOps workflow for a Docker application

Part-1: The details of Docker & how to set up local and development environments for Docker applications

Introduction to Containers and Docker

      I.   The creation of Containers and their use
      II.  Docker Containers vs Virtual Machines
      III. What is Docker?
      IV. Docker Benefits
      V.  Docker Architecture and Terminology

 I. The creation of Containers and their use

Containerization is an approach to software development in which an application or service, its dependencies, and its configuration are packaged together as a container image. You then can test the containerized application as a unit and deploy it as a container image instance to the host operating system.
Placing software into containers makes it possible for developers and IT professionals to deploy those containers across environments with little or no modification.
Containers also isolate applications from one another on a shared operating system (OS). Containerized applications run on top of a container host, which in turn runs on the OS (Linux or Windows). Thus, containers have a significantly smaller footprint than virtual machine (VM) images.
Containers offer the benefits of isolation, portability, agility, scalability, and control across the entire application life cycle workflow. The most important benefit is the isolation provided between Dev and Ops.

II. Docker Containers vs. Virtual Machines

Docker containers are lightweight because in contrast to virtual machines, they don’t need the extra load of a hypervisor, but run directly within the host machine’s kernel. This means you can run more containers on a given hardware combination than if you were using virtual machines. You can even run Docker containers within host machines that are actually virtual machines!

Picture7

III. What is Docker?

  • An open platform for developing, shipping, and running applications
  • Enables separating your applications from your infrastructure for quick software delivery 
  • Enables managing your infrastructure in the same way you manage your applications
  • By taking advantage of Docker’s methodologies for shipping, testing, and deploying code quickly, you can significantly reduce the delay between writing code and running it in production
  • Uses the Docker Engine to quickly build and package apps as Docker images are created, using files written in the Dockerfile format that then are deployed and run in a layered container

IV. Docker Benefits

1.  Fast, consistent delivery of your applications

Docker streamlines the development lifecycle by allowing developers to work in standardized environments. It uses local containers to support your applications and services. Containers are great for continuous integration and continuous delivery (CI/CD) workflow.

Consider the following scenario:
Your developers write code locally and share their work with their colleagues using Docker containers.
They use Docker to push their applications into a test environment and execute automated and manual tests.
When developers find bugs, they can fix them in the development environment and redeploy them to the test environment for testing and validation.
When testing is complete, getting the fix to the customer is as simple as pushing the updated image to the production environment

2.  Runs more workloads on the same hardware

Docker is lightweight and fast. It provides a viable, cost-effective alternative to hypervisor-based virtual machines, so you can use more of your compute capacity to achieve your business goals.

Docker is perfect for high density environments and for small and medium deployments where you need to do more with fewer resources.

V. Docker Architecture and Terminology

1.  Docker Architecture Overview

The Docker Engine is a client-server application with three major components:

  • A server which is a type of long-running program called a daemon process
  • A RESET API which specifies interfaces that programs can use to talk to the daemon and instruct it what to do
  • A command line interface (CLI) client (the Docker command)

Picture8

Docker client and daemon relation:

  • Both client and daemon can run on the same system, or you can connect a client to a remote Docker daemon
  • When using commands such as docker run, the client sends them to Docker Daemon, which carries them out
  • Both client and daemon communicate via a RESET API, sockets or a network interface

Picture9

2. Docker Terminology

The following are the basic definitions anyone needs to understand before getting deeper into Docker.

Azure Container Registry

  •  A public resource for working with Docker images and its components in Azure
  •  This provides a registry that is close to your deployments in Azure and that gives you control over access, making it possible to use your Azure Active Directory groups and permissions.

Build

  •  The action of building a container image based on the information and context provided by its Dockerfile as well as additional files in the folder where the image is built
  •  You can build images by using the Docker build command

Cluster

  •  A collection of Docker hosts exposed as if they were a single virtual Docker host so that the application can scale to multiple instances of the services spread across multiple hosts within the cluster
  •  Can be created  by using Docker Swarm, Mesosphere DC/OS, Kubernetes, and Azure Service Fabric

Note: If you use Docker Swarm for managing a cluster, you typically refer to the cluster as a swarm instead of a cluster.

Compose

  •  A command-line tool and YAML file format with metadata for defining and running multi-container applications
  •  You define a single application based on multiple images with one or more .yml files that can override values depending on the environment
  •  After you have created the definitions, you can deploy the entire multi-container application by using a single command (docker-compose up) that creates a container per image on the Docker host

Container
An instance of an image is called a container. The container or instance of a Docker image will contain the following components:

  1. An operating system selection (for example, a Linux distribution or Windows)
  2. Files added by the developer (for example, app binaries)
  3. Configuration (for example, environment settings and dependencies)
  4. Instructions for what processes to run by Docker
    • A container represents a runtime for a single application, process, or service. It consists of the contents of a Docker image, a runtime environment, and a standard set of instructions.
    •  You can create, start, stop, move, or delete a container using the Docker API or CLI.
    •   When scaling a service, you create multiple instances of a container from the same image. Or, a batch job can create multiple containers from the same image, passing different parameters to each instance.

Docker client

  • Is the primary way that many Docker users interact with Docker
  •  Can communicate with more than one daemon

Docker Community Edition (CE)

  •  Provides development tools for Windows and mac OS for building, running, and testing containers locally
  •  Docker CE for Windows provides development environments for both Linux and Windows Containers
  •  The Linux Docker host on Windows is based on a Hyper-V VM. The host for Windows Containers is directly based on Windows
  • Docker CE for Mac is based on the Apple Hypervisor framework and the xhyve hypervisor, which provides a Linux Docker host VM on Mac OS X
  •  Docker CE for Windows and for Mac replaces Docker Toolbox, which was based on Oracle VirtualBox

Docker daemon (dockerd)

  • Listens for Docker API requests and manages Docker objects such as images, containers, networks, and volumes
  •  Can also communicate with other daemons to manage Docker services

Docker Enterprise Edition

It is designed for enterprise development and is used by IT teams who build, ship, and run large business-critical applications in production.

Dockerfile

It is a text file that contains instructions for how to build a Docker image

Docker Hub

  • A public registry to upload images and work with them
  • Provides Docker image hosting, public or private registries, build triggers, web hooks, and integration with GitHub and Bitbucket

Docker Image

  • A package with all of the dependencies and information needed to create a container. An image includes all of the dependencies (such as frameworks) plus deployment and configuration to be used by a container runtime.
  • Usually, an image derives from multiple base images that are layers stacked one atop the other to form the container’s file system.
  • An image is immutable after it has been created. Docker image containers can run natively on Linux and Windows:

    •  Windows images can run only on Windows host
    •  Linux images can run only on Linux hosts, meaning a host server or a VM
    •  Developers working on Windows can create images for either Linux or Windows Containers

Docker Trusted Registry (DTR)

It is a Docker registry service (from Docker) that you can install on-premises so that it resides within the organization’s datacenter and network. It is convenient for private images that should be managed within the enterprise. Docker Trusted Registry is included as part of the Docker Datacenter product. For more information, go to https://docs.docker.com/docker-trusted-registry/overview/.

Orchestrator

  •  A tool that simplifies management of clusters and Docker hosts
  •  Used to manage images, containers, and hosts through a CLI or a graphical user interface
  •  Helps managing container networking, configurations, load balancing, service discovery, high availability, Docker host configuration, and more
  •  Responsible for running, distributing, scaling, and healing workloads across a collection of nodes
  •  Typically, orchestrator products are the same products that provide cluster infrastructure, like Mesosphere DC/OS, Kubernetes, Docker Swarm, and Azure Service Fabric

Registry

  •  A service that provides access to repositories
  •  The default registry for most public images is Docker Hub (owned by Docker as an organization)
  •  A registry usually contains repositories from multiple teams

Companies often have private registries to store and manage images that they’ve       created.  Azure Container Registry is another example.

Repository (also known as repo)

  • A collection of related Docker images labeled with a tag that indicates the image version
  • Some repositories contain multiple variants of a specific image, such as an image containing SDKs (heavier), an image containing only runtimes (lighter), and so on. Those variants can be marked with tags
  • A single repository can contain platform variants, such as a Linux image and a Windows image

Tag:

A mark or label that you can apply to images so that different images or versions of the same image (depending on the version number or the destination environment) can be identified

Setting up local and development environments for Docker applications


Basic Docker taxonomy: containers, images, and registries

Picture10

Introduction to the Docker application lifecycle

The lifecycle of containerized applications is like a journey which starts with the developer. The developer chooses and begins with containers and Docker because it eliminates friction between deployments and IT Operations, which ultimately helps them to be more agile, more productive end-to-end, faster.

Picture1

By the very nature of the Containers and Docker technology, developers are able to easily share their software and dependencies with IT Operations and production environments while eliminating the typical “it works on my machine” excuse.

Containers solve application conflicts between different environments. Indirectly, Containers and Docker bring developers and IT Ops closer together. It makes it easier for them to collaborate effectively.

With Docker Containers, developers own what’s inside the container (application/service and dependencies to frameworks/components) and how the containers/services behave together as an application composed by a collection of services.

The interdependencies of the multiple containers are defined with a docker-compose.yml file, or what could be called a deployment manifest.

Meanwhile, IT Operation teams (IT Pros and IT management) can focus on the management of production environments, infrastructure, and scalability, monitoring and ultimately making sure the applications are delivering right for the end-users, without having to know the content of the various containers. Hence the “container” name because of the analogy to shipping containers in real-life. In a similar way than the shipping company gets the contents from a-b without knowing or caring about the contents, in the same way developers own the contents within a container.

Developers on the left of the above image, are writing code and running their code in Docker containers locally using Docker for Windows/Linux. They define their operating environment with a dockerfile that specifies the base OS they run on, and the build steps for building their code into a Docker image.

They define how one or more images will inter-operate using a deployment manifest like a docker-compose.yml file. As they complete their local development, they push their application code plus the Docker configuration files to the code repository of their choice (i.e. Git repos).

The DevOps pillar defines the build-CI-pipelines using the dockerfile provided in the code repo. The CI system pulls the base container images from the Docker registries they’ve configured and builds the Docker images. The images are then validated and pushed to the Docker registry used for the deployments to multiple environments.

Operation teams on the right of the above image, are managing deployed applications and infrastructure in production while monitoring the environment and applications so they provide feedback and insights to the development team about how the application must be improved. Container apps are typically run in production using Container Orchestrators.

Introduction to a generic E2E Docker application lifecycle workflow

s1

Benefits from DevOps for containerized applications

The most important benefits provided by a solid DevOps workflow are:

  1. Deliver better quality software faster and with better compliance
  2. Drive continuous improvement and adjustments earlier and more economically
  3. Increase transparency and collaboration among stakeholders involved in delivering and operating software
  4. Control costs and utilize provisioned resources more effectively while minimizing security risks
  5. Plug and play well with many of your existing DevOps investments, including investments in open source

Introduction to the Microsoft platform and tools for containerized applications

s2

The above figure shows the main pillars in the lifecycle of Docker apps classified by the type of work delivered by multiple teams (app-development, DevOps infrastructure processes and IT Management and Operations).

Microsoft Technologies

3rd party-Azure pluggable

Platform for Docker Apps
  • Visual Studio & Visual Studio Code
  • .NET
  • Azure Kubernetes Service
  • Azure Service Fabric
  • Azure Container Registry


  • Any code editor (i.e. Sublime, etc.)
  • Any language (Node, Java etc.)
  • Any Orchestrator and Scheduler
  • Any Docker Registry


DevOps for Docker Apps


  • Azure DevOps Services
  • Team Foundation Server
  • Azure Kubernetes Service
  • Azure Service Fabric


  • GitHub, Git, Subversion, etc.
  • Jenkins, Chef, Puppet, Velocity, CircleCI, TravisCI, etc.
  • On-premises Docker Datacenter, Docker Swarm, Mesos DC/OS, Kubernetes,
    etc.


Management & Monitoring


  • Operations Management Suite
  • Application Insights


  • Marathon, Chronos, etc


The Microsoft platform and tools for containerized Docker applications, as defined in above Figure has the following components:

    • Platform for Docker Apps development. The development of a service, or collection of services that make up an “app”. The development platform provides all the work a developer requires prior to pushing their code to a shared code repo. Developing services, deployed as containers, are very similar to the development of the same apps or services without Docker. You continue to use your preferred language (.NET, Node.js, Go, etc.) and preferred editor or IDE like Visual Studio or Visual Studio Code. However, rather than consider Docker a deployment target, you develop your services in the Docker environment. You build, run, test and debug your code in containers locally, providing the target environment at development time. By providing the target environment locally, Docker containers enable what will drastically help you improve your Development and Operations lifecycle. Visual Studio and Visual Studio Code have extensions to integrate the container build, run and test your .NET, .NET Core and Node.js applications.
    • DevOps for Docker Apps. Developers creating Docker applications can leverage Azure DevOps Services (Azure DevOps) or any other third party product like Jenkins, to build out a comprehensive automated application lifecycle management (ALM).
      With Azure DevOps, developers can create container-focused DevOps for a fast, iterative process that covers source-code control from anywhere (Azure DevOps-Git, GitHub, any remote Git repository or Subversion), continuous integration (CI), and internal unit tests, inter container/service integration tests, continuous delivery CD, and release management (RM). Developers can also automate their Docker application releases into Azure Kubernetes Service, from development to staging and production environments.
      • IT production management and monitoring.
        Management –
        IT can manage production applications and services in several ways:

        1. Azure portal. If using OSS orchestrators, Azure Kubernetes Service (AKS) plus cluster management tools like Docker Datacenter and Mesosphere Marathon help you to set up and maintain your Docker environments. If using Azure Service Fabric, the Service Fabric Explorer tool allows you to visualize and configure your cluster
        2. Docker tools. You can manage your container applications using familiar tools. There’s no need to change your existing Docker management practices to move container workloads to the cloud. Use the application management tools you’re already familiar with and connect via the standard API endpoints for the orchestrator of your choice. You can also use other third party tools to manage your Docker applications like Docker Datacenter or even CLI Docker tools.
        3. Open source tools. Because AKS expose the standard API endpoints for the orchestration engine, the most popular tools are compatible with Azure Kubernetes Service and, in most cases, will work out of the box—including visualizers, monitoring, command line tools, and even future tools as they become available.
        Monitoring – While running production environments, you can monitor every angle with:
        1. Operations Management Suite (OMS). The “OMS Container Solution” can manage and monitor Docker hosts and containers by showing information about where your containers and container hosts are, which containers are running or failed, and Docker daemon and container logs. It also shows performance metrics such as CPU, memory, network and storage for the container and hosts to help you troubleshoot and find noisy neighbour containers.
        2. Application Insights. You can monitor production Docker applications by simply setting up its SDK into your services so you can get telemetry data from the applications.

Set up a local environment for Docker

A local development environment for Dockers has the following prerequisites:

If your system does not meet the requirements to run Docker for Windows, you can install Docker Toolbox, which uses Oracle Virtual Box instead of Hyper-V.

  • README FIRST for Docker Toolbox and Docker Machine users: Docker for Windows requires Microsoft Hyper-V to run. The Docker for Windows installer enables Hyper-V for you, if needed, and restart your machine. After Hyper-V is enabled, VirtualBox no longer works, but any VirtualBox VM images remain. VirtualBox VMs created with docker-machine (including the default one typically created during Toolbox install) no longer start. These VMs cannot be used side-by-side with Docker for Windows. However, you can still use docker-machine to manage remote VMs.
  • Virtualization must be enabled in BIOS and CPU SLAT-capable. Typically, virtualization is enabled by default. This is different from having Hyper-V enabled. For more detail see Virtualization must be enabled in Troubleshooting.

Enable Hypervisor

Hypervisor enables virtualization, which is the foundation on which all container orchestrators operate, including Kubernetes.

This blog uses Hyper-V as the hypervisor. On many Windows 10 versions, Hyper-V is already installed—for example, on 64-bit versions of Windows Professional, Enterprise, and Education in Windows 8 and later. It is not available on Windows Home edition.

NOTE: If you’re running something other than Windows 10 on your development platforms, another hypervisor option is to use VirtualBox, a cross-platform virtualization application. For a list of hypervisors, see “Install a Hypervisor” on the Minikube page of the Kubernetes documentation.

NOTE:
Install Hyper-V on Windows 10: https://docs.microsoft.com/en-us/virtualization/hyper-v-on-windows/quick-start/enable-hyper-v

To enable Hyper-V manually on Windows 10 and set up a virtual switch:

          1. Go to the Control Panel >select Programs then click on Turn Windows features on or off.
            Picture2
          2. Select the Hyper-V check boxes, then click OK.
          3. To set up a virtual switch, type hyper in the Windows Start menu, then select Hyper-V Manager.
          4. In Hyper-V Manager, select Virtual Switch Manager.
          5. Select External as the type of virtual switch.
          6. Select the Create Virtual Switch button.
          7. Ensure that the Allow management operating system to share this network adapter checkbox is selected.

The current version of Docker for Windows runs on 64bit Windows 10 Pro, Enterprise and Education (1607 Anniversary Update, Build 14393 or later).

Containers and images created with Docker for Windows are shared between all user accounts on machines where it is installed. This is because all Windows accounts use the same VM to build and run containers.

Nested virtualization scenarios, such as running Docker for Windows on a VMWare or Parallels instance, might work, but come with no guarantees. For more information, see Running Docker for Windows in nested virtualization scenarios

Installing Docker for Windows

Docker for Windows is a Docker Community Edition (CE) app.

  • The Docker for Windows install package includes everything you need to run Docker on a Windows system.
  • Download the above file, and double click on downloaded installer file then follow the install wizard to accept the license, authorize the installer, and proceed with the install.
  • You are asked to authorize Docker.app with your system password during the install process. Privileged access is needed to install networking components, links to the Docker apps, and manage the Hyper-V VMs.
  • Click Finish on the setup complete dialog to launch Docker.
  • The installation provides Docker Engine, Docker CLI client, Docker Compose, Docker Machine, and Kitematic.

More info:  To learn more about installing Docker for Windows, go to https://docs.docker.com/docker-for-windows/.

Note:

  1. You can develop both Docker Linux containers and Docker Windows containers with Docker for Windows.
  2. The current version of Docker for Windows runs on 64bit Windows 10 Pro, Enterprise and Education (1607 Anniversary Update, Build 14393 or later).
  3. Virtualization must be enabled. You can verify that virtualization is enabled by checking the Performance tab on the Task Manager.
  4. The Docker for Windows installer enables Hyper-V for you.
  5. Containers and images created with Docker for Windows are shared between all user accounts on machines where it is installed. This is because all Windows accounts use the same VM to build and run containers.
  6. We can switch between Windows and Linux containers.

Test your Docker installation

  1. Open a terminal window (Command Prompt or PowerShell, but not PowerShell ISE).
  2. Run docker –version or docker version to ensure that you have a supported version of Docker:
  3. The output should tell you the basic details about your Docker environment:

docker –version

Docker version 18.05.0-ce, build f150324

docker version

Client:
Version: 18.05.0-ce
API version: 1.37
Go version: go1.9.5
Git commit: f150324
Built: Wed May 9 22:12:05 2018
OS/Arch: windows/amd64
Experimental: false
Orchestrator: swarm

Server:
Engine:
Version: 18.05.0-ce
API version: 1.37 (minimum version 1.12)
Go version: go1.10.1
Git commit: f150324
Built: Wed May 9 22:20:16 2018
OS/Arch: linux/amd64
Experimental: true

Note: The OS/Arch field tells you the operating system you’re using. Docker is cross-platform, so you can manage Windows Docker servers from a Linux client and vice-versa, using the same docker commands.

Start Docker for Windows

Docker does not start automatically after installation. To start it, search for Docker, select Docker for Windows in the search results, and click it (or hit Enter).

Picture3

When the whale in the status bar stays steady, Docker is up-and-running, and accessible from any terminal window.

Picture4

If the whale is hidden in the Notifications area, click the up arrow on the taskbar to show it. To learn more, see Docker Settings.

If you just installed the app, you also get a popup success message with suggested next steps, and a link to this documentation.

Picture5

When initialization is complete, select About Docker from the notification area icon to verify that you have the latest version.

Congratulations! You are up and running with Docker for Windows.

Picture6

Important Docker Commands

Description Docker command
To get the list of all Images docker images -a

docker image ls -a

To Remove the Docker Image based in ID:


docker rmi d62ae1319d0a
To get the list of all Docker Containers


docker ps -a

docker container ls -a

To Remove the Docker Container based in ID:


docker container rm d62ae1319d0a
To Remove ALL Docker Containers


docker container rm -f $(docker container ls -a -q)
Getting Terminal Access of a Container in Running state


docker exec -it <containername> /bin/bash (For Linux)

docker exec -it <containername> cmd.exe (For Windows)

Set up Development environment for Docker apps

Development tools choices: IDE or editor

No matter if you prefer a full and powerful IDE or a lightweight and agile editor, either way Microsoft have you covered when developing Docker applications?

Visual Studio Code and Docker CLI (Cross-Platform Tools for Mac, Linux and Windows). If you prefer a lightweight and cross-platform editor supporting any development language, you can use Microsoft Visual Studio Code and Docker CLI.

These products provide a simple yet robust experience which is critical for streamlining the developer workflow.

By installing “Docker for Mac” or “Docker for Windows” (development environment), Docker developers can use a single Docker CLI to build apps for either Windows or Linux (execution environment). Plus, Visual Studio code supports extensions for Docker with intellisense for Docker files and shortcut-tasks to run Docker commands from the editor.

Download and Install Visual Studio Code

Download and Install Docker for Mac and Windows

Visual Studio with Docker Tools.

When using Visual Studio 2015 you can install the add-on tools “Docker Tools for Visual Studio”.

When using Visual Studio 2017, Docker Tools come built-in already.

In both cases you can develop, run and validate your applications directly in the target Docker environment.

F5 your application (single container or multiple containers) directly into a Docker host with debugging, or CTRL + F5 to edit & refresh your app without having to rebuild the container.

This is the simples and more powerful choice for Windows developers targeting Docker containers for Linux or Windows.

Download and Install Visual Studio Enterprise 2015/2017

Download and Install Docker for Mac and Windows

If you’re using Visual Studio 2015, you must have Update 3 or a later version plus the Visual Studio Tools for Docker.

More info:  For instructions on installing Visual Studio, go to https://www.visualstudio.com/
products/vs-2015-product-editions
.

To see more about installing Visual Studio Tools for Docker, go to http://aka.ms/vstoolsfordocker and https://docs.microsoft.com/aspnet/core/host-and-deploy/docker/visual-studio-tools-for-docker.

If you’re using Visual Studio 2017, Docker support is already included.

Language and framework choices

You can develop Docker applications and Microsoft tools with most modern languages. The following is an initial list, but you are not limited to it.

  1. .NET Core and ASP.NET Core
  2. Node.js
  3. Go Lang
  4. Java
  5. Ruby
  6. Python

Basically, you can use any modern language supported by Docker in Linux or Windows.

Note: But In this blog, we are using development IDE as Visual Studi0 2017 and use .NET Core and ASP.NET Core programming languages for developing Containerized based applications.