Overview of this 4-Part Blog series
This blog outlines the process to
- Compile a Database application and Deploy into Azure SQL Database
- Compile Docker-based ASP.NET Core Web application, API application
- Deploy web and API applications into to a Kubernetes cluster running on Azure Kubernetes Service (AKS) using the Azure DevOps

The content of this blog is divided up into 4 main parts:
Part-1: Explains the details of Docker & how to set up local and development environments for Docker applications
Part-2: Explains in detail the Inner-loop development workflow for both Docker and Database applications
Part-3: Explains in detail the Outer-loop DevOps workflow for a Database application
Part-4: Explains in detail how to create an Azure Kubernetes Service (AKS), Azure Container Registry (ACR) through the Azure CLI, and an Outer-loop DevOps workflow for a Docker application
Part-1: The details of Docker & how to set up local and development environments for Docker applications
Introduction to Containers and Docker
I. The creation of Containers and their use
II. Docker Containers vs Virtual Machines
III. What is Docker?
IV. Docker Benefits
V. Docker Architecture and Terminology
I. The creation of Containers and their use
Containerization is an approach to software development in which an application or service, its dependencies, and its configuration are packaged together as a container image. You then can test the containerized application as a unit and deploy it as a container image instance to the host operating system.
Placing software into containers makes it possible for developers and IT professionals to deploy those containers across environments with little or no modification.
Containers also isolate applications from one another on a shared operating system (OS). Containerized applications run on top of a container host, which in turn runs on the OS (Linux or Windows). Thus, containers have a significantly smaller footprint than virtual machine (VM) images.
Containers offer the benefits of isolation, portability, agility, scalability, and control across the entire application life cycle workflow. The most important benefit is the isolation provided between Dev and Ops.
II. Docker Containers vs. Virtual Machines
Docker containers are lightweight because in contrast to virtual machines, they don’t need the extra load of a hypervisor, but run directly within the host machine’s kernel. This means you can run more containers on a given hardware combination than if you were using virtual machines. You can even run Docker containers within host machines that are actually virtual machines!

III. What is Docker?
-
An open platform for developing, shipping, and running applications
-
Enables separating your applications from your infrastructure for quick software delivery
-
Enables managing your infrastructure in the same way you manage your applications
-
By taking advantage of Docker’s methodologies for shipping, testing, and deploying code quickly, you can significantly reduce the delay between writing code and running it in production
-
Uses the Docker Engine to quickly build and package apps as Docker images are created, using files written in the Dockerfile format that then are deployed and run in a layered container
IV. Docker Benefits
1. Fast, consistent delivery of your applications
Docker streamlines the development lifecycle by allowing developers to work in standardized environments. It uses local containers to support your applications and services. Containers are great for continuous integration and continuous delivery (CI/CD) workflow.
Consider the following scenario:
Your developers write code locally and share their work with their colleagues using Docker containers.
They use Docker to push their applications into a test environment and execute automated and manual tests.
When developers find bugs, they can fix them in the development environment and redeploy them to the test environment for testing and validation.
When testing is complete, getting the fix to the customer is as simple as pushing the updated image to the production environment
2. Runs more workloads on the same hardware
Docker is lightweight and fast. It provides a viable, cost-effective alternative to hypervisor-based virtual machines, so you can use more of your compute capacity to achieve your business goals.
Docker is perfect for high density environments and for small and medium deployments where you need to do more with fewer resources.
V. Docker Architecture and Terminology
1. Docker Architecture Overview
The Docker Engine is a client-server application with three major components:

Docker client and daemon relation:
- Both client and daemon can run on the same system, or you can connect a client to a remote Docker daemon
-
When using commands such as docker run, the client sends them to Docker Daemon, which carries them out
-
Both client and daemon communicate via a RESET API, sockets or a network interface

2. Docker Terminology
The following are the basic definitions anyone needs to understand before getting deeper into Docker.
Azure Container Registry
- A public resource for working with Docker images and its components in Azure
- This provides a registry that is close to your deployments in Azure and that gives you control over access, making it possible to use your Azure Active Directory groups and permissions.
Build
- The action of building a container image based on the information and context provided by its Dockerfile as well as additional files in the folder where the image is built
- You can build images by using the Docker build command
Cluster
- A collection of Docker hosts exposed as if they were a single virtual Docker host so that the application can scale to multiple instances of the services spread across multiple hosts within the cluster
- Can be created by using Docker Swarm, Mesosphere DC/OS, Kubernetes, and Azure Service Fabric
Note: If you use Docker Swarm for managing a cluster, you typically refer to the cluster as a swarm instead of a cluster.
Compose
- A command-line tool and YAML file format with metadata for defining and running multi-container applications
- You define a single application based on multiple images with one or more .yml files that can override values depending on the environment
- After you have created the definitions, you can deploy the entire multi-container application by using a single command (docker-compose up) that creates a container per image on the Docker host
Container
An instance of an image is called a container. The container or instance of a Docker image will contain the following components:
- An operating system selection (for example, a Linux distribution or Windows)
- Files added by the developer (for example, app binaries)
- Configuration (for example, environment settings and dependencies)
- Instructions for what processes to run by Docker
- A container represents a runtime for a single application, process, or service. It consists of the contents of a Docker image, a runtime environment, and a standard set of instructions.
- You can create, start, stop, move, or delete a container using the Docker API or CLI.
- When scaling a service, you create multiple instances of a container from the same image. Or, a batch job can create multiple containers from the same image, passing different parameters to each instance.
Docker client
- Is the primary way that many Docker users interact with Docker
- Can communicate with more than one daemon
Docker Community Edition (CE)
- Provides development tools for Windows and mac OS for building, running, and testing containers locally
- Docker CE for Windows provides development environments for both Linux and Windows Containers
- The Linux Docker host on Windows is based on a Hyper-V VM. The host for Windows Containers is directly based on Windows
- Docker CE for Mac is based on the Apple Hypervisor framework and the xhyve hypervisor, which provides a Linux Docker host VM on Mac OS X
- Docker CE for Windows and for Mac replaces Docker Toolbox, which was based on Oracle VirtualBox
Docker daemon (dockerd)
- Listens for Docker API requests and manages Docker objects such as images, containers, networks, and volumes
- Can also communicate with other daemons to manage Docker services
Docker Enterprise Edition
It is designed for enterprise development and is used by IT teams who build, ship, and run large business-critical applications in production.
Dockerfile
It is a text file that contains instructions for how to build a Docker image
Docker Hub
- A public registry to upload images and work with them
- Provides Docker image hosting, public or private registries, build triggers, web hooks, and integration with GitHub and Bitbucket
Docker Image
- A package with all of the dependencies and information needed to create a container. An image includes all of the dependencies (such as frameworks) plus deployment and configuration to be used by a container runtime.
- Usually, an image derives from multiple base images that are layers stacked one atop the other to form the container’s file system.
- An image is immutable after it has been created. Docker image containers can run natively on Linux and Windows:
- Windows images can run only on Windows host
- Linux images can run only on Linux hosts, meaning a host server or a VM
- Developers working on Windows can create images for either Linux or Windows Containers
Docker Trusted Registry (DTR)
It is a Docker registry service (from Docker) that you can install on-premises so that it resides within the organization’s datacenter and network. It is convenient for private images that should be managed within the enterprise. Docker Trusted Registry is included as part of the Docker Datacenter product. For more information, go to https://docs.docker.com/docker-trusted-registry/overview/.
Orchestrator
- A tool that simplifies management of clusters and Docker hosts
- Used to manage images, containers, and hosts through a CLI or a graphical user interface
- Helps managing container networking, configurations, load balancing, service discovery, high availability, Docker host configuration, and more
- Responsible for running, distributing, scaling, and healing workloads across a collection of nodes
- Typically, orchestrator products are the same products that provide cluster infrastructure, like Mesosphere DC/OS, Kubernetes, Docker Swarm, and Azure Service Fabric
Registry
- A service that provides access to repositories
- The default registry for most public images is Docker Hub (owned by Docker as an organization)
- A registry usually contains repositories from multiple teams
Companies often have private registries to store and manage images that they’ve created. Azure Container Registry is another example.
Repository (also known as repo)
-
A collection of related Docker images labeled with a tag that indicates the image version
-
Some repositories contain multiple variants of a specific image, such as an image containing SDKs (heavier), an image containing only runtimes (lighter), and so on. Those variants can be marked with tags
-
A single repository can contain platform variants, such as a Linux image and a Windows image
Tag:
A mark or label that you can apply to images so that different images or versions of the same image (depending on the version number or the destination environment) can be identified
Setting up local and development environments for Docker applications
Basic Docker taxonomy: containers, images, and registries

Introduction to the Docker application lifecycle
The lifecycle of containerized applications is like a journey which starts with the developer. The developer chooses and begins with containers and Docker because it eliminates friction between deployments and IT Operations, which ultimately helps them to be more agile, more productive end-to-end, faster.

By the very nature of the Containers and Docker technology, developers are able to easily share their software and dependencies with IT Operations and production environments while eliminating the typical “it works on my machine” excuse.
Containers solve application conflicts between different environments. Indirectly, Containers and Docker bring developers and IT Ops closer together. It makes it easier for them to collaborate effectively.
With Docker Containers, developers own what’s inside the container (application/service and dependencies to frameworks/components) and how the containers/services behave together as an application composed by a collection of services.
The interdependencies of the multiple containers are defined with a docker-compose.yml file, or what could be called a deployment manifest.
Meanwhile, IT Operation teams (IT Pros and IT management) can focus on the management of production environments, infrastructure, and scalability, monitoring and ultimately making sure the applications are delivering right for the end-users, without having to know the content of the various containers. Hence the “container” name because of the analogy to shipping containers in real-life. In a similar way than the shipping company gets the contents from a-b without knowing or caring about the contents, in the same way developers own the contents within a container.
Developers on the left of the above image, are writing code and running their code in Docker containers locally using Docker for Windows/Linux. They define their operating environment with a dockerfile that specifies the base OS they run on, and the build steps for building their code into a Docker image.
They define how one or more images will inter-operate using a deployment manifest like a docker-compose.yml file. As they complete their local development, they push their application code plus the Docker configuration files to the code repository of their choice (i.e. Git repos).
The DevOps pillar defines the build-CI-pipelines using the dockerfile provided in the code repo. The CI system pulls the base container images from the Docker registries they’ve configured and builds the Docker images. The images are then validated and pushed to the Docker registry used for the deployments to multiple environments.
Operation teams on the right of the above image, are managing deployed applications and infrastructure in production while monitoring the environment and applications so they provide feedback and insights to the development team about how the application must be improved. Container apps are typically run in production using Container Orchestrators.
Introduction to a generic E2E Docker application lifecycle workflow

Benefits from DevOps for containerized applications
The most important benefits provided by a solid DevOps workflow are:
-
Deliver better quality software faster and with better compliance
-
Drive continuous improvement and adjustments earlier and more economically
-
Increase transparency and collaboration among stakeholders involved in delivering and operating software
-
Control costs and utilize provisioned resources more effectively while minimizing security risks
-
Plug and play well with many of your existing DevOps investments, including investments in open source
Introduction to the Microsoft platform and tools for containerized applications

The above figure shows the main pillars in the lifecycle of Docker apps classified by the type of work delivered by multiple teams (app-development, DevOps infrastructure processes and IT Management and Operations).
|
Microsoft Technologies
|
3rd party-Azure pluggable
|
| Platform for Docker Apps |
|
- Visual Studio & Visual Studio Code
- .NET
- Azure Kubernetes Service
- Azure Service Fabric
- Azure Container Registry
- Any code editor (i.e. Sublime, etc.)
- Any language (Node, Java etc.)
- Any Orchestrator and Scheduler
- Any Docker Registry
DevOps for Docker Apps
- Azure DevOps Services
- Team Foundation Server
- Azure Kubernetes Service
- Azure Service Fabric
- GitHub, Git, Subversion, etc.
- Jenkins, Chef, Puppet, Velocity, CircleCI, TravisCI, etc.
- On-premises Docker Datacenter, Docker Swarm, Mesos DC/OS, Kubernetes,
etc.
Management & Monitoring
- Operations Management Suite
- Application Insights
The Microsoft platform and tools for containerized Docker applications, as defined in above Figure has the following components:
-
-
Platform for Docker Apps development. The development of a service, or collection of services that make up an “app”. The development platform provides all the work a developer requires prior to pushing their code to a shared code repo. Developing services, deployed as containers, are very similar to the development of the same apps or services without Docker. You continue to use your preferred language (.NET, Node.js, Go, etc.) and preferred editor or IDE like Visual Studio or Visual Studio Code. However, rather than consider Docker a deployment target, you develop your services in the Docker environment. You build, run, test and debug your code in containers locally, providing the target environment at development time. By providing the target environment locally, Docker containers enable what will drastically help you improve your Development and Operations lifecycle. Visual Studio and Visual Studio Code have extensions to integrate the container build, run and test your .NET, .NET Core and Node.js applications.
-
DevOps for Docker Apps. Developers creating Docker applications can leverage Azure DevOps Services (Azure DevOps) or any other third party product like Jenkins, to build out a comprehensive automated application lifecycle management (ALM).
With Azure DevOps, developers can create container-focused DevOps for a fast, iterative process that covers source-code control from anywhere (Azure DevOps-Git, GitHub, any remote Git repository or Subversion), continuous integration (CI), and internal unit tests, inter container/service integration tests, continuous delivery CD, and release management (RM). Developers can also automate their Docker application releases into Azure Kubernetes Service, from development to staging and production environments.
-
IT production management and monitoring.
Management – IT can manage production applications and services in several ways:
1. Azure portal. If using OSS orchestrators, Azure Kubernetes Service (AKS) plus cluster management tools like Docker Datacenter and Mesosphere Marathon help you to set up and maintain your Docker environments. If using Azure Service Fabric, the Service Fabric Explorer tool allows you to visualize and configure your cluster
2. Docker tools. You can manage your container applications using familiar tools. There’s no need to change your existing Docker management practices to move container workloads to the cloud. Use the application management tools you’re already familiar with and connect via the standard API endpoints for the orchestrator of your choice. You can also use other third party tools to manage your Docker applications like Docker Datacenter or even CLI Docker tools.
3. Open source tools. Because AKS expose the standard API endpoints for the orchestration engine, the most popular tools are compatible with Azure Kubernetes Service and, in most cases, will work out of the box—including visualizers, monitoring, command line tools, and even future tools as they become available.
Monitoring – While running production environments, you can monitor every angle with:
1. Operations Management Suite (OMS). The “OMS Container Solution” can manage and monitor Docker hosts and containers by showing information about where your containers and container hosts are, which containers are running or failed, and Docker daemon and container logs. It also shows performance metrics such as CPU, memory, network and storage for the container and hosts to help you troubleshoot and find noisy neighbour containers.
2. Application Insights. You can monitor production Docker applications by simply setting up its SDK into your services so you can get telemetry data from the applications.
Set up a local environment for Docker
A local development environment for Dockers has the following prerequisites:
If your system does not meet the requirements to run Docker for Windows, you can install Docker Toolbox, which uses Oracle Virtual Box instead of Hyper-V.
-
README FIRST for Docker Toolbox and Docker Machine users: Docker for Windows requires Microsoft Hyper-V to run. The Docker for Windows installer enables Hyper-V for you, if needed, and restart your machine. After Hyper-V is enabled, VirtualBox no longer works, but any VirtualBox VM images remain. VirtualBox VMs created with docker-machine (including the default one typically created during Toolbox install) no longer start. These VMs cannot be used side-by-side with Docker for Windows. However, you can still use docker-machine to manage remote VMs.
-
Virtualization must be enabled in BIOS and CPU SLAT-capable. Typically, virtualization is enabled by default. This is different from having Hyper-V enabled. For more detail see Virtualization must be enabled in Troubleshooting.
Enable Hypervisor
Hypervisor enables virtualization, which is the foundation on which all container orchestrators operate, including Kubernetes.
This blog uses Hyper-V as the hypervisor. On many Windows 10 versions, Hyper-V is already installed—for example, on 64-bit versions of Windows Professional, Enterprise, and Education in Windows 8 and later. It is not available on Windows Home edition.
NOTE: If you’re running something other than Windows 10 on your development platforms, another hypervisor option is to use VirtualBox, a cross-platform virtualization application. For a list of hypervisors, see “Install a Hypervisor” on the Minikube page of the Kubernetes documentation.
NOTE:
Install Hyper-V on Windows 10: https://docs.microsoft.com/en-us/virtualization/hyper-v-on-windows/quick-start/enable-hyper-v
To enable Hyper-V manually on Windows 10 and set up a virtual switch:
-
-
-
-
-
Go to the Control Panel >select Programs then click on Turn Windows features on or off.

-
Select the Hyper-V check boxes, then click OK.
-
To set up a virtual switch, type hyper in the Windows Start menu, then select Hyper-V Manager.
-
In Hyper-V Manager, select Virtual Switch Manager.
-
Select External as the type of virtual switch.
-
Select the Create Virtual Switch button.
-
Ensure that the Allow management operating system to share this network adapter checkbox is selected.
The current version of Docker for Windows runs on 64bit Windows 10 Pro, Enterprise and Education (1607 Anniversary Update, Build 14393 or later).
Containers and images created with Docker for Windows are shared between all user accounts on machines where it is installed. This is because all Windows accounts use the same VM to build and run containers.
Nested virtualization scenarios, such as running Docker for Windows on a VMWare or Parallels instance, might work, but come with no guarantees. For more information, see Running Docker for Windows in nested virtualization scenarios
Installing Docker for Windows
Docker for Windows is a Docker Community Edition (CE) app.
-
The Docker for Windows install package includes everything you need to run Docker on a Windows system.
-
-
Download the above file, and double click on downloaded installer file then follow the install wizard to accept the license, authorize the installer, and proceed with the install.
-
You are asked to authorize Docker.app with your system password during the install process. Privileged access is needed to install networking components, links to the Docker apps, and manage the Hyper-V VMs.
-
Click Finish on the setup complete dialog to launch Docker.
-
More info: To learn more about installing Docker for Windows, go to https://docs.docker.com/docker-for-windows/.
Note:
-
You can develop both Docker Linux containers and Docker Windows containers with Docker for Windows.
-
The current version of Docker for Windows runs on 64bit Windows 10 Pro, Enterprise and Education (1607 Anniversary Update, Build 14393 or later).
-
Virtualization must be enabled. You can verify that virtualization is enabled by checking the Performance tab on the Task Manager.
-
The Docker for Windows installer enables Hyper-V for you.
-
Containers and images created with Docker for Windows are shared between all user accounts on machines where it is installed. This is because all Windows accounts use the same VM to build and run containers.
-
We can switch between Windows and Linux containers.
Test your Docker installation
-
Open a terminal window (Command Prompt or PowerShell, but not PowerShell ISE).
-
Run docker –version or docker version to ensure that you have a supported version of Docker:
-
The output should tell you the basic details about your Docker environment:
docker –version
Docker version 18.05.0-ce, build f150324
docker version
Client:
Version: 18.05.0-ce
API version: 1.37
Go version: go1.9.5
Git commit: f150324
Built: Wed May 9 22:12:05 2018
OS/Arch: windows/amd64
Experimental: false
Orchestrator: swarm
Server:
Engine:
Version: 18.05.0-ce
API version: 1.37 (minimum version 1.12)
Go version: go1.10.1
Git commit: f150324
Built: Wed May 9 22:20:16 2018
OS/Arch: linux/amd64
Experimental: true
Note: The OS/Arch field tells you the operating system you’re using. Docker is cross-platform, so you can manage Windows Docker servers from a Linux client and vice-versa, using the same docker commands.
Start Docker for Windows
Docker does not start automatically after installation. To start it, search for Docker, select Docker for Windows in the search results, and click it (or hit Enter).

When the whale in the status bar stays steady, Docker is up-and-running, and accessible from any terminal window.

If the whale is hidden in the Notifications area, click the up arrow on the taskbar to show it. To learn more, see Docker Settings.
If you just installed the app, you also get a popup success message with suggested next steps, and a link to this documentation.

When initialization is complete, select About Docker from the notification area icon to verify that you have the latest version.
Congratulations! You are up and running with Docker for Windows.

Important Docker Commands
| Description |
Docker command |
| To get the list of all Images |
docker images -a
docker image ls -a |
| To Remove the Docker Image based in ID:
|
docker rmi d62ae1319d0a |
| To get the list of all Docker Containers
|
docker ps -a
docker container ls -a |
| To Remove the Docker Container based in ID:
|
docker container rm d62ae1319d0a |
| To Remove ALL Docker Containers
|
docker container rm -f $(docker container ls -a -q) |
| Getting Terminal Access of a Container in Running state
|
docker exec -it <containername> /bin/bash (For Linux)
docker exec -it <containername> cmd.exe (For Windows) |
Set up Development environment for Docker apps
Development tools choices: IDE or editor
No matter if you prefer a full and powerful IDE or a lightweight and agile editor, either way Microsoft have you covered when developing Docker applications?
Visual Studio Code and Docker CLI (Cross-Platform Tools for Mac, Linux and Windows). If you prefer a lightweight and cross-platform editor supporting any development language, you can use Microsoft Visual Studio Code and Docker CLI.
These products provide a simple yet robust experience which is critical for streamlining the developer workflow.
By installing “Docker for Mac” or “Docker for Windows” (development environment), Docker developers can use a single Docker CLI to build apps for either Windows or Linux (execution environment). Plus, Visual Studio code supports extensions for Docker with intellisense for Docker files and shortcut-tasks to run Docker commands from the editor.
Download and Install Visual Studio Code
Download and Install Docker for Mac and Windows
Visual Studio with Docker Tools.
When using Visual Studio 2015 you can install the add-on tools “Docker Tools for Visual Studio”.
When using Visual Studio 2017, Docker Tools come built-in already.
In both cases you can develop, run and validate your applications directly in the target Docker environment.
F5 your application (single container or multiple containers) directly into a Docker host with debugging, or CTRL + F5 to edit & refresh your app without having to rebuild the container.
This is the simples and more powerful choice for Windows developers targeting Docker containers for Linux or Windows.
Download and Install Visual Studio Enterprise 2015/2017
Download and Install Docker for Mac and Windows
If you’re using Visual Studio 2015, you must have Update 3 or a later version plus the Visual Studio Tools for Docker.
More info: For instructions on installing Visual Studio, go to https://www.visualstudio.com/
products/vs-2015-product-editions.
To see more about installing Visual Studio Tools for Docker, go to http://aka.ms/vstoolsfordocker and https://docs.microsoft.com/aspnet/core/host-and-deploy/docker/visual-studio-tools-for-docker.
If you’re using Visual Studio 2017, Docker support is already included.
Language and framework choices
You can develop Docker applications and Microsoft tools with most modern languages. The following is an initial list, but you are not limited to it.
-
.NET Core and ASP.NET Core
-
Node.js
-
Go Lang
-
Java
-
Ruby
-
Python
Basically, you can use any modern language supported by Docker in Linux or Windows.
Note: But In this blog, we are using development IDE as Visual Studi0 2017 and use .NET Core and ASP.NET Core programming languages for developing Containerized based applications.
![]() Shows the number of unpublished commits in your local branch. Selecting this will open the Sync view in Team Explorer.
Shows the number of unpublished commits in your local branch. Selecting this will open the Sync view in Team Explorer.![]() Shows the number of uncommitted file changes. Selecting this will open the Changes view in Team Explorer.
Shows the number of uncommitted file changes. Selecting this will open the Changes view in Team Explorer.![]() Shows the current Git repo. Selecting this will open the Connect view in Team Explorer.
Shows the current Git repo. Selecting this will open the Connect view in Team Explorer.![]() Shows your current Git branch. Selecting this displays a branch picker to quickly switch between Git branches or create new branches.
Shows your current Git branch. Selecting this displays a branch picker to quickly switch between Git branches or create new branches.![]() or
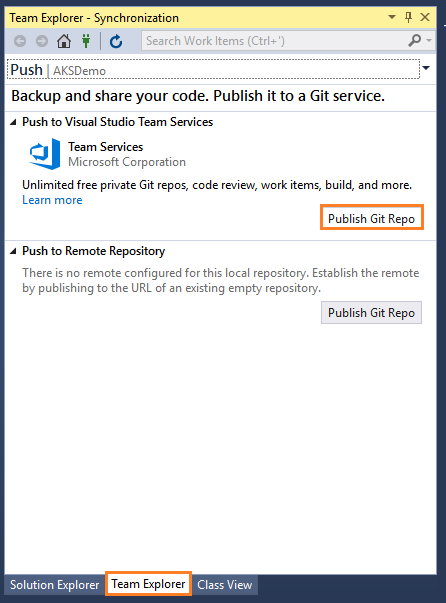
or![]() , ensure that you have a project open that is part of a Git repo. If your project is brand new or not yet added to a repo, you can add it to one by selecting
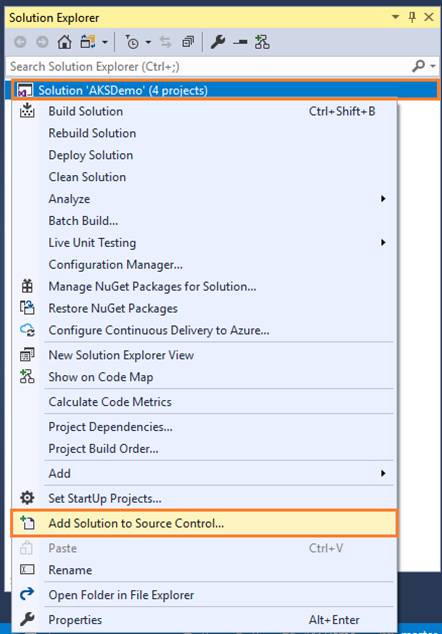
, ensure that you have a project open that is part of a Git repo. If your project is brand new or not yet added to a repo, you can add it to one by selecting ![]() on the status bar, or by right-clicking your solution in Solution Explorer and choosing Add Solution to Source Control.
on the status bar, or by right-clicking your solution in Solution Explorer and choosing Add Solution to Source Control.


![clip_image003[5] clip_image003[5]](https://kishore1021.files.wordpress.com/2018/11/clip_image0035_thumb.png?w=437&h=467)
![clip_image004[5] clip_image004[5]](https://kishore1021.files.wordpress.com/2018/11/clip_image0045_thumb.png?w=442&h=339)

